
Fetch Data in the Browser with Loading, Success, and Error States
You click a button, the page freezes for two seconds, and then either fills in with data or stays empty forever. The code might be fine. The problem is…

Key topics
A blank page is not a loading state. It is a bug the user cannot see.
You click a button, the page freezes for two seconds, and then either fills in with data or stays empty forever. The code might be fine. The problem is that the page never told the user what was happening. Fetching data in the browser is not one step. It is a small machine with three visible states: loading, success, and error. Get those three states right and your page stops feeling broken.
By the end of this tutorial, you will have one small page that moves through all three states on purpose. You will also know how to force each state so you can prove it works instead of hoping it does.
This builds directly on the promise and async/await pattern from the earlier lesson, so we reuse that structure here rather than re-explaining it.
What fetch Actually Returns
Most beginners read fetch(url) as "go get the data." That mental model is the source of half the confusion that follows.
fetch(url) returns a promise that resolves to a Response object. That Response is not your data. It is metadata about the answer plus a body you have not read yet. To get the actual data, you call a method on the response, usually response.json(). That call also returns a promise.
So there are two awaits, and they hand you two different things:
const response = await fetch(url); // a Response object
const data = await response.json(); // the parsed body
The first await waits for the server to respond with headers. The second await reads the body and parses it as JSON. If you forget the second step, you will try to render a Response object and wonder why your page shows [object Response].
Note:
response.json()only works if the body is actually JSON. If the server sends HTML or plain text, parsing will fail, and that failure belongs in your error state.
Knowledge check
Check your understanding
Answer this question before you continue.
A Tiny Page You Can Run Right Now
Before wiring anything to the screen, prove the data arrives. Start with one HTML file and one script. No framework, no build step.
<!DOCTYPE html>
<html lang="en">
<head>
  <meta charset="UTF-8">
  <title>Fetch Demo</title>
</head>
<body>
  <div id="app">Nothing yet.</div>
  <script src="app.js"></script>
</body>
</html>
async function loadData() {
  const response = await fetch("https://jsonplaceholder.typicode.com/posts/1");
  const data = await response.json();
  console.log(data);
}

loadData();
Open the page in your browser and check the console. You should see something like this:
{
  userId: 1,
  id: 1,
  title: "sunt aut facere repellat provident occaecati excepturi optio reprehenderit",
  body: "quia et suscipit..."
}
That object is the shape you will render in a moment. Logging first is not wasted work. It separates "did the data arrive?" from "did I render it correctly?" When something breaks later, you will know which half to inspect.
Warning: This request must run from a page served over
httporhttps. If you open the HTML file directly from your file system, the browser will block the request. A quick local server or a code playground avoids this.
The Three States Your Page Can Be In
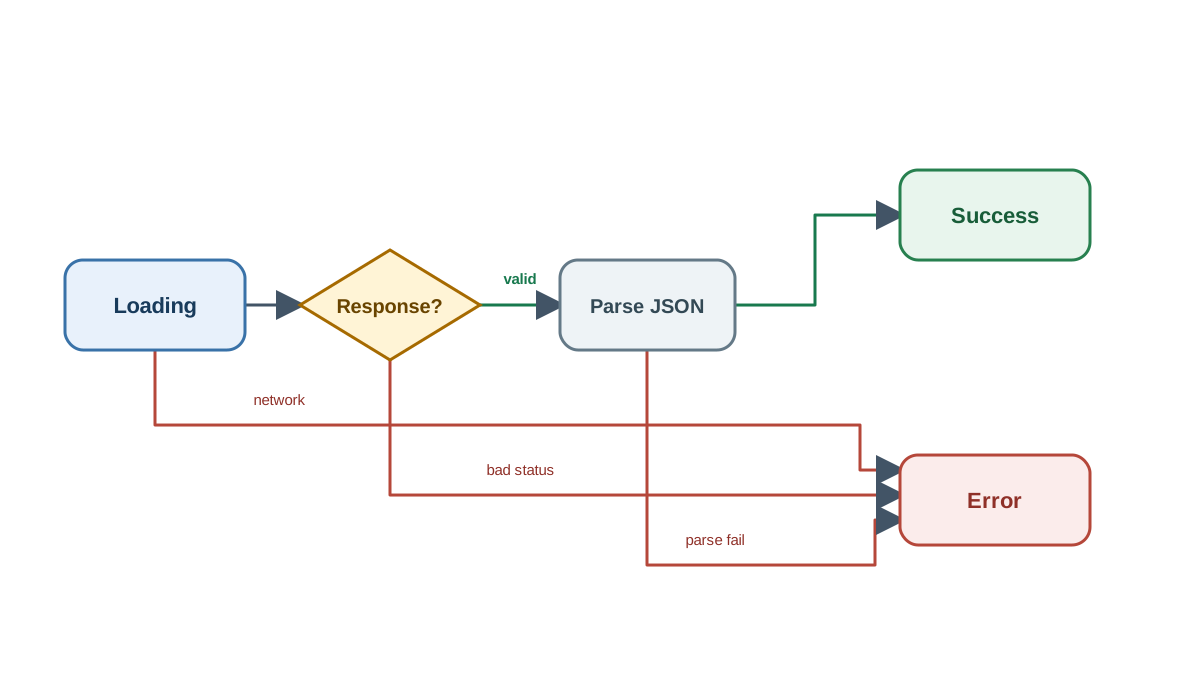
Here is the anchor idea for the rest of this tutorial: at any moment, your page is in exactly one of three states.
| State | What it means | What the user sees |
|---|---|---|
| Loading | The request started, no answer yet | A message or spinner |
| Success | A response arrived and parsed | The data |
| Error | The request failed, the status was bad, or parsing broke | A readable message |
A blank screen during loading reads as broken even when your code is working perfectly. The user cannot tell the difference between "almost done" and "never coming back."
The fix is structural. Keep a single render function that takes a state and writes the matching view. That way the page always reflects exactly one state, and you never accidentally show two at once.
Show Loading Before You Show Data
The loading state is the first thing the user sees, so render it deliberately. The order matters: set loading, then fetch, then replace the loading view.
const app = document.getElementById("app");

function render(state, payload) {
  if (state === "loading") {
    app.textContent = "Loading...";
  } else if (state === "success") {
    app.textContent = payload.title;
  } else if (state === "error") {
    app.textContent = "Something went wrong: " + payload;
  }
}

async function loadData() {
  render("loading");
  const response = await fetch("https://jsonplaceholder.typicode.com/posts/1");
  const data = await response.json();
  render("success", data);
}

loadData();
While the request is in flight, the page shows Loading.... When the data arrives, that text is replaced by the post title.
Common mistake: Writing the loading text after the
await. By then the data has already arrived, so the loading message flashes for a fraction of a millisecond or never appears at all. Set the loading state before you start waiting.
Knowledge check
Check your understanding
Answer this question before you continue.
Check the Response Before You Trust It
This is the part where most beginners' mental models break, so slow down here.
fetch only rejects its promise on a network-level failure — no connection, DNS failure, that kind of thing. A 404 Not Found or a 500 Internal Server Error does not throw. The promise resolves normally, and you get a Response object with a bad status code.
If you skip the check, your success path runs on an error response, and your page either shows nothing or crashes on a missing field.
You have to check response.ok yourself. It is true for status codes 200 through 299, and false for everything else.
async function loadData() {
  render("loading");
  const response = await fetch("https://jsonplaceholder.typicode.com/posts/1");

  if (!response.ok) {
    throw new Error(`HTTP ${response.status}: ${response.statusText}`);
  }

  const data = await response.json();
  render("success", data);
}
Now a bad status throws your own error, which the next section catches. response.status gives you the number, and response.statusText gives you the short label, so your message can say something useful like HTTP 404: Not Found.
Knowledge check
Check your understanding
Answer this question before you continue.
Parse the Body and Render the Data
Once the response passes the check, await response.json() hands you a plain JavaScript object or array. Build the HTML from it and write it into the container.
function render(state, payload) {
  if (state === "loading") {
    app.textContent = "Loading...";
  } else if (state === "success") {
    app.innerHTML = `
      <h2>${payload.title ?? "Untitled"}</h2>
      <p>${payload.body ?? "No content available."}</p>
    `;
  } else if (state === "error") {
    app.textContent = "Something went wrong: " + payload;
  }
}
Notice the ?? operator. It means "use the value on the left if it exists, otherwise use the value on the right." This guards against missing fields so one absent property does not blank the whole page.
An empty result is still a success. If your data is an array and it comes back empty, show a friendly "nothing here yet" message rather than an error. The request worked. There was simply nothing to show.
Turn Failures Into Useful Messages
Wrap the fetch and parse steps in try/catch so both network failures and your own thrown status errors land in one place.
async function loadData() {
  render("loading");
  try {
    const response = await fetch("https://jsonplaceholder.typicode.com/posts/1");

    if (!response.ok) {
      throw new Error(`HTTP ${response.status}: ${response.statusText}`);
    }

    const data = await response.json();
    render("success", data);
  } catch (error) {
    render("error", error.message);
  }
}
The catch block receives both kinds of failure: the network error that fetch throws on its own, and the status error you threw manually. That is why one try/catch covers the whole flow.
In this example, the catch block itself replaces the loading view with the error message. You do not need a separate cleanup step to leave the loading state, because rendering success or error overwrites whatever was on screen.
A finally block is a different tool. It runs after try and catch finish, no matter which one ran. Use it for cleanup that must happen regardless of outcome — re-enabling a disabled button, hiding a spinner element, or resetting a flag. If you add a spinner later, finally is where you hide it so the page never gets stuck on "Loading...".
Tip: Match the message to what the user can act on. "No connection" suggests checking the network. "Server problem" suggests trying again later. "Bad data" suggests the response was not what you expected. A raw stack trace helps no one.
Knowledge check
Check your understanding
Answer this question before you continue.
Force Each State On Purpose
Code that looks right is not the same as code you have watched work. Force each state deliberately.
- Network error: Break the URL, for example change
https://tohttps://x. The request fails before any response arrives. - Bad status: Point at a path that returns
404. Yourresponse.okcheck should throw. - Loading: Open your browser's developer tools, go to the Network tab, and throttle the connection to "Slow 3G." The loading message stays visible long enough to inspect.
- Empty success: Point at an endpoint that returns an empty array and confirm you see the friendly empty message, not an error.
This habit is the difference between hoping your page works and knowing it does. Every state you have seen with your own eyes is a state you can defend.
Practice: Add a Second Request
Your turn. Pick a different public JSON endpoint and render it with the same three-state pattern.
- Goal: Fetch a new endpoint and show loading, success, and error states.
- Starter: Reuse the
renderfunction and thetry/catchstructure from this tutorial. - Expected behavior: The loading message appears, then either the data or a clear error.
- Hint: Keep the state logic identical. Only change the URL and the way you render the fields.
- Extension: Add a retry button that calls
loadData()again.
The state machine does not change. Only the data does.
Where This Pays Off
Any time you fetch data, decide up front what the page shows while waiting, what it shows on success, and what it shows when things break. Then force all three states once before you call it done.
That decision rule is the whole skill. It is also the foundation of every data-driven page you will build next — a weather card, a search results list, a dashboard. Start with one endpoint and three states. The pattern scales further than you expect.
Knowledge check
Final check
Finish the article by checking the ideas you just learned.
References
Want a more structured JavaScript path?
Use the JavaScript for AI Applications Starter Pack to turn individual tutorials into a focused path from language fundamentals to interactive AI applications.
JavaScript for AI Applications Starter Pack
Build the JavaScript foundation behind modern interactive applications. The JavaScript for AI Applications Starter Pack takes you from core language concepts through functions, browser events, forms, DOM updates, application state, debugging, and practical projects—so you can learn how interfaces take input, work with structured data, respond to users, and turn results into experiences people can actually use.
- 253-page illustrated PDF
- 12 guided JavaScript chapters
- Visual concept diagrams
- Self-assessment quizzes
- Bonus deep-dive sections
- DOM, events, forms & application state
- Browser projects, debugging & practical workflows
Coming soon


