
Build a Click Counter
There's a moment in learning JavaScript when things stop being abstract. You've studied variables and functions. You've followed along with examples. But…

Key topics
There's a moment in learning JavaScript when things stop being abstract. You've studied variables and functions. You've followed along with examples. But nothing you've written has actually done something on a page yet.
This is that moment. We're going to build a JavaScript click counter—the smallest possible interactive app. One button. One number. When you click the button, the number goes up. That's it.
And yet, hidden inside those fifteen lines of code is the exact pattern that powers toggles, forms, menus, and games. Get this working, and you've crossed the bridge from "I understand JavaScript" to "I can build something that reacts."
Why Start With a Click Counter
Here's what makes a click counter the perfect beginner JavaScript project: it's the smallest app where JavaScript actually does something visible on the page. Not a console log you have to squint at. Not a calculation you have to trust. A number on the screen that changes because you clicked a button.
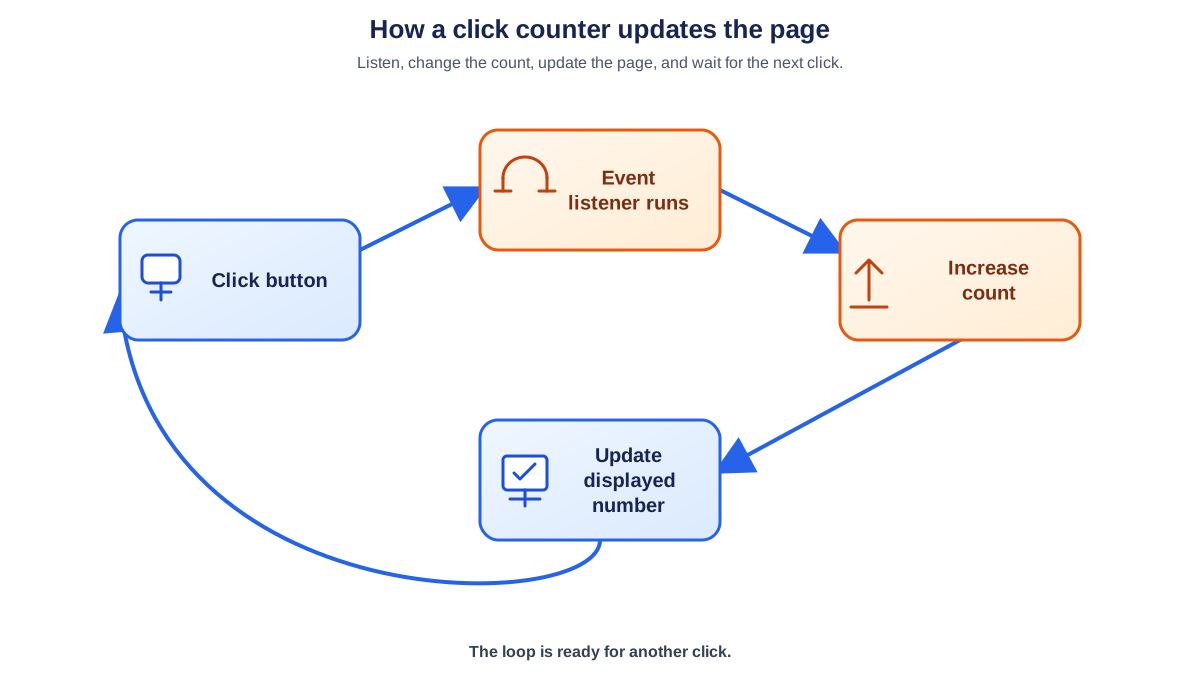
That simple interaction teaches you the core loop of interactive programming:
- Listen for an event (a click).
- Change some state (the count).
- Update the screen (show the new number).
Every interactive app you'll ever build runs on this loop. A light/dark mode toggle? Listen for the switch, change the theme state, update the page. A shopping cart? Listen for "add to cart," change the cart state, update the total. A game? Listen for key presses, change the player's position, update the screen.
The skills you'll use here—selecting an element from the page, handling a click, updating text—show up again in real projects constantly. That's why this simple JavaScript app is worth building carefully.
We're keeping the scope tight: one button, one number, no styling distractions. You can make it pretty later. Right now, we want the mechanism.
What You Need Before You Start
Before we dive in, let's make sure you're set up. This tutorial assumes you're comfortable with basic HTML structure and have seen JavaScript variables and functions before. If selecting elements from the page or attaching event listeners feels unfamiliar, that's okay—we'll walk through every line together.
Here's the good news about the setup: you need nothing special.
- A text editor. Any one will do—VS Code, Notepad, TextEdit, whatever you already have.
- A browser. Chrome, Firefox, Safari, Edge—any modern browser works.
- No installs. No frameworks. No build tools.
We'll create three files in the same folder:
index.html— the page structurestyle.css— optional styling (we'll keep it minimal)script.js— the JavaScript that makes it work
Set Up the HTML
Let's start with the page structure. Open your editor and create a file called index.html with this content:
<!DOCTYPE html>
<html lang="en">
<head>
  <meta charset="UTF-8">
  <meta name="viewport" content="width=device-width, initial-scale=1.0">
  <title>Click Counter</title>
</head>
<body>
  <h1>Click Counter</h1>
  <p>You've clicked <span id="count">0</span> times.</p>
  <button id="clickButton">Click me</button>

  <script src="script.js"></script>
</body>
</html>
Let's look at what's here and why.
The <span id="count">0</span> is where our number will live. The id attribute is crucial—it's how JavaScript will find this element later. The 0 inside is the starting count.
The <button id="clickButton"> is what the user will click. Again, the id gives JavaScript a handle to grab onto.
Notice that the <script> tag comes at the end of the body, not in the head. This matters. When the browser reads the page top to bottom, it needs to have already created the button and the span before the JavaScript tries to find them. Put the script at the end, and the HTML elements exist by the time your code runs.
Write the JavaScript That Makes It Count
Now for the fun part. Create a file called script.js in the same folder and add this:
// Grab the elements we need from the page
const button = document.getElementById("clickButton");
const countDisplay = document.getElementById("count");

// Track the count in a variable
let count = 0;

// Listen for clicks on the button
button.addEventListener("click", function() {
  // Increase the count
  count = count + 1;

  // Update what the page shows
  countDisplay.textContent = count;
});
That's the whole app. Let's walk through it line by line, because every line is doing a specific job.
Getting the elements:
const button = document.getElementById("clickButton");
const countDisplay = document.getElementById("count");
document.getElementById is how JavaScript finds elements on the page. You give it the id you set in the HTML, and it hands you back the element itself. Now button refers to the actual button on the page, and countDisplay refers to the span.
Tracking the count:
let count = 0;
This variable is the heart of the app. It's the state—the piece of information that changes as the user interacts. We use let instead of const because we're going to change this value. The count starts at 0.
Listening for clicks:
button.addEventListener("click", function() {
This is where the magic happens. addEventListener tells the browser: "Watch this button, and when someone clicks it, run this function."
The first argument, "click", is the event we're listening for. A click happens when a user presses and releases a mouse button over the element. The browser also fires a click event for touch gestures and for keyboard users pressing Enter or Space on a focused button—so this works across mouse, touch, and keyboard.
The second argument is the function that runs when the click happens. This is called a callback or an event handler.
Updating the count and the page:
  count = count + 1;
  countDisplay.textContent = count;
When the button is clicked, we do two things. First, we add 1 to our count variable. Second, we push that new value into the page using textContent.
Why textContent and not innerHTML? For a plain number, textContent is the safer, more direct choice. It treats the value as plain text, not as HTML. If your count somehow became something like <b>5</b>, textContent would display it literally as text, while innerHTML would try to render it as a bold element. For plain numbers, textContent is the right tool.
Knowledge check
Check your understanding
Answer this question before you continue.
Run It and Watch It Work
Now for the payoff. Open index.html in your browser. You can do this by double-clicking the file, or by dragging it into an open browser window.
You should see a heading, a sentence that says "You've clicked 0 times," and a button. Click the button.
The number changes. Click again. It goes up again.
Here's what happens on each single click:
- The browser detects the click and fires a
clickevent on the button. - Your event listener catches that event and runs its function.
- The function adds 1 to the
countvariable. - The function updates the span's text with the new count.
Listen. Change. Update. That's the loop. And you just built it.
Knowledge check
Check your understanding
Answer this question before you continue.
Common Beginner Mistakes (and How to Fix Them)
When something doesn't work, don't panic. Debugging is part of building. Here are the three most common issues you'll hit with this project, what causes them, and how to fix them.
Nothing happens when you click
Symptoms: The page loads fine, but clicking the button does nothing.
Likely causes:
- Your
<script>tag is in the<head>instead of at the end of the<body>. When the script runs, the button doesn't exist yet, sodocument.getElementById("clickButton")returnsnull, and the whole script fails. - The
idin your JavaScript doesn't match theidin your HTML. Check for typos—clickButtonvs.clickbuttonorcountvs.counter.
The fix: Move the script tag to the end of the body, right before </body>. Double-check that every id matches exactly.
The number resets to 0 on every click
Symptoms: The number briefly shows 1, then goes back to 0 before the next click.
Likely cause: You declared the count variable inside the event listener function:
button.addEventListener("click", function() {
  let count = 0;  // Wrong! Resets every click
  count = count + 1;
  countDisplay.textContent = count;
});
Every time the function runs, it creates a fresh count starting at 0, adds 1, and displays 1. The variable needs to live outside the function so it survives between clicks.
The fix: Declare count at the top level of your script, before the addEventListener line.
Knowledge check
Check your understanding
Answer this question before you continue.
The page shows the number but never updates
Symptoms: The page loads and shows 0, but clicking does nothing even though the button is there.
Likely causes:
- The event listener was never attached. Check that your
addEventListenerline is actually in the script and not commented out. - The update line is missing. Your function might be incrementing the count but never writing it back to the page.
The fix: Make sure your function has both lines: the increment and the textContent update. If you only change the variable, the page never knows about it.
Knowledge check
Check your understanding
Answer this question before you continue.
Make It Yours: Three Quick Variations
Now that the basic counter works, let's stretch those new muscles. Each variation reuses the same pattern—listen, change, update—so you're building fluency through repetition.
Variation 1: Add a reset button
Add a second button to your HTML:
<button id="resetButton">Reset</button>
Then in your JavaScript:
const resetButton = document.getElementById("resetButton");

resetButton.addEventListener("click", function() {
  count = 0;
  countDisplay.textContent = count;
});
Same pattern. Listen for the click, change the state, update the page.
Variation 2: Add a minus button
Add a third button:
<button id="minusButton">-1</button>
And wire it up:
const minusButton = document.getElementById("minusButton");

minusButton.addEventListener("click", function() {
  count = count - 1;
  countDisplay.textContent = count;
});
Here's a question worth thinking about: should the count be allowed to go below zero? If not, you'd add a check before subtracting:
minusButton.addEventListener("click", function() {
  if (count > 0) {
    count = count - 1;
    countDisplay.textContent = count;
  }
});
That's a real design decision. There's no wrong answer—it depends on what you want the counter to do.
Variation 3: Add a milestone message
Add a paragraph to your HTML:
<p id="message"></p>
Then, inside your original click handler, add a check:
button.addEventListener("click", function() {
  count = count + 1;
  countDisplay.textContent = count;

  if (count === 10) {
    document.getElementById("message").textContent = "Ten clicks! Nice work.";
  }
});
Now your simple JavaScript app has a little personality.
What This Teaches You for Bigger Projects
Take a step back and look at what you just built. It's a click counter. It's also a working model of how interactive software works.
The listen-change-update loop you just practiced is the same pattern behind:
- Toggles — a dark mode switch listens for a click, changes the theme state, updates the page.
- Forms — a submit button listens for a click, changes the submitted data, updates the confirmation message.
- Menus — a hamburger icon listens for a click, changes the open/closed state, updates the menu's visibility.
- Games — a key press listener changes the player's position, and the screen updates.
The count variable is also your first real piece of state. State is just the information an app remembers while it runs. And here's a truth that will save you hours of debugging later: most bugs in interactive apps come from losing track of state. When the count resets, it's because the state got recreated. When the page doesn't update, it's because the state changed but the screen never heard about it.
You now own the core interactive pattern. That's not a small thing.
If you want to keep going, try one of the variations above. Or take the next step in your learning path and build something slightly bigger—a to-do list or a simple quiz. Both reuse these exact skills: select elements, listen for events, change state, update the page.
The click counter is the first rung on a ladder. You've climbed it. The view from here is just beginning.
Knowledge check
Final check
Finish the article by checking the ideas you just learned.
References
Research updated Sep 6, 2026


