
Build a Digital Clock with JavaScript
There is a small magic moment in every beginner programmer's life: the first time a page changes itself, with no click, no refresh, no input from you. The…

Key topics
There is a small magic moment in every beginner programmer's life: the first time a page changes itself, with no click, no refresh, no input from you. The browser just decides it is time to show something new, and it does. A digital clock is the perfect way to create that moment—and to understand the mechanism behind it.
By the end of this project, you will have built a working JavaScript digital clock that displays the current time and updates itself every second. You will learn how to read time from the system, format it so it looks right, write it into the page, and schedule it to refresh automatically. These four skills are the foundation for dashboards, live feeds, countdown timers, and any interface that needs to stay current without human help.
What We're Building and Why It Matters
The finished clock is simple to describe: hours, minutes, and seconds displayed in a large font, updating every second, with no page refresh required. Open the file, and the clock shows the current time. Wait a moment, and the seconds tick forward on their own.
That behavior is the milestone. Every project you have built so far changed because you did something—clicked a button, typed text, submitted a form. This clock changes because time does. The page is no longer a static document waiting for input. It is a small live system, reading real data and deciding when to update itself.
This project assumes you already know three things:
- How to write and call functions
- How to change text on a page using the DOM
- How to attach JavaScript to an HTML file with a script tag
If those skills feel shaky, review them before starting. The clock will make much more sense with those foundations in place.
The project uses three files, each with one job:
- index.html — the page structure and the empty element where the clock will appear
- style.css — the visual design that makes the clock readable and satisfying to look at
- script.js — the logic that reads the time, formats it, and updates the page
Here is the target. When you open the page, you should see something like this in the center of the screen:
09:41:07
And one second later, without you touching anything:
09:41:08
That is the whole goal. Now let's build it step by step.
Set Up the HTML Structure
Create a new folder for the project and add a file called index.html. The HTML needs a container element where the clock text will live, and it needs to load your CSS and JavaScript files.
<!DOCTYPE html>
<html lang="en">
<head>
  <meta charset="UTF-8">
  <meta name="viewport" content="width=device-width, initial-scale=1.0">
  <title>Digital Clock</title>
  <link rel="stylesheet" href="style.css">
</head>
<body>
  <div id="clock">--:--:--</div>
  <script src="script.js"></script>
</body>
</html>
The key piece is the <div id="clock">. This is the element JavaScript will find and update. The id attribute is the handshake between HTML and JavaScript: the HTML says "here is a container called clock," and JavaScript will say "I want to put text inside the element called clock."
The placeholder text --:--:-- is optional. It gives the page something to show before JavaScript runs, which helps you notice if the script fails to load. If JavaScript never runs, you will see the dashes and know something is wrong. If it runs correctly, the dashes will be replaced within a fraction of a second.
Note: The script tag goes at the end of the body, after the clock element. JavaScript can only find elements that already exist in the page. If the script runs before the browser has parsed the
<div>, it will find nothing and fail silently.
Style the Clock with CSS
The clock works without any CSS. But a small amount of styling makes the result feel real—like an actual digital clock rather than plain text on a white page.
Create style.css in the same folder:
body {
  margin: 0;
  min-height: 100vh;
  display: flex;
  justify-content: center;
  align-items: center;
  background-color: #1a1a2e;
  font-family: Arial, sans-serif;
}

#clock {
  font-family: "Courier New", monospace;
  font-size: 72px;
  font-weight: bold;
  color: #00d4aa;
  background-color: #16213e;
  padding: 20px 40px;
  border-radius: 12px;
  letter-spacing: 4px;
}
Here is what each rule does:
- The
bodyrules center the clock both horizontally and vertically.min-height: 100vhmakes the body at least as tall as the viewport, and the flexbox properties do the centering. - The dark background color gives the page a dashboard feel.
- The
#clockrules target your clock element specifically. The monospace font keeps every digit the same width, so the clock does not jiggle as numbers change. The large font size makes it readable from across the room. The teal color on a dark panel gives it that digital-display look.
Open the page in your browser now. You should see the placeholder --:--:-- centered on a dark background. The styling works. Now it is time to make the clock actually tell time.
The Live-Update Loop: A Mental Model
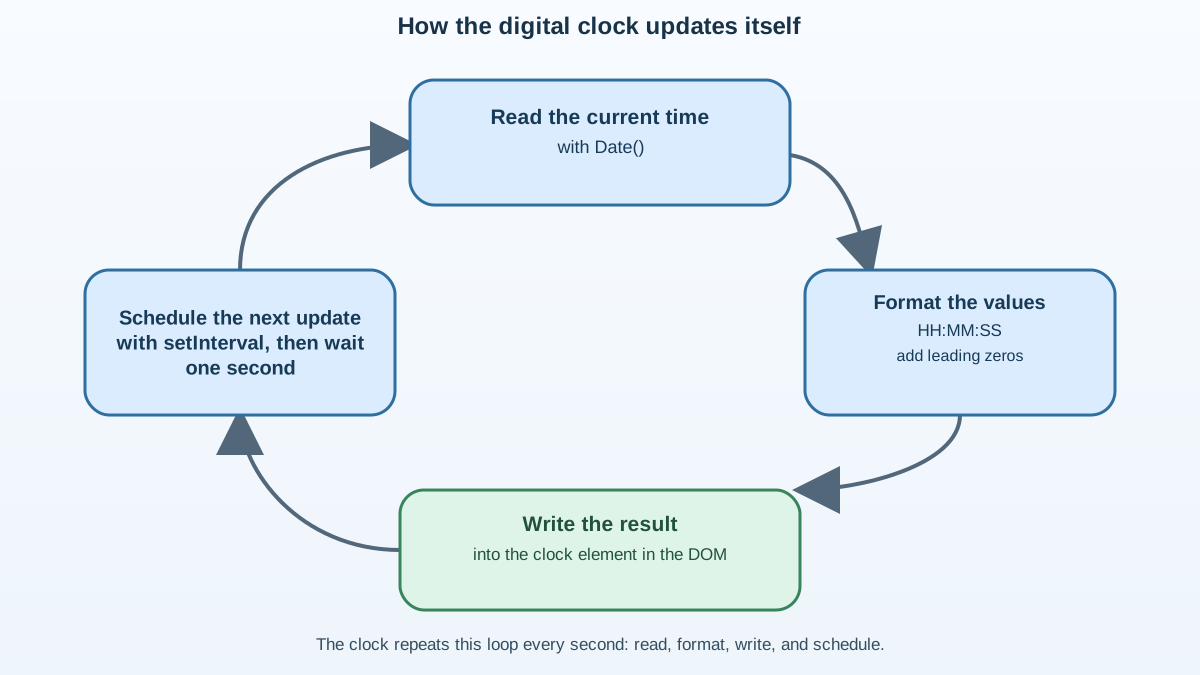
Before we write the JavaScript, let's name the pattern that makes a clock work. Every live-updating interface follows the same four-step loop:
- Read the current data.
- Format it into a display-ready string.
- Write that string into the page.
- Schedule the next read.
Your clock will read the current time, format it with leading zeros, write it into the clock element, and schedule itself to run again in one second. Then the loop repeats: read, format, write, schedule. Forever.
Keep this loop in mind as we build. Every piece of code you write fits into one of those four steps.
Read the Current Time with the Date Object
JavaScript has a built-in tool called the Date object. When you create a new one without any arguments, it captures the current moment on the machine where the code is running—your computer, right now.
Create script.js and start with this temporary experiment:
const now = new Date();
console.log(now);
Open the page and look at the browser console. You will see something like this:
Mon Mar 17 2025 09:41:07 GMT-0400 (Eastern Daylight Time)
The exact format depends on your browser and time zone, but the important thing is that new Date() gives you a snapshot of the current moment. That snapshot contains everything: year, month, day, hour, minute, second, and more.
To build a clock, you only need three pieces of that snapshot. The Date object has methods that pull out each part:
const now = new Date();

const hours = now.getHours();
const minutes = now.getMinutes();
const seconds = now.getSeconds();

console.log(hours);
console.log(minutes);
console.log(seconds);
Each method returns a plain number. If it is 9:41:07 in the morning, you will see:
9
41
7
Notice that the hour and second came back as single digits. That is technically correct—it is 9 o'clock and 7 seconds—but a clock that displays 9:41:7 looks broken. Real digital clocks always show two digits: 09:41:07.
That inconsistency is the next problem to solve.
Note: These console experiments are temporary. They help you see what the
Dateobject returns, but they will not appear on the page. When we build the realupdateClock()function, we will remove theconsole.loglines and replace them with a DOM update.
Knowledge check
Check your understanding
Answer this question before you continue.
Format the Time with Leading Zeros
A clock that reads 9:5:3 is telling the truth, but it looks wrong. The fix is to add a leading zero whenever a value is below 10. The number 9 becomes 09. The number 7 becomes 07. The number 41 stays 41 because it already has two digits.
You could write this check three times, once for hours, minutes, and seconds:
let displayHours = hours;
if (hours < 10) {
  displayHours = "0" + hours;
}
But repeating the same logic three times is exactly the kind of code that invites mistakes. If you need to change how the formatting works, you have to remember to change it in three places. A helper function is cleaner:
function formatTimeUnit(unit) {
  if (unit < 10) {
    return "0" + unit;
  }
  return unit;
}
This function takes a number, checks if it is below 10, and if so, returns a string with a leading zero. Otherwise, it returns the original number.
Test it with a few values:
console.log(formatTimeUnit(9));   // "09"
console.log(formatTimeUnit(41));  // 41
console.log(formatTimeUnit(7));   // "07"
The expected output:
09
41
07
Notice that formatTimeUnit(41) returns the number 41, not the string "41". That is fine. When you combine the pieces into a display string, JavaScript will convert everything to text anyway.
Common mistake: Forgetting the
returnstatement. A function that does not explicitly return a value returnsundefined. If your clock suddenly showsundefinedin place of a number, check that every branch of your function returns something.
Knowledge check
Check your understanding
Answer this question before you continue.
Update the Page with the DOM
Now you have all the pieces: read the time, format each part, combine them into a string. The next step is to write that string into the page.
You already know the DOM technique for this. Find the element by its id, then set its text content:
function updateClock() {
  const now = new Date();

  const hours = formatTimeUnit(now.getHours());
  const minutes = formatTimeUnit(now.getMinutes());
  const seconds = formatTimeUnit(now.getSeconds());

  const timeString = hours + ":" + minutes + ":" + seconds;

  document.getElementById("clock").textContent = timeString;
}
Let's walk through what this function does:
- Creates a new
Dateobject to capture the current moment. - Pulls out the hours, minutes, and seconds.
- Passes each one through
formatTimeUnitso single digits get a leading zero. - Joins them with colons into a string like
"09:41:07". - Finds the element with id
clockand sets its text to that string.
The function does not return anything. Its job is to cause an effect: changing what the page displays. That is a common pattern in browser JavaScript—functions that update the page rather than compute and return values.
To see the clock work once, call the function:
updateClock();
Open the page. The placeholder dashes should be replaced with the current time, formatted with leading zeros:
09:41:07
But the clock is frozen. It showed the time once, at the exact moment the function ran, and then stopped. The seconds do not move.
That is the final piece of the puzzle.
Make the Clock Tick with setInterval
The clock needs to re-run its update function on a schedule. Every second, call updateClock() again. Read the time fresh, format it, write it to the page.
JavaScript has a built-in tool for exactly this: setInterval. It takes two arguments:
- The function to call
- The delay between calls, in milliseconds
setInterval(updateClock, 1000);
The second argument is the delay, not the speed. It is not "run 1000 times per second." It is "wait 1000 milliseconds between each call." Since there are 1000 milliseconds in one second, this schedules the function to run once per second.
Here is the complete script.js:
function formatTimeUnit(unit) {
  if (unit < 10) {
    return "0" + unit;
  }
  return unit;
}

function updateClock() {
  const now = new Date();

  const hours = formatTimeUnit(now.getHours());
  const minutes = formatTimeUnit(now.getMinutes());
  const seconds = formatTimeUnit(now.getSeconds());

  const timeString = hours + ":" + minutes + ":" + seconds;

  document.getElementById("clock").textContent = timeString;
}

updateClock();
setInterval(updateClock, 1000);
Open the page and watch. The seconds change every second. The minutes change every sixty seconds. The hours change every sixty minutes. No refresh, no button, no user input. The page is alive.
Note: The
updateClock()call beforesetIntervalis not optional. Without it, the page would show the placeholder text for the first full second, until the first scheduled call fires. Calling the function once at the start makes the clock appear instantly.
Knowledge check
Check your understanding
Answer this question before you continue.
Verify Your Clock Works
Before you move on, run through this quick checklist. Each item confirms that a different part of the loop is working:
- Refresh the page. The clock should appear immediately, not after a delay. If it takes a second to show up, you forgot the initial
updateClock()call. - Check the format. The time should look like
09:41:07, not9:41:7. If single digits are missing their leading zero, check yourformatTimeUnitfunction. - Watch the seconds cross a boundary. Wait until the seconds reach
59and tick over to00. The minutes should advance at the same moment. If the minutes do not change, thegetMinutes()call is probably not insideupdateClock(). - Open the browser console. You should see no errors. If the clock stays frozen at the placeholder text, check the console for a message like
Cannot read properties of null. That usually means the script tag is in the<head>instead of at the end of the<body>.
If all four checks pass, your clock is working correctly. If something fails, the common mistakes section below will help you find the fix.
Common Beginner Mistakes and How to Fix Them
Every beginner hits a few predictable walls with this project. Here is what goes wrong, how to recognize it, and how to fix it.
Mistake 1: The page is blank for the first second
Symptom: The clock area shows --:--:-- or nothing when the page loads, then suddenly shows the correct time after about a second.
Cause: You called setInterval but forgot to call updateClock() once at the start. The first scheduled call does not happen until 1000 milliseconds have passed.
Fix: Add updateClock() immediately before the setInterval line. The clock should appear instantly, then keep updating.
Mistake 2: The clock updates too fast or too slowly
Symptom: The seconds race by, or the clock barely seems to move.
Cause: The delay value is wrong. setInterval measures time in milliseconds, not seconds. A delay of 1 means "call this function every 1 millisecond," which would make the clock spin wildly. A delay of 1 with the word "second" in your head means you actually wrote 1 when you meant 1000.
Fix: Use 1000 for one second. If you want to see the clock update faster while testing, use 100 for a tenth of a second—but remember to change it back.
Mistake 3: The time never appears on the page
Symptom: The console shows no errors, but the clock element stays empty or keeps its placeholder text.
Cause: The id in your HTML does not match the id you are looking for in JavaScript. Maybe the HTML says id="clock" and the JavaScript says getElementById("Clock") with a capital C. Or the HTML says class="clock" and the JavaScript is looking for an id.
Fix: Check both files. The string inside getElementById() must match the id attribute in the HTML exactly, including capitalization.
Knowledge check
Check your understanding
Answer this question before you continue.
Mistake 4: JavaScript cannot find the clock element at all
Symptom: The console shows an error like Cannot read properties of null or getElementById(...) is null.
Cause: The script tag is in the <head> of the page, before the browser has parsed the <div id="clock">. When the script runs, the element does not exist yet, so getElementById returns null.
Fix: Move the script tag to the end of the <body>, after the clock element. This is the simplest fix and works every time.
Make It Yours: Simple Extensions
The clock works. Now make it yours. Each of these extensions reuses the same skills you just practiced: read data, format it, update the page.
Add AM/PM
Switch to a 12-hour format by checking the hour value. This extension replaces only the updateClock() function. Keep formatTimeUnit and the setInterval line exactly as they are:
function updateClock() {
  const now = new Date();

  let hours = now.getHours();
  const minutes = formatTimeUnit(now.getMinutes());
  const seconds = formatTimeUnit(now.getSeconds());

  const ampm = hours >= 12 ? "PM" : "AM";
  hours = hours % 12;
  if (hours === 0) {
    hours = 12;
  }

  const timeString = formatTimeUnit(hours) + ":" + minutes + ":" + seconds + " " + ampm;

  document.getElementById("clock").textContent = timeString;
}
The % operator (modulo) gives you the remainder after division. 13 % 12 is 1, so 1 PM becomes 1. The special case handles midnight and noon, where 0 should display as 12.
Important: Choose one version of
updateClock(). Do not paste the AM/PM version below the original 24-hour version. The second function definition will overwrite the first, which is confusing when you try to debug later. Replace the original function, then test.
Add the Date Below the Time
The Date object has methods for the date too. Add a second element to the HTML:
<div id="clock">--:--:--</div>
<div id="date"></div>
Then update both elements in the same function:
function updateClock() {
  const now = new Date();

  const hours = formatTimeUnit(now.getHours());
  const minutes = formatTimeUnit(now.getMinutes());
  const seconds = formatTimeUnit(now.getSeconds());

  const timeString = hours + ":" + minutes + ":" + seconds;
  const dateString = now.toDateString();

  document.getElementById("clock").textContent = timeString;
  document.getElementById("date").textContent = dateString;
}
The toDateString() method returns something like Mon Mar 17 2025. Style the date element with a smaller font size and a dimmer color to create visual hierarchy.
Restyle It
Change the color scheme. Make the clock look like a retro LED display with a black background and red digits. Make it look like a dashboard widget with a clean white card and subtle shadow. The JavaScript does not care what the clock looks like—it only writes text. The CSS is where you control the personality.
Try changing the background-color of the body, the color of the clock text, and the font-family. A monospace font is important for keeping digits stable, but you can choose which monospace font you like.
What You Just Built
Stop for a moment and look at what you actually created. The page reads real data from the system clock. It formats that data so it looks clean and consistent. It writes the result into the page. And it schedules itself to repeat that process every second, indefinitely, without any further instruction.
That is not a toy pattern. That is the template for every live-updating interface on the web. Stock tickers, sports scores, chat notifications, server status dashboards, auction countdowns—they all follow the same shape: read data, format it, update the DOM, schedule the next update.
The only difference between your clock and a stock ticker is the source of the data and how often it refreshes. The mechanism is identical.
Pick one extension from the list above and build it. Then pick another. Each one will stretch a different muscle—the AM/PM version makes you think about conditional logic, the date version practices working with multiple DOM elements, and the restyling version exercises your CSS judgment.
When you are ready, the next natural project is something that combines this self-updating behavior with user interaction: a countdown timer, a pomodoro clock, or a stopwatch. You now know how to make the page move on its own. The question is what you want it to do next.
Knowledge check
Final check
Finish the article by checking the ideas you just learned.
References
Research updated Sep 6, 2026


