
Build a Simple Calculator
A calculator is not smart. It just remembers two numbers and one operator between clicks. Once you see that, the whole project becomes simple—and you will…

Key topics
A calculator is not smart. It just remembers two numbers and one operator between clicks. Once you see that, the whole project becomes simple—and you will have glued together event listeners, DOM selection, and state tracking into something real you can open in a browser and use.
What You'll Build
By the end of this tutorial, you'll have a working calculator app with:
- Number buttons for digits 0 through 9
- Operator buttons for addition, subtraction, multiplication, and division
- A clear button to reset everything
- An equals button to run the calculation
- A display that shows what you've typed and the final result
Think of the calculator as three moving parts working together:
- Buttons fire events when clicked.
- The display is the part of the page you update.
- Logic decides what each click should do.
If you've already built the random quote generator, you've done most of this before. You attached click listeners to buttons. You updated text on the page. The new challenge here is remembering values between clicks—and that's what makes this project worth building.
Setting Up the Project Files
No build tools. No frameworks. No installs. Just three plain files that any browser can open directly.
Create a new folder called calculator and add three files inside it:
index.html— the structurestyle.css— the stylingscript.js— the behavior
Start with a basic HTML skeleton in index.html:
<!DOCTYPE html>
<html lang="en">
<head>
  <meta charset="UTF-8">
  <meta name="viewport" content="width=device-width, initial-scale=1.0">
  <title>Calculator</title>
  <link rel="stylesheet" href="style.css">
</head>
<body>
  <!-- Calculator markup goes here -->

  <script src="script.js"></script>
</body>
</html>
Notice where the script tag sits: right before the closing </body> tag. That placement matters. When the browser reads your HTML from top to bottom, it builds the page structure first. If the script ran before the buttons existed, JavaScript wouldn't find them. Putting the script at the end guarantees the DOM—the page structure JavaScript reads—is ready.
Knowledge check
Check your understanding
Answer this question before you continue.
Building the Calculator Layout in HTML
Now let's add the visible structure inside the body. You need a display area on top and a grid of buttons below.
<div class="calculator">
  <div id="display" class="display">0</div>
  <div class="buttons">
    <button class="clear">C</button>
    <button class="operator">/</button>
    <button class="operator">*</button>
    <button class="operator">-</button>
    <button>7</button>
    <button>8</button>
    <button>9</button>
    <button class="operator">+</button>
    <button>4</button>
    <button>5</button>
    <button>6</button>
    <button id="equals">=</button>
    <button>1</button>
    <button>2</button>
    <button>3</button>
    <button>0</button>
    <button>.</button>
  </div>
</div>
The display is a simple div with the id display. It starts showing 0. Each button carries either a number, an operator symbol, or a special class.
The clear button gets the class clear. The equals button gets the id equals. Operators get the class operator. These markers let JavaScript treat different buttons differently. A number click should append a digit. An operator click should store the operator. The equals click should run the math.
Common mistake: If you accidentally add two buttons with the same class or id, your JavaScript will behave unpredictably. Keep one clear button and one equals button.
Making the Calculator Look Like a Calculator
Styling is a bonus here. The JavaScript works the same no matter how the page looks. But a little CSS makes the project feel real and helps you read the display clearly.
Add this to style.css:
body {
  display: flex;
  justify-content: center;
  align-items: center;
  min-height: 100vh;
  background: #f0f0f0;
  font-family: Arial, sans-serif;
}

.calculator {
  background: #333;
  padding: 20px;
  border-radius: 10px;
  width: 240px;
}

.display {
  background: #e8e8e8;
  padding: 15px;
  text-align: right;
  font-size: 2rem;
  border-radius: 5px;
  margin-bottom: 15px;
  min-height: 50px;
  overflow: hidden;
}

.buttons {
  display: grid;
  grid-template-columns: repeat(4, 1fr);
  gap: 8px;
}

button {
  padding: 15px;
  font-size: 1.2rem;
  border: none;
  border-radius: 5px;
  background: #666;
  color: white;
  cursor: pointer;
}

button:hover {
  background: #888;
}

.operator {
  background: #f39c12;
}

.operator:hover {
  background: #e67e22;
}

.clear {
  background: #e74c3c;
}

#equals {
  background: #2ecc71;
}
The grid-template-columns: repeat(4, 1fr) line arranges the buttons into four equal columns. The display sits on top with right-aligned text, just like a real calculator.
If the layout looks off, don't stress. Adjust spacing, colors, or sizes until it feels right. The styling is yours to play with.
Wiring Up Button Clicks with JavaScript
Now for the fun part. Open script.js and start by selecting the elements you need:
const display = document.getElementById('display');
const buttons = document.querySelectorAll('button');
getElementById grabs the display. querySelectorAll('button') grabs every button on the page and returns a list you can loop through.
Before writing the full logic, let's prove the clicks work. Attach a listener to each button and log what was clicked:
buttons.forEach(button => {
  button.addEventListener('click', () => {
    console.log(button.textContent);
  });
});
Open the page in your browser, press a few buttons, and open the developer console (right-click → Inspect → Console tab). You should see the button labels appear as you click.
7
+
3
=
This is the same event-listener pattern you used in the quote generator. The difference: now you're attaching it to many buttons at once with a loop. Every click fires, and you can see exactly which button was pressed.
This click logger is just a temporary test. You'll replace it with the real handler in the next step.
Knowledge check
Check your understanding
Answer this question before you continue.
Tracking the Numbers and the Operator
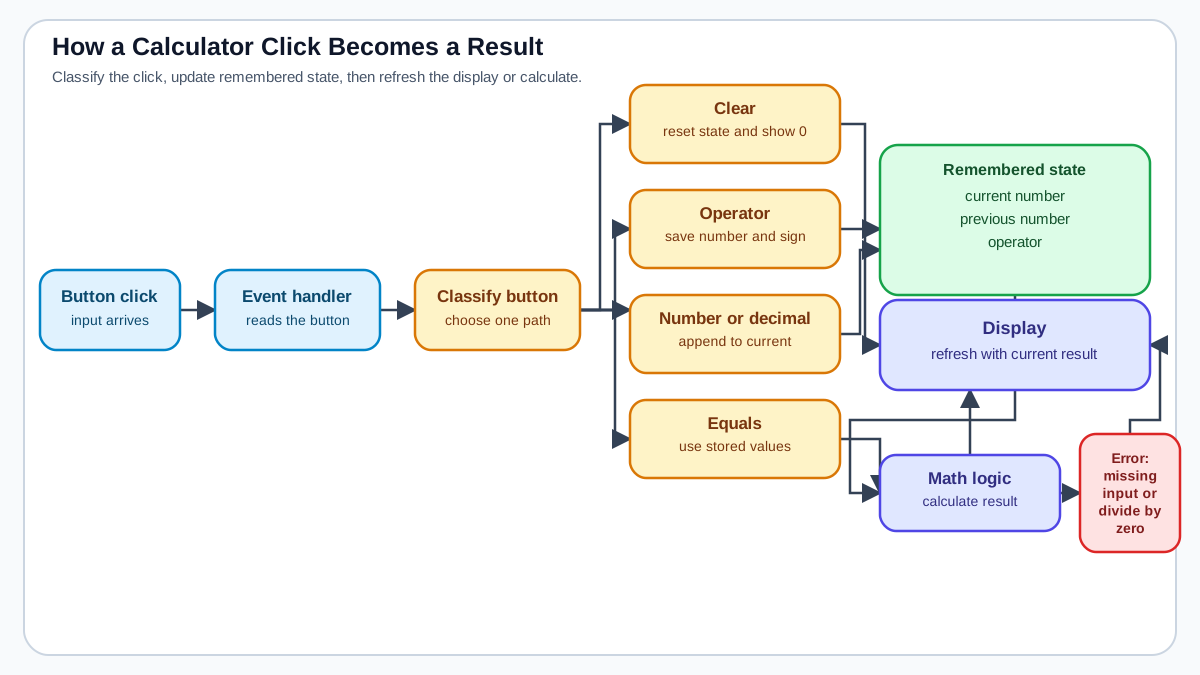
Here's the conceptual heart of the project. A calculator must remember three things between clicks:
- The number being typed right now
- The number typed before the operator
- The operator waiting to run
Let's store those in variables:
let currentNumber = '';
let previousNumber = '';
let operator = '';
Why strings for numbers? Because when a user types 1 then 5, you want to build "15" by appending, not add 1 + 5 to get 6. String concatenation builds the display value naturally. You'll convert to real numbers only when it's time to calculate.
Now replace the temporary click logger with the real handler that sorts buttons by type:
buttons.forEach(button => {
  button.addEventListener('click', () => {
    const value = button.textContent;

    if (button.classList.contains('clear')) {
      // Reset everything
      currentNumber = '';
      previousNumber = '';
      operator = '';
      display.textContent = '0';
    } else if (button.classList.contains('operator')) {
      // Store the operator and move the current number aside
      operator = value;
      previousNumber = currentNumber;
      currentNumber = '';
    } else if (button.id === 'equals') {
      // Run the calculation (we'll write this next)
      calculate();
    } else {
      // It's a number or decimal point
      currentNumber += value;
      display.textContent = currentNumber;
    }
  });
});
Walk through what happens when a user presses 1, 2, +, 7:
- Press
1:currentNumberbecomes"1". Display shows1. - Press
2:currentNumberbecomes"12". Display shows12. - Press
+:operatorbecomes"+".previousNumberbecomes"12".currentNumberresets to"". - Press
7:currentNumberbecomes"7". Display shows7.
The calculator isn't doing math yet. It's just remembering: first number 12, operator +, second number 7. That's the whole trick.
Knowledge check
Check your understanding
Answer this question before you continue.
Writing the Math Logic
When the user presses equals, it's time to convert those strings into numbers and run the operation.
Add a function that performs the calculation:
function calculate() {
  if (previousNumber === '' || currentNumber === '') return;

  const prev = parseFloat(previousNumber);
  const current = parseFloat(currentNumber);
  let result;

  switch (operator) {
    case '+':
      result = prev + current;
      break;
    case '-':
      result = prev - current;
      break;
    case '*':
      result = prev * current;
      break;
    case '/':
      if (current === 0) {
        display.textContent = 'Error';
        return;
      }
      result = prev / current;
      break;
    default:
      return;
  }

  display.textContent = result;
  previousNumber = String(result);
  currentNumber = '';
}
parseFloat converts a string like "12" into the number 12. The switch statement checks which operator is stored and runs the matching arithmetic.
The guard at the top prevents a crash when the user presses = without typing a second number. Without it, parseFloat('') would produce NaN—short for "Not a Number"—and the display would show a confusing result.
The division check catches division by zero. In JavaScript, dividing by zero gives Infinity, which is technically correct but not useful on a calculator display. Showing Error is friendlier.
Test it with 12 + 7:
19
The display shows 19. Your calculator works.
One note: real calculators handle long chains like 2 + 3 × 4 with proper operator precedence. This project deliberately keeps the scope to two numbers and one operation. That's the right size for a first build.
Knowledge check
Check your understanding
Answer this question before you continue.
The Complete script.js
Here's the full JavaScript file with everything assembled. If you've been following along, your file should match this:
const display = document.getElementById('display');
const buttons = document.querySelectorAll('button');

let currentNumber = '';
let previousNumber = '';
let operator = '';

function calculate() {
  if (previousNumber === '' || currentNumber === '') return;

  const prev = parseFloat(previousNumber);
  const current = parseFloat(currentNumber);
  let result;

  switch (operator) {
    case '+':
      result = prev + current;
      break;
    case '-':
      result = prev - current;
      break;
    case '*':
      result = prev * current;
      break;
    case '/':
      if (current === 0) {
        display.textContent = 'Error';
        return;
      }
      result = prev / current;
      break;
    default:
      return;
  }

  display.textContent = result;
  previousNumber = String(result);
  currentNumber = '';
}

buttons.forEach(button => {
  button.addEventListener('click', () => {
    const value = button.textContent;

    if (button.classList.contains('clear')) {
      currentNumber = '';
      previousNumber = '';
      operator = '';
      display.textContent = '0';
    } else if (button.classList.contains('operator')) {
      operator = value;
      previousNumber = currentNumber;
      currentNumber = '';
    } else if (button.id === 'equals') {
      calculate();
    } else {
      currentNumber += value;
      display.textContent = currentNumber;
    }
  });
});
Save the file, open index.html in your browser, and run through this test:
- Press
1,2 - Press
+ - Press
7 - Press
= - Confirm the display shows
19
19
Then try subtraction, multiplication, and division. Press clear and confirm the display resets to 0.
Handling the Tricky Edges
Every first calculator breaks in the same few places. Here's what to watch for.
The page reload trap
If your buttons somehow sit inside a <form> element, clicking them can submit the form and refresh the page. The fix is to prevent that default behavior:
button.addEventListener('click', (event) => {
  event.preventDefault();
  // rest of your handler
});
If you're not using a form, you won't hit this. But if clicks ever make the page reload, this is why.
Pressing an operator before a second number
What happens if the user presses 5, +, then = without typing a second number? The guard in calculate() catches it. If either number is missing, the function does nothing. The calculator quietly waits for valid input.
Pressing two operators in a row
What about 5, +, -? The current code stores - as the operator and keeps 5 as the previous number. The second operator replaces the first. That's a reasonable beginner behavior—the calculator just uses the last operator you pressed.
Typing multiple decimal points
What about 1, ., 2, ., 3? The current code would build the string "1.2.3", and parseFloat would read it as 1.2, silently dropping the rest. That's confusing. A small guard fixes it:
} else if (value === '.' && currentNumber.includes('.')) {
  // Ignore a second decimal point
} else {
  currentNumber += value;
  display.textContent = currentNumber;
}
Now 1.2.3 stays 1.2, and the second decimal point is ignored.
These edge cases aren't failures. They're the exact spots where every beginner calculator breaks—and fixing them is how you learn to think like a developer.
Testing Your Calculator and Common Fixes
Run through this sequence to verify everything works:
- Press
1,2 - Press
+ - Press
7 - Press
= - Confirm the display shows
19
Then try subtraction, multiplication, and division. Press clear and confirm the display resets to 0.
If something's broken, here are the usual suspects:
| Symptom | Likely cause | Fix |
|---|---|---|
| Nothing happens on click | Listener not attached | Check that querySelectorAll ran and addEventListener is inside the loop |
| Wrong result | Operator not stored | Log operator to the console after pressing an operator button |
| Page reloads on click | Buttons inside a form | Add event.preventDefault() to the click handler |
Display shows NaN | Missing number guard | Add the empty-string check in calculate |
Display shows Infinity | Division by zero | Add the zero check in the division case |
Here's my honest advice: break it on purpose. Press buttons in weird orders. Click = first. Press two operators in a row. Watch what happens in the console. Debugging isn't a detour from building—it's how you learn what the code is actually doing.
Next Steps to Push Your Skills Further
Your calculator is complete when you can explain, in plain words, what it remembers between clicks: the current number, the previous number, and the operator.
When you're ready to push further, try these extensions on your own:
- Add a backspace button that removes the last digit typed
- Support keyboard input so pressing
7on your keyboard types7 - Allow chained operations so
2 + 3 + 4works without pressing equals between each step
The natural next project in this learning path is a to-do list, where you'll manage a growing list of items instead of just two numbers. That project introduces arrays and rendering lists—skills that show up constantly in real web development.
For now, though, enjoy this win. You took event listeners, DOM selection, and state tracking—three separate skills—and glued them into something that works. That's what building with JavaScript feels like.
Knowledge check
Final check
Finish the article by checking the ideas you just learned.
References
Research updated Sep 6, 2026


