
Build a JavaScript Quiz App
You've learned arrays, conditionals, click events, and DOM updates as separate lessons. Now it's time to see them work together. A quiz app is the perfect…

Key topics
You've learned arrays, conditionals, click events, and DOM updates as separate lessons. Now it's time to see them work together. A quiz app is the perfect first project for that: the browser asks a question, waits for your click, checks your answer, keeps score, and moves on—all driven by a few variables you control.
By the end of this tutorial, you'll have a working multiple-choice quiz that displays questions, tracks a score, and shows a final result. You'll also understand the pattern behind it, which you can reuse for flashcards, surveys, and study tools.
What You Will Build
Here's the finished behavior: a question appears on the page with several answer buttons. You click one. The app checks whether it's correct, updates your score if needed, and shows the next question. When you've answered everything, the question and choices disappear and a final message appears: "You scored 2 out of 3."
This project pulls together skills you've already practiced:
- Arrays of objects to store the questions and answers
- if/else statements to check whether a click is correct
- Click events to respond when the user picks an answer
- DOM text updates to change what appears on the page
The file setup is simple: three files in one folder.
quiz-app/
├── index.html
├── style.css
└── script.js
If you haven't worked through arrays, if/else, click events, and DOM updates yet, this project will feel much smoother after you've covered those topics. The quiz is where those separate lessons stop being isolated facts and start being one interactive system.
Plan the Quiz Data
Before writing any display logic, decide how to store the questions. An array of objects is the natural choice here. Each question becomes one object with three pieces of information:
- The question text
- An array of answer choices
- The index of the correct answer
Here's what that looks like with three sample questions:
const questions = [
  {
    question: "What does DOM stand for?",
    choices: ["Document Object Model", "Data Output Method", "Digital Object Manager"],
    correct: 0
  },
  {
    question: "Which keyword declares a block-scoped variable?",
    choices: ["var", "let", "function"],
    correct: 1
  },
  {
    question: "Which method adds an element to the end of an array?",
    choices: ["push()", "pop()", "shift()"],
    correct: 0
  }
];
Notice the shape: questions is an array, so you access items by index. Each item is an object, so you access its properties by name. To read the first question's text, you'd write:
questions[0].question;   // "What does DOM stand for?"
questions[0].choices;    // ["Document Object Model", "Data Output Method", "Digital Object Manager"]
questions[0].correct;    // 0
The correct value is an index, not the answer text itself. For the first question, correct: 0 means "the correct answer is the choice at position 0," which is "Document Object Model." Storing the index keeps the data compact and makes the checking logic straightforward.
A good beginner instinct: keep the data separate from the display logic. If you want to add questions later, you only edit this array. The code that shows questions and checks answers doesn't need to change at all.
Knowledge check
Check your understanding
Answer this question before you continue.
Set Up the HTML Shell
The HTML stays short because JavaScript fills in the content. You need containers for the question text, the answer buttons, the score, and the final result.
<!DOCTYPE html>
<html lang="en">
<head>
  <meta charset="UTF-8">
  <meta name="viewport" content="width=device-width, initial-scale=1.0">
  <title>JavaScript Quiz</title>
  <link rel="stylesheet" href="style.css">
</head>
<body>
  <div id="quiz">
    <h1>JavaScript Quiz</h1>
    <p id="question"></p>
    <div id="choices"></div>
    <p id="score"></p>
    <p id="result"></p>
  </div>

  <script src="script.js"></script>
</body>
</html>
The script tag goes at the end of the body so the DOM is fully loaded before the JavaScript runs. That way, when your code tries to grab elements like #question, they already exist.
For CSS, keep it minimal. Styling is not the point of this project. A little spacing and button styling is enough to make the quiz readable:
body {
  font-family: Arial, sans-serif;
  max-width: 600px;
  margin: 40px auto;
  padding: 0 20px;
}

button {
  display: block;
  margin: 8px 0;
  padding: 10px 16px;
  font-size: 16px;
  cursor: pointer;
}
Track the Quiz State
Here's the core idea that makes the whole app work: state. State is the information the app has to remember while it runs. For this quiz, there are two pieces of state:
- Which question is currently showing
- How many answers the user got right
Both start at zero:
let currentQuestion = 0;
let score = 0;
These variables live outside any function, at the top level of your script. That matters. If you declared them inside a function, they'd be created fresh each time that function runs. By keeping them outside, they survive from one click to the next.
Here's the mental model that drives everything else in this project:
Every click reads the current state, changes it, and then redraws the screen from the new state.
The user clicks an answer. Your code checks whether it's correct. If so, the score goes up. Then the code moves to the next question and updates the page to match. The state variables are the source of truth; the page is just a reflection of them.
Knowledge check
Check your understanding
Answer this question before you continue.
Display a Question
Now write the function that reads the current question from the array and puts it on the page. First, grab the elements you'll update:
const questionElement = document.getElementById("question");
const choicesElement = document.getElementById("choices");
const scoreElement = document.getElementById("score");
const resultElement = document.getElementById("result");
Then write a function that displays one question:
function showQuestion() {
  const question = questions[currentQuestion];

  questionElement.textContent = question.question;
  choicesElement.innerHTML = "";

  question.choices.forEach((choice, index) => {
    const button = document.createElement("button");
    button.textContent = choice;
    button.addEventListener("click", () => checkAnswer(index));
    choicesElement.appendChild(button);
  });
}
Let's walk through what this does:
- It grabs the current question object using the state index.
- It writes the question text into the
#questionelement. - It clears any old buttons from the
#choicescontainer. - It loops over the choices array and creates a button for each one.
- Each button gets a click listener that calls
checkAnswerwith that choice's index.
The forEach loop is doing important work here. For the first question, it runs three times and creates three buttons. Each button remembers its own index through the index parameter.
Call this function once to start the quiz:
showQuestion();
When you open the page, you should see the first question with three clickable buttons beneath it. The score line can show your starting point:
scoreElement.textContent = `Score: ${score}`;
Knowledge check
Check your understanding
Answer this question before you continue.
Check the Answer and Move Forward
Now for the click handler. Each answer button knows which choice it represents because of the loop index. When the user clicks, that index gets passed to checkAnswer, which compares it to the correct answer stored in the question object.
The handler has two jobs:
- Update the score if the answer is correct
- Decide whether to show the next question or the final result
Here's the complete function:
function checkAnswer(selectedIndex) {
  const question = questions[currentQuestion];

  if (selectedIndex === question.correct) {
    score++;
  }

  scoreElement.textContent = `Score: ${score}`;

  currentQuestion++;

  if (currentQuestion < questions.length) {
    showQuestion();
  } else {
    showResult();
  }
}
The if statement is simple: if the clicked index matches the stored correct index, the answer is right. The score only increases on a correct answer. A wrong click leaves it unchanged.
Then the decision happens. The code compares the current index to the array length. If questions remain, the index increases and showQuestion runs again to display the next one. If no questions remain, the quiz is over.
The order matters here. The score must be updated before the screen is redrawn. If you moved to the next question first, you'd lose track of which question the user was answering.
The final function clears the question area and shows the result:
function showResult() {
  questionElement.textContent = "";
  choicesElement.innerHTML = "";
  resultElement.textContent = `You scored ${score} out of ${questions.length}`;
}
With the three sample questions, a perfect run shows:
You scored 3 out of 3
If you got two right:
You scored 2 out of 3
Knowledge check
Check your understanding
Answer this question before you continue.
Put the Script Together
Here's the complete script.js file with everything in order. This is the version you should have when you're done:
const questions = [
  {
    question: "What does DOM stand for?",
    choices: ["Document Object Model", "Data Output Method", "Digital Object Manager"],
    correct: 0
  },
  {
    question: "Which keyword declares a block-scoped variable?",
    choices: ["var", "let", "function"],
    correct: 1
  },
  {
    question: "Which method adds an element to the end of an array?",
    choices: ["push()", "pop()", "shift()"],
    correct: 0
  }
];

let currentQuestion = 0;
let score = 0;

const questionElement = document.getElementById("question");
const choicesElement = document.getElementById("choices");
const scoreElement = document.getElementById("score");
const resultElement = document.getElementById("result");

function showQuestion() {
  const question = questions[currentQuestion];

  questionElement.textContent = question.question;
  choicesElement.innerHTML = "";

  question.choices.forEach((choice, index) => {
    const button = document.createElement("button");
    button.textContent = choice;
    button.addEventListener("click", () => checkAnswer(index));
    choicesElement.appendChild(button);
  });
}

function checkAnswer(selectedIndex) {
  const question = questions[currentQuestion];

  if (selectedIndex === question.correct) {
    score++;
  }

  scoreElement.textContent = `Score: ${score}`;

  currentQuestion++;

  if (currentQuestion < questions.length) {
    showQuestion();
  } else {
    showResult();
  }
}

function showResult() {
  questionElement.textContent = "";
  choicesElement.innerHTML = "";
  resultElement.textContent = `You scored ${score} out of ${questions.length}`;
}

showQuestion();
scoreElement.textContent = `Score: ${score}`;
If you built the file step by step, compare your version against this one. The order matters: data first, then state, then element references, then functions, then the initial call at the bottom.
How the Quiz Runs, Step by Step
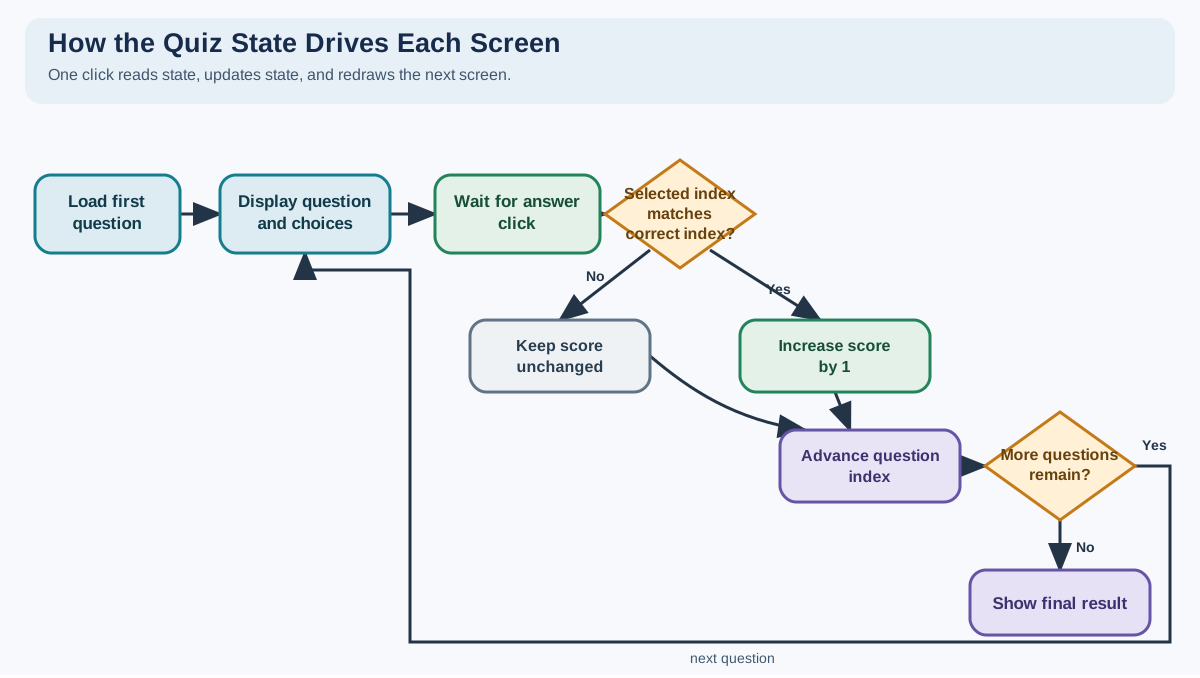
Let's trace through what happens from the moment you open the page. This is the state-to-screen pattern in action.
Page load. The script runs top to bottom. The questions array is created, the state variables start at zero, and the element references are grabbed. Then showQuestion() runs once. It reads questions[0], writes the question text, and creates three buttons. The score line reads Score: 0.
First click. Say you click the correct answer for question one. The button's listener fires with index set to 0. Inside checkAnswer, the code compares 0 to question.correct, which is also 0. The score becomes 1. The score line updates to Score: 1. Then currentQuestion becomes 1, which is less than questions.length (3), so showQuestion() runs again and draws question two.
Wrong click. Suppose you click a wrong answer on question two. The comparison fails, so the score stays at 1. The score line still updates—it just shows the same number. Then currentQuestion becomes 2, and showQuestion() draws question three.
Final click. After answering question three, currentQuestion becomes 3. Now 3 < 3 is false, so showResult() runs instead. The question text and buttons are cleared, and the result message appears.
Notice what happens on a wrong answer: the score doesn't change, but the quiz still advances. That's the behavior we built into the if statement. Only the score update is conditional; moving forward always happens.
Verify Your Quiz Works
Before you start adding features, check that the core behavior is correct. Run through this list:
| Action | Expected result |
|---|---|
| Open the page | Question 1 appears with three answer buttons and Score: 0 |
| Click the correct answer | Score increases by 1 and question 2 appears |
| Click a wrong answer | Score stays the same and the next question appears |
| Answer all three questions | Question and choices disappear, result message appears |
| Check the result text | It shows your correct answers out of 3 |
If any of these steps don't match, use the mistakes below to figure out why.
Common Beginner Mistakes
Every beginner hits a few predictable walls with this project. Here's what they look like and how to fix them.
Forgetting to reset state on restart
If you add a restart button later, you need to reset both currentQuestion and score to zero. If you only reset one, the second run starts mid-quiz or with a leftover score.
Symptom: The quiz starts at question 3 on the second playthrough.
Fix: Set both variables back to zero before calling showQuestion().
Comparing the wrong values
The correct property stores an index, not the answer text. If you compare selectedIndex against question.choices[question.correct], you're comparing a number to a string, and the check always fails.
Symptom: Every answer is marked wrong, even the correct ones.
Fix: Compare the clicked index directly to question.correct.
Stacking duplicate click listeners
If you attach click listeners inside showQuestion but never clear the old buttons, every redraw adds more listeners on top of the old ones. Clicking once fires multiple handlers.
Symptom: The score jumps by 2 or 3 on a single correct click.
Fix: Clear the choices container with choicesElement.innerHTML = "" at the start of showQuestion.
Off-by-one errors on the last question
Array indexes start at zero. If you have three questions, the valid indexes are 0, 1, and 2. Checking currentQuestion <= questions.length would try to access index 3, which doesn't exist.
Symptom: The quiz crashes or shows undefined after the last question.
Fix: Use currentQuestion < questions.length for the "more questions remain" check.
Make It Yours
The quiz works. Now make it yours. The simplest way to grow it is to add more questions to the array. The display and checking logic handle any array length automatically.
Here are three natural next experiments:
Add feedback on each answer. Before moving to the next question, show whether the click was right or wrong. You could set the button's background color to green or red, or display a short message like "Correct!" or "Not quite."
Add a restart button. After the result appears, show a button that resets currentQuestion and score to zero, clears the result, and calls showQuestion() again.
Show progress. Display "Question 2 of 5" above the question text. You already have the state to calculate it: currentQuestion + 1 out of questions.length.
Try one of these, run it, and see what breaks. That's the learning loop: build, test, observe, fix.
Next Steps
Run your finished quiz. Click through all the questions. Break it on purpose, then fix it. Add a few questions of your own, even if they're not JavaScript-related. The mechanics are the same whether you're quizzing on capitals, vocabulary, or code syntax.
This project proved something important: you can combine separate JavaScript skills into one working interactive system. The pattern you just built—state variables, a display function, and a click handler that updates state—shows up again in to-do lists, flashcard apps, and much larger applications.
When you're ready, move on to the next project in the beginner path and keep building.
Knowledge check
Final check
Finish the article by checking the ideas you just learned.
References
Research updated Sep 6, 2026


