
Make a Simple To-Do List
A to-do list is the first app where your page stops being a static document and starts remembering what the user does. Same event-listening idea as a click…

Key topics
A to-do list is the first app where your page stops being a static document and starts remembering what the user does. Same event-listening idea as a click counter—but now the page has to hold a growing list of items. That one shift introduces two ideas you'll use for the rest of your JavaScript life: arrays and re-rendering.
What You'll Build
You're going to build a working JavaScript to-do list with two core features:
- Add a task — type something into a text box, click a button, and it appears in the list.
- Remove a task — click a delete button next to any task, and that task disappears.
Here's what the finished behavior looks like. After typing "Buy groceries" and clicking Add, then typing "Walk the dog" and clicking Add again:
- Buy groceries
- Walk the dog
Click the remove button next to "Buy groceries," and the list becomes:
- Walk the dog
That's the whole app. No frameworks, no build tools, no libraries. Just HTML, CSS, and plain JavaScript.
If you've already built a click counter, you know the basic rhythm: listen for a click, run a function, update the page. This project keeps that rhythm but adds a new challenge—managing many items at once instead of a single number. That's where arrays come in.
Set Up the Page
Create a new folder for this beginner JavaScript project and add a file called index.html. Start with this structure:
<!DOCTYPE html>
<html lang="en">
<head>
  <meta charset="UTF-8">
  <meta name="viewport" content="width=device-width, initial-scale=1.0">
  <title>My To-Do List</title>
</head>
<body>
  <h1>My To-Do List</h1>

  <input type="text" id="taskInput" placeholder="Enter a task...">
  <button id="addButton">Add Task</button>

  <ul id="taskList"></ul>

  <script src="script.js"></script>
</body>
</html>
Three elements matter here:
- The
<input>is where the user types a task. It has anidoftaskInputso JavaScript can read what's inside it. - The
<button>triggers the add action when clicked. - The
<ul>(unordered list) is where tasks will appear. It starts empty. ItsidoftaskListis how JavaScript finds it and fills it with items.
Notice the <script> tag sits at the bottom of the body, after all the HTML elements. That placement matters: JavaScript runs top to bottom, and if the script loads before the input and list exist, it can't find them. Putting the script last guarantees the page elements are already there.
You can add a little CSS to make it look nicer, but it's completely optional. Plain HTML works fine for learning the JavaScript mechanics. The styling is just window dressing.
Store Tasks in an Array
Here's the core problem: when a user adds a task, where does it live? The input box clears after adding. The page doesn't remember anything on its own. You need a place to store the tasks between actions.
That place is an array—a variable that holds an ordered list of items. Think of it as the app's memory for tasks.
Create a file called script.js and start with this:
let tasks = [];
That's an empty array, ready to hold tasks. The [] is the array itself, and tasks is the name you'll use to refer to it.
To add an item to an array, use the push() method:
let tasks = [];
tasks.push("Buy groceries");
tasks.push("Walk the dog");
console.log(tasks);
["Buy groceries", "Walk the dog"]
push() adds one item to the end of the list. That's all it does—and it's exactly what you need when a user adds a new task.
Knowledge check
Check your understanding
Answer this question before you continue.
Add a Task
Now let's wire up the add flow. When the user types a task and clicks the button, four things need to happen:
- Read what's in the input box.
- Check that it's not empty.
- Add it to the
tasksarray. - Clear the input box.
Here's the function. Add this below your let tasks = []; line, and keep only that one array declaration:
function addTask() {
  const input = document.getElementById("taskInput");
  const text = input.value.trim();

  if (text === "") {
    return;
  }

  tasks.push(text);
  input.value = "";
  displayTasks();
}
Let's walk through it line by line.
document.getElementById("taskInput") finds the input box on the page. Then .value reads whatever text the user typed into it.
The .trim() part removes extra spaces from the beginning and end. That way, if the user accidentally types a space before their task, it doesn't count as part of the task text.
The if statement is a guard against empty input. If the user clicks Add without typing anything, text will be an empty string (""), and the function stops right there with return. Without this guard, you'd end up with blank items cluttering your list.
If there is real text, tasks.push(text) adds it to the array. Then input.value = "" clears the input box so it's ready for the next task.
Finally, displayTasks() is called—but you haven't written that function yet. That's the next step, and it's the most important part of the whole app.
To connect the button to this function, add an event listener at the bottom of your script:
document.getElementById("addButton").addEventListener("click", addTask);
This says: when the Add button is clicked, run the addTask function. Same event-listener pattern you used in the click counter.
Knowledge check
Check your understanding
Answer this question before you continue.
Display the List
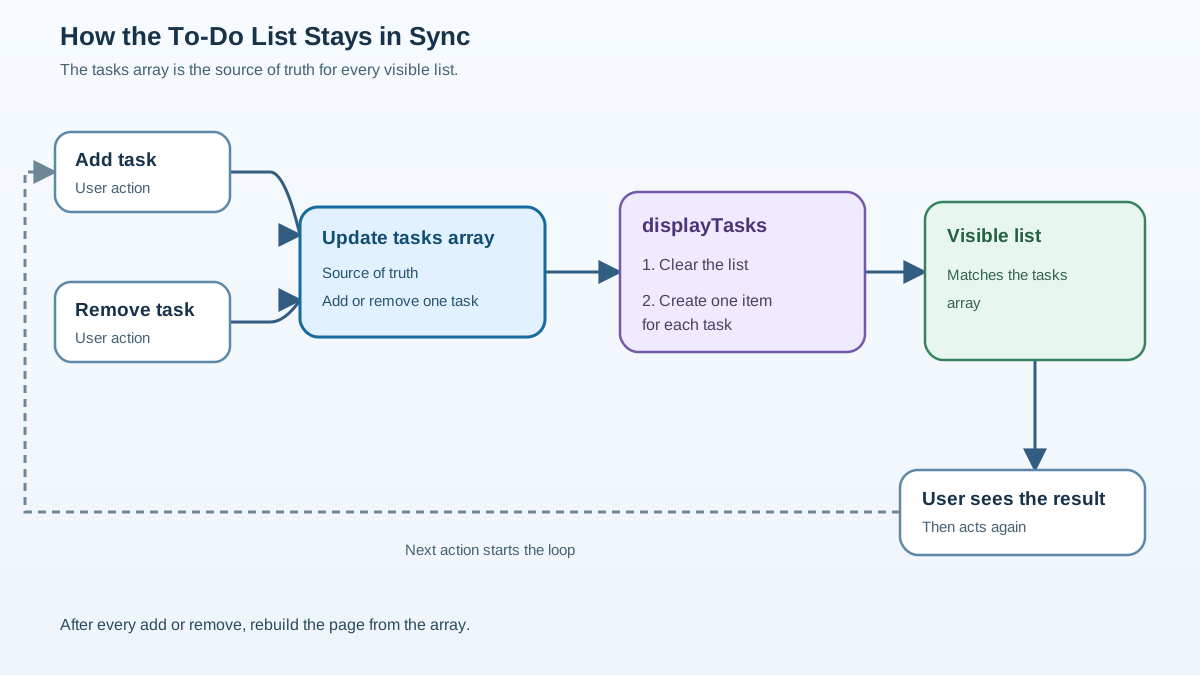
Here's the key idea that makes this app work: every time the array changes, rebuild the entire visible list from scratch.
This is called re-rendering. Instead of trying to surgically insert one new item into the page, you wipe the list clean and rebuild it from the array. The array is the source of truth; the page is just a reflection of it.
Add this function below addTask:
function displayTasks() {
  const list = document.getElementById("taskList");
  list.innerHTML = "";

  for (let i = 0; i < tasks.length; i++) {
    const li = document.createElement("li");
    li.textContent = tasks[i];
    list.appendChild(li);
  }
}
Here's what each part does:
list.innerHTML = ""clears the list. Any items currently shown are removed.- The
forloop visits every task in the array, one at a time. - For each task,
document.createElement("li")creates a new list item element. li.textContent = tasks[i]sets that item's text to the current task.list.appendChild(li)adds the item to the visible list on the page.
The loop is the heart of it: visit each task and turn it into a line on the page. If the array has three tasks, the loop runs three times and creates three list items.
After adding two tasks, the rendered page looks like:
- Buy groceries
- Walk the dog
This re-render approach might feel wasteful—why rebuild everything when you only added one item? But for a list this size, it's fast, simple, and nearly impossible to get wrong. The page always matches the array, because the page is built from the array every single time.
Knowledge check
Check your understanding
Answer this question before you continue.
Remove a Task
Adding tasks is only half the app. Now you need to let users remove them.
The tricky part: when the user clicks a remove button, how does JavaScript know which task to remove?
The answer is position. Every item in an array has an index—a number representing its position, starting at 0. The first task is at index 0, the second at index 1, and so on.
To remove an item at a specific position, use splice():
tasks.splice(index, 1);
splice() takes two arguments: where to start, and how many items to remove. So splice(1, 1) means "start at position 1 and remove one item." That removes the second task.
Now replace your current displayTasks() function with this version, which gives each list item its own remove button:
function displayTasks() {
  const list = document.getElementById("taskList");
  list.innerHTML = "";

  for (let i = 0; i < tasks.length; i++) {
    const li = document.createElement("li");
    li.textContent = tasks[i];

    const removeButton = document.createElement("button");
    removeButton.textContent = "Remove";
    removeButton.addEventListener("click", function () {
      removeTask(i);
    });

    li.appendChild(removeButton);
    list.appendChild(li);
  }
}
Each task now gets a Remove button next to it. When that button is clicked, it calls removeTask(i), passing the index of that specific task.
Here's the mechanism worth understanding: each time the loop runs, it creates a fresh button, and that button's click handler remembers the current value of i for that pass through the loop. The first button created remembers 0, the second remembers 1, and so on. Then, when you remove a task and re-render, the whole list is rebuilt from the updated array—so every button gets a fresh, correct index.
Now write the removeTask function. Add this below displayTasks:
function removeTask(index) {
  tasks.splice(index, 1);
  displayTasks();
}
Two lines. splice(index, 1) removes the task at that position from the array, and displayTasks() re-renders the list to match.
If the list shows "Buy groceries" and "Walk the dog," and the user clicks Remove next to "Buy groceries" (index 0), the array becomes ["Walk the dog"], and the page re-renders to show only that task.
This is why removing by position matters. If you tried to remove by matching the task text instead, you'd run into trouble when two tasks have the same text—say, "Call mom" and "Call mom." Which one should be removed? Position is unambiguous. Each task has its own index, so each remove button knows exactly which task it belongs to.
Knowledge check
Check your understanding
Answer this question before you continue.
Test Your Work
Once you've assembled all the pieces, open index.html in your browser and run through these checks:
- Type "Buy groceries" and click Add. The task appears in the list.
- Click Add with an empty input. Nothing happens—no blank items appear.
- Add a second task, then click Remove next to the first one. Only the second task remains.
If any of those steps fail, check the common mistakes below.
Common Beginner Mistakes
Every beginner hits these. Here's what they look like and how to fix them fast.
Mistake 1: Forgetting to re-render
Symptom: You click Add, the input clears, but nothing appears in the list. Or you click Remove, and the task stays on the page.
Cause: You updated the array but never called displayTasks(). The array changed, but the page didn't.
Fix: Make sure displayTasks() is the last line in both addTask() and removeTask(). The page only updates when you tell it to.
Mistake 2: Removing by text instead of position
Symptom: Removing a task deletes the wrong one, or removes all tasks with the same text.
Cause: You tried to find and remove a task by matching its text, like tasks.indexOf("Buy groceries"). If two tasks share the same text, this breaks.
Fix: Always remove by index. Each remove button should know its own position in the array, which is why the loop passes i to removeTask(i).
Mistake 3: Script placed before the HTML elements
Symptom: You get an error like Cannot read properties of null when the page loads.
Cause: Your <script> tag is in the <head> or at the top of the <body>. The script runs before the input and list elements exist, so document.getElementById() can't find them.
Fix: Move the <script> tag to the bottom of the <body>, after all your HTML elements. The elements will exist by the time the script runs.
Mistake 4: Duplicate code from copying snippets
Symptom: You get an error like Identifier 'tasks' has already been declared, or your remove buttons don't appear.
Cause: You pasted every code block into script.js without replacing the earlier versions. Remember: you only need one let tasks = []; line, and the second displayTasks() version replaces the first.
Fix: Compare your file against the structure below. You should have exactly one array declaration, one addTask, one displayTasks, one removeTask, and one event listener.
Your Complete Script
Here's what your full script.js should look like when assembled correctly:
let tasks = [];

function addTask() {
  const input = document.getElementById("taskInput");
  const text = input.value.trim();

  if (text === "") {
    return;
  }

  tasks.push(text);
  input.value = "";
  displayTasks();
}

function displayTasks() {
  const list = document.getElementById("taskList");
  list.innerHTML = "";

  for (let i = 0; i < tasks.length; i++) {
    const li = document.createElement("li");
    li.textContent = tasks[i];

    const removeButton = document.createElement("button");
    removeButton.textContent = "Remove";
    removeButton.addEventListener("click", function () {
      removeTask(i);
    });

    li.appendChild(removeButton);
    list.appendChild(li);
  }
}

function removeTask(index) {
  tasks.splice(index, 1);
  displayTasks();
}

document.getElementById("addButton").addEventListener("click", addTask);
If your file matches this, and your HTML has the script tag at the bottom of the body, the app should work.
Practice and Next Steps
You've built a working JavaScript to-do list. Before moving on, try these two challenges to make sure the pattern sticks:
Challenge 1: Add a "Clear All" button. Add a button that empties the entire list. You'll need to set tasks = [] and then call displayTasks(). That's it—two lines plus a button in your HTML.
Challenge 2: Block duplicate tasks. Before pushing a new task, check if it's already in the array. The includes() method can help: if (tasks.includes(text)) { return; }. This prevents the same task from being added twice.
When you're ready for the next step, the natural one is saving tasks so they survive a page refresh. Right now, refreshing the page wipes everything—the array lives only in memory. The browser's localStorage lets you save the array as text and load it back when the page opens. That's the feature that turns this from a demo into something you might actually use.
But here's what to notice first: the pattern you just built—events, arrays, and re-rendering—is the same core loop behind much larger apps. Big applications use more sophisticated tools to manage that loop, but the underlying idea is identical: user does something, data changes, the page updates to match. You've built that loop from scratch. Everything from here is a refinement of it.
Knowledge check
Final check
Finish the article by checking the ideas you just learned.
References
Research updated Sep 6, 2026


