Handling Click Events
You have a button on your page. You want something to happen when someone clicks it. That moment—when a static page starts responding—is where JavaScript…

Key topics
You have a button on your page. You want something to happen when someone clicks it. That moment—when a static page starts responding—is where JavaScript stops being a language you study and starts being a tool you use.
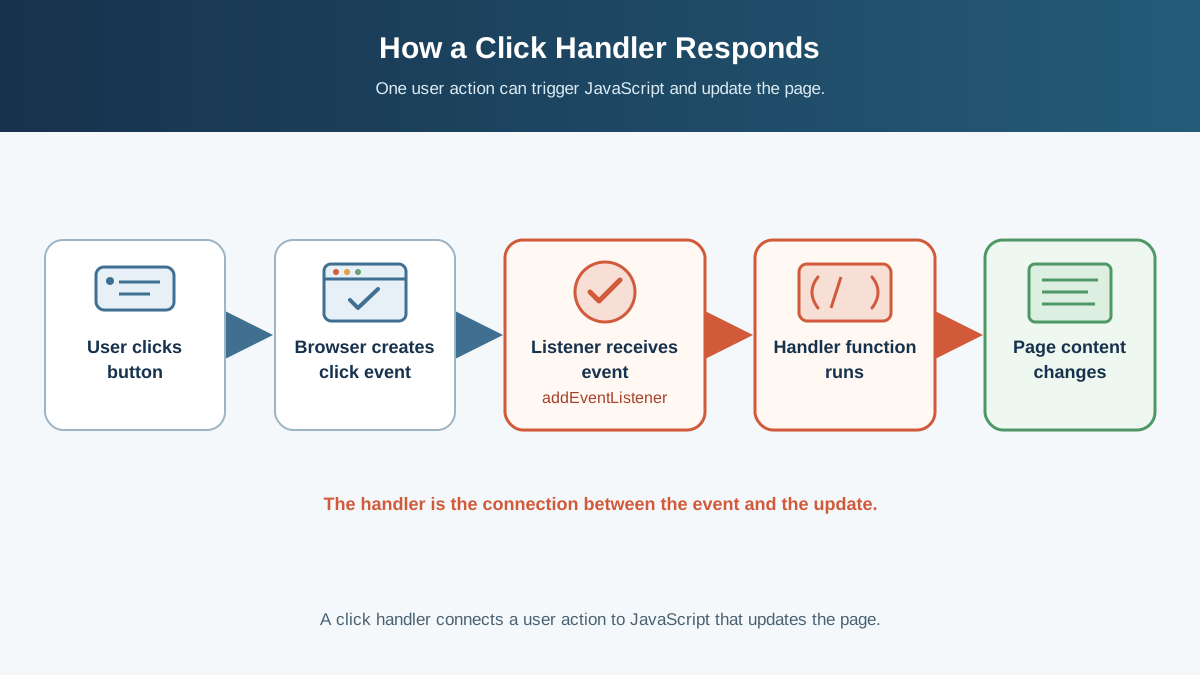
The core idea is simple: you register a function, and the browser calls it for you when the click happens. You don't have to watch for the click yourself. You just tell the browser, "When this button gets clicked, run this code." Then you get out of the way.
Let's build that from scratch.
What a Click Event Actually Is
When a user presses and releases a mouse button over an element—or taps it on a touchscreen, or presses Enter or Space while the button is focused—the browser sends a click event to that element.
Think of an event as a signal. The browser is saying, "Hey, this button just got clicked." Your JavaScript can listen for that signal and respond with a function.
You may already know from the introduction to events that events are how browsers report what's happening on the page. A click is one specific type of event. There are others—key presses, mouse movements, form submissions—but clicks are the one you'll reach for first, because they're the foundation of interactivity on the web.
Knowledge check
Check your understanding
Answer this question before you continue.
Your First Click Handler
Let's make it real. Create a new file called click.html, paste in the code below, save it, and open the file in your browser.
<!DOCTYPE html>
<html>
<body>
  <button id="my-button">Click me</button>
  <p id="message">Nothing happened yet.</p>

  <script>
    const button = document.getElementById("my-button");
    const message = document.getElementById("message");

    button.addEventListener("click", function () {
      message.textContent = "The button was clicked!";
    });
  </script>
</body>
</html>
When you open this page and click the button, the paragraph changes to "The button was clicked!"
Let's break down what's happening in that JavaScript:
document.getElementById("my-button")finds the button element in the page..addEventListener()is the method that registers your handler."click"is the event name you're listening for.- The function after it is what runs when the click happens.
That function is called a handler or event listener. It's just a regular function, but you're not calling it yourself. The browser calls it when the event fires.
Notice what you didn't write: no code that checks "is the button being clicked right now?" over and over. You registered a function and moved on. The browser handles the watching.
Knowledge check
Check your understanding
Answer this question before you continue.
The onclick Attribute vs. addEventListener
If you've looked at HTML code around the web, you've probably seen clicks handled a different way:
<button onclick="handleClick()">Click me</button>
This is the onclick attribute, and it works. But it comes with tradeoffs.
Here's the same button handled both ways. Both snippets assume the same page setup as before, with a <p id="message"> element. Run one approach at a time.
Using onclick in HTML:
<button onclick="changeText()">Click me</button>

<script>
  function changeText() {
    document.getElementById("message").textContent = "Changed!";
  }
</script>
Using addEventListener:
<button id="my-button">Click me</button>

<script>
  const button = document.getElementById("my-button");
  button.addEventListener("click", function () {
    document.getElementById("message").textContent = "Changed!";
  });
</script>
Both work. So which should you use?
| Approach | What it looks like | Strength | Weakness |
|---|---|---|---|
onclick attribute | onclick="myFunction()" in HTML | Quick to write | Mixes JavaScript into HTML; only one handler per element |
addEventListener | element.addEventListener("click", handler) in JavaScript | Keeps JavaScript separate; allows multiple handlers | Slightly more to type |
The onclick attribute has a real limitation: if you assign a second onclick to the same element, it replaces the first one. With addEventListener, you can attach multiple handlers to the same element, and they all run.
My rule is simple: start with addEventListener. It keeps your JavaScript in one place, it grows with you, and it's the pattern you'll see in modern code. The onclick attribute isn't wrong—you just won't need it once you're comfortable with the better default.
Knowledge check
Check your understanding
Answer this question before you continue.
Reading the Event Object
When a click fires, the browser doesn't just call your function with no context. It creates an event object full of details about what happened, and passes it to your handler as an argument.
You can accept that argument and use it:
button.addEventListener("click", function (event) {
  console.log(event.type);     // "click"
  console.log(event.target);   // the element that was clicked
});
The most useful property for beginners is event.target. It tells you which element was actually clicked. This matters more than you might think—if you have a button that contains an icon or a span, a click on the icon still counts as a click on the button. event.target shows you exactly what received the click.
button.addEventListener("click", function (event) {
  console.log("You clicked:", event.target);
});
You don't need to memorize the whole event API. Start with event.target, and add more properties when you have a specific question to answer.
Knowledge check
Check your understanding
Answer this question before you continue.
Common Beginner Mistakes
Every beginner hits these. Here's what goes wrong and how to fix it.
Mistake 1: Calling the function instead of passing it
// Wrong: this runs handleClick immediately, before any click
button.addEventListener("click", handleClick());

// Right: this passes the function, so the browser calls it on click
button.addEventListener("click", handleClick);
The difference is the parentheses. handleClick is the function itself. handleClick() is you calling it right now. You want to hand the function to the browser, not call it yourself.
Mistake 2: Script runs before the button exists
// Wrong: the script runs before the button is in the page
const button = document.getElementById("my-button");  // null!
button.addEventListener("click", handler);  // error!
If your script is in the <head> or runs before the button appears in the HTML, getElementById returns null, and you can't attach a listener to nothing.
The fix: put your script at the end of the <body>, after your HTML elements. That's why the examples in this article place the <script> tag after the button.
Mistake 3: Wrong event name
// Wrong: event names are case-sensitive
button.addEventListener("Click", handler);

// Right
button.addEventListener("click", handler);
The symptom is silent: no error, no warning, just nothing happening when you click. If your handler never fires, check the event name first.
Practice: Make a Button Do Something
Now it's your turn. Build a page with a button and a paragraph. When the button is clicked, the paragraph's text should change to something new.
Here's your starter HTML:
<!DOCTYPE html>
<html>
<body>
  <button id="change-button">Change the text</button>
  <p id="output">This text will change.</p>

  <script>
    // Your code goes here
  </script>
</body>
</html>
The expected behavior: click the button, and the paragraph reads something different.
Hint: Use addEventListener with the "click" event. Inside your handler, set textContent on the paragraph.
When you've got that working, try one small extension: make the button count how many times it's been clicked and display that number. You'll need a variable to keep track, and you'll update the paragraph each time.
let count = 0;

const button = document.getElementById("change-button");
const output = document.getElementById("output");

button.addEventListener("click", function () {
  count = count + 1;
  output.textContent = "Clicked " + count + " times";
});
Click it a few times. Watch the count climb. That's your first interactive page.
What's Next
You now have the core mental model: a click handler is just a function you register, and the browser calls it when the user clicks. That pattern extends far beyond buttons—the same addEventListener method handles keyboard presses, form submissions, mouse movements, and more.
The natural next step is to explore other event types, or to combine what you've learned about functions with events to build more interactive pages. But first, build that practice button. Run it. Break it. Fix it. That loop—write, click, observe, adjust—is how JavaScript starts feeling like your own.
Knowledge check
Final check
Finish the article by checking the ideas you just learned.
References
Research updated Sep 6, 2026


