
Handle Form Submissions with JavaScript
You fill out a form, hit submit, and the whole page jumps. Everything you typed is gone. The browser did what forms do by default: it sent the data and…

Key topics
You fill out a form, hit submit, and the whole page jumps. Everything you typed is gone. The browser did what forms do by default: it sent the data and loaded a fresh page.
But here's the thing: you can step in before that happens. The JavaScript form submit event is your moment to take control. Instead of letting the browser reload, you can read what the user typed, check it, and show feedback right on the page.
That's what we'll build together in this tutorial.
Why Your Form Reloads (and How to Stop It)
When you submit an HTML form, the browser's default behavior is to send the form data to a server and then navigate or reload the page. That's how forms have worked since the early web—the page goes away, and something new comes back.
Modern web apps often don't want that. They want to stay on the same page, check the input, and only send data if everything looks right.
That's where the submit event comes in. When a user tries to submit a form, the browser fires a submit event on the form element before it does its default reload. If your JavaScript is listening, you can intercept that moment, run your own code, and decide what happens next.
You already know how to select elements and attach event listeners from earlier tutorials. Now we'll put those skills together for a real-world task: handling a form submission without losing the page.
Here's our goal: build a small form where JavaScript reads what the user typed, checks that it's not empty, and shows a message on the page—all without a single reload.
Set Up a Simple Form to Test
Let's start with a minimal HTML form. We'll keep it to one text input so you can focus on the submit mechanism, not on form complexity.
Create a file called form-demo.html and add this:
<!DOCTYPE html>
<html lang="en">
<head>
  <meta charset="UTF-8">
  <title>Form Demo</title>
</head>
<body>
  <form id="signup-form">
    <label for="username">Username:</label>
    <input type="text" id="username" name="username">
    <button type="submit">Sign Up</button>
  </form>

  <p id="message"></p>

  <script>
    // Your JavaScript goes here
  </script>
</body>
</html>
A few things to notice:
- The
<form>has anid="signup-form"so JavaScript can find it. - The text input has an
id="username"so we can read its value later. - The
<p id="message">is empty for now. That's where we'll show our result. - The
<script>tag is at the bottom of the body, after the form elements.
If you open this file in a browser and click "Sign Up," the page will reload instantly. Nothing seems to happen because there's no server to send data to—but the reload still occurs. Let's fix that.
Listen for the Submit Event
To handle the submit event, we attach an event listener to the form element, not the button. This is a common beginner mistake, so let's be clear about why.
There are two ways a user can submit a form:
- Clicking the submit button.
- Pressing Enter while typing in a text field.
Both actions fire the same submit event on the form. If you attach your listener to the button, you'll catch the click but miss the Enter key. Attach it to the form, and you catch both.
Add this to your <script> tag:
const form = document.querySelector('#signup-form');

form.addEventListener('submit', function(event) {
  console.log('Form submitted!');
});
Save the file and open it in your browser. Open the developer console (right-click → Inspect → Console tab), then try both ways of submitting: click the button, and press Enter in the text field.
You should see "Form submitted!" in the console both times.
That's your JavaScript form submit event working. But you'll also notice the page still reloads. Let's stop that next.
Knowledge check
Check your understanding
Answer this question before you continue.
Stop the Page Reload with preventDefault()
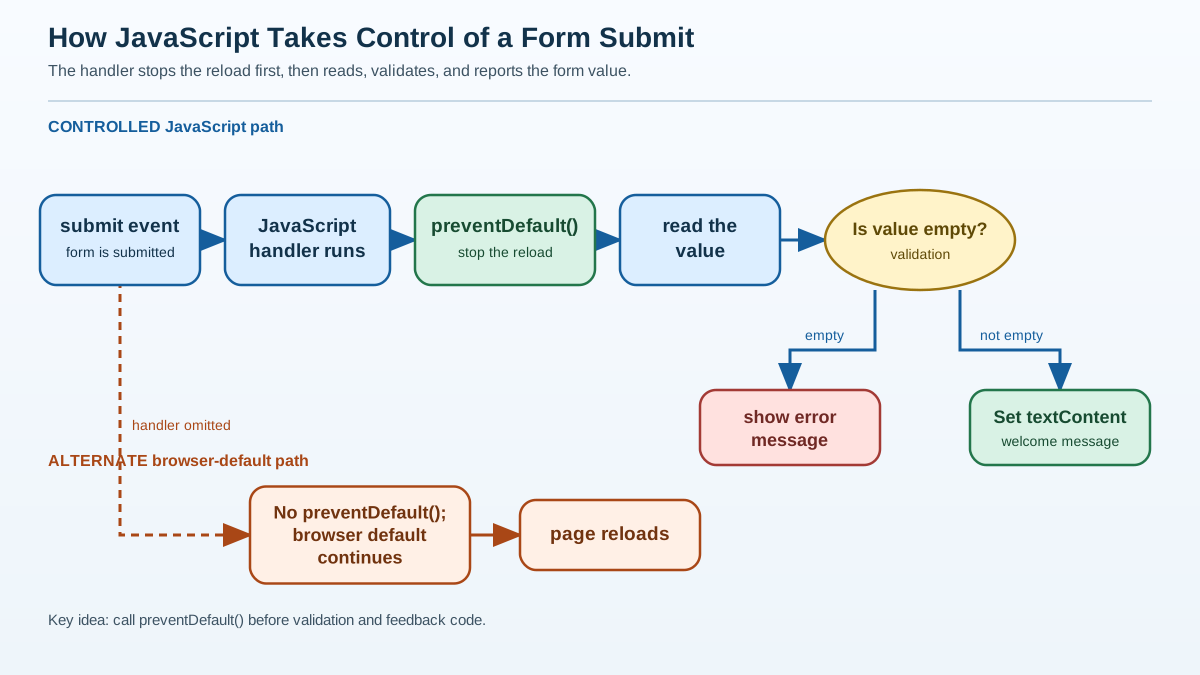
Here's the problem: our event handler runs, but the browser's default behavior still happens afterward. The page reloads, and any message we try to show gets wiped out instantly.
This is the single most common reason beginner form code "doesn't work." The code runs fine—but the reload erases the result before you can see it.
The fix is a method called preventDefault(). When the browser fires the submit event, it passes an event object to your handler. That object carries details about what happened, and it also has a way to cancel the default behavior.
Update your handler:
const form = document.querySelector('#signup-form');

form.addEventListener('submit', function(event) {
  event.preventDefault();
  console.log('Form submitted!');
});
Now try submitting again. The console message still appears, but the page stays perfectly still. No reload. No jump.
That's preventDefault() in action: it cancels the browser's default form submission so your code can take over. In practice, you'll use this whenever you want to validate input or send data with JavaScript instead of letting the browser handle it.
Knowledge check
Check your understanding
Answer this question before you continue.
Read What the User Typed
Now that the page stays put, we can actually do something useful. Let's read the text the user typed into the input field.
Every input element has a .value property that holds its current text. We select the input the same way we selected the form, then read .value:
const form = document.querySelector('#signup-form');
const usernameInput = document.querySelector('#username');

form.addEventListener('submit', function(event) {
  event.preventDefault();

  const username = usernameInput.value;
  console.log(username);
});
Type something in the field and submit. You'll see exactly what you typed appear in the console.
One important detail: .value always returns a string, even if the input looks like a number. If you had an input type="number" and the user typed 42, .value would give you the string "42", not the number 42. For our text input, that's fine—we just want to check whether the user typed anything at all.
Knowledge check
Check your understanding
Answer this question before you continue.
Validate a Simple Value
Reading the input is only half the job. The real reason to intercept form submission is to validate what the user typed before accepting it.
Let's add a simple rule: the username must not be empty. If it is, we'll show an error. If it's not, we'll show a success message.
const form = document.querySelector('#signup-form');
const usernameInput = document.querySelector('#username');

form.addEventListener('submit', function(event) {
  event.preventDefault();

  const username = usernameInput.value;

  if (username === '') {
    console.log('Error: username is required');
  } else {
    console.log('Success: welcome, ' + username + '!');
  }
});
This is the basic pattern behind the validation you see on real signup and contact forms:
- Read the input.
- Check it against a rule.
- Branch: show an error or accept the value.
Try submitting with an empty field, then with text. Watch the console in both cases.
The if/else structure is simple, but it's the same logic that powers much more complex validation. Once you understand this flow, you can extend it to check email formats, password lengths, or anything else.
Knowledge check
Check your understanding
Answer this question before you continue.
Show the Result on the Page
Console messages are great for testing, but your users will never see them. Let's display the result right on the page using that empty <p> element.
We'll use textContent to set the message. This is safer and simpler than innerHTML because it treats the content as plain text, not HTML. If a user typed <b>hello</b>, textContent would show it literally instead of rendering it as bold text.
Here's the complete working example:
<!DOCTYPE html>
<html lang="en">
<head>
  <meta charset="UTF-8">
  <title>Form Demo</title>
</head>
<body>
  <form id="signup-form">
    <label for="username">Username:</label>
    <input type="text" id="username" name="username">
    <button type="submit">Sign Up</button>
  </form>

  <p id="message"></p>

  <script>
    const form = document.querySelector('#signup-form');
    const usernameInput = document.querySelector('#username');
    const message = document.querySelector('#message');

    form.addEventListener('submit', function(event) {
      event.preventDefault();

      const username = usernameInput.value;

      if (username === '') {
        message.textContent = 'Error: username is required.';
      } else {
        message.textContent = 'Welcome, ' + username + '!';
      }
    });
  </script>
</body>
</html>
Save, refresh, and test both cases:
Case 1: Empty input
Click "Sign Up" without typing anything. The page stays still, and you'll see:
Error: username is required.
Case 2: Valid input
Type alex and submit. You'll see:
Welcome, alex!
No reload. No lost input. The page simply updates with feedback. That's the power of handling form submissions with JavaScript.
Common Beginner Mistakes to Avoid
If your form isn't behaving, check these three mistakes first. They account for nearly every beginner issue I've seen.
Mistake 1: Forgetting preventDefault()
Symptom: Your message flashes on screen for a split second, then disappears. Or you never see it at all.
Cause: The page reloads right after your handler runs, wiping out any changes you made.
Fix: Call event.preventDefault() as the first line inside your submit handler.
Mistake 2: Attaching the listener to the button
Symptom: Clicking the button works, but pressing Enter in the text field doesn't trigger your code.
Cause: The submit event fires on the form, not the button. A click listener on the button misses Enter-key submissions entirely.
Fix: Attach your listener to the form element:
form.addEventListener('submit', function(event) { ... });
Mistake 3: Running the script before the form exists
Symptom: You get an error like Cannot read properties of null and nothing works.
Cause: Your JavaScript runs before the browser has parsed the form HTML, so querySelector can't find the elements.
Fix: Place your <script> tag at the end of the <body>, after your form markup. That's why our example puts the script last.
Practice: Build Your Own Check
Now it's your turn to extend what we've built. Here are three challenges, in order of difficulty:
Challenge 1: Change the validation rule so the username must be at least 3 characters long. Hint: check username.length instead of comparing to an empty string.
Challenge 2: Add a second input field for an email address. Read both values on submit and show them both in the message.
Challenge 3: Temporarily remove event.preventDefault() and submit the form. Watch what happens to your message. Then add it back. This experiment will make the reload problem unforgettable.
When you're ready to go further, the natural next step is sending your validated data to a server. That's where real signup forms start to come alive—but you've already mastered the hardest part: taking control at the submit event and keeping the page in your hands instead of the browser's.
Knowledge check
Final check
Finish the article by checking the ideas you just learned.
References
Research updated Sep 6, 2026


