
JavaScript DOM Manipulation Practice Exercises
You have read about getElementById, textContent, createElement, and remove(). You understand what they do on paper. But understanding a method and feeling…

Key topics
You have read about getElementById, textContent, createElement, and remove(). You understand what they do on paper. But understanding a method and feeling it work are different things. The gap between them closes only one way: write code, run it in the browser, and watch the page respond.
That loop—write, run, observe, adjust—is the real skill. These JavaScript DOM exercises are designed to build it. Each task is small, has a visible before-and-after, and targets one core manipulation: selecting, reading, changing, creating, or removing elements. By the end, you will have turned memorized methods into reflexes.
Before You Start: What These Exercises Assume
These exercises assume you already know the basics:
- How to select an element with
getElementByIdorquerySelector - How to change text with
textContent - How to create elements with
createElementand add them withappendChild - How to remove elements with
remove() - How to respond to button clicks
If any of those feel shaky, review them first. This article is where you practice those skills, not where you first meet them.
How to Set Up Your Practice Page
Create a single HTML file. Each exercise gives you starter code to drop inside it. Here is the basic template:
<!DOCTYPE html>
<html>
<head>
  <meta charset="utf-8">
  <title>DOM Practice</title>
</head>
<body>
  <!-- Your exercise HTML goes here -->

  <script>
    // Your exercise JavaScript goes here
  </script>
</body>
</html>
Open the file in your browser. When you change the code, refresh the page and try again.
The Practice Loop
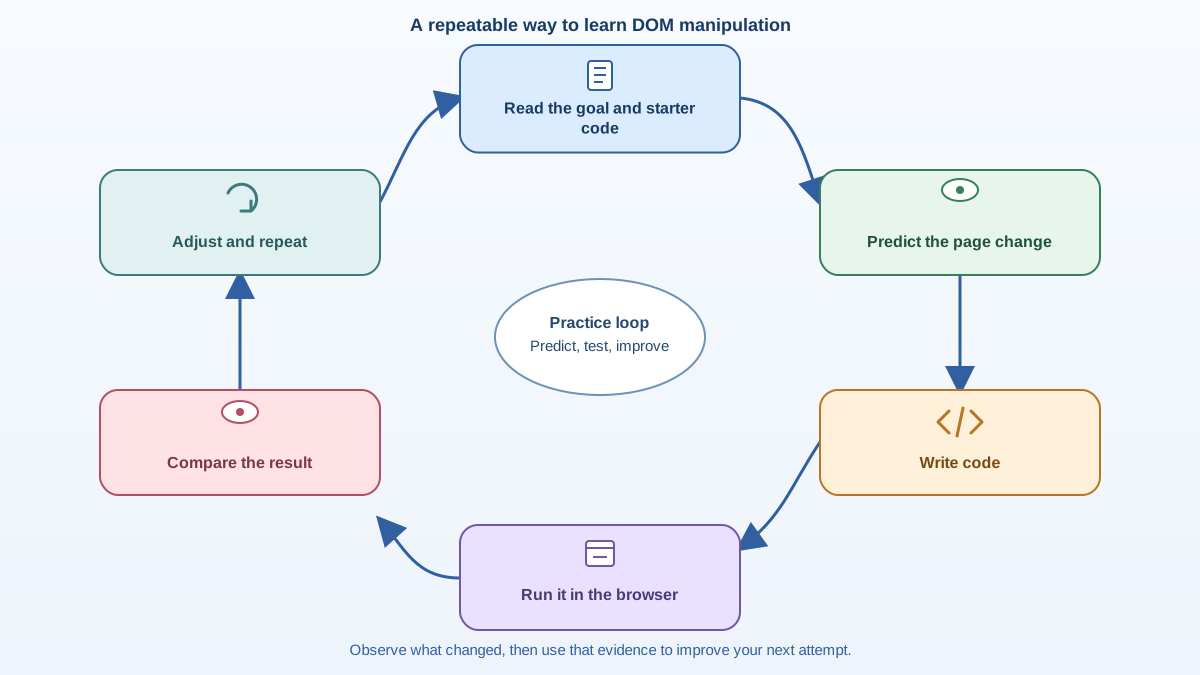
For each exercise, follow the same rhythm:
- Read the goal and the starter code.
- Predict what the page should look like before and after your code runs.
- Write your solution.
- Run it in the browser.
- Compare what you see with the expected behavior.
- If it does not work, read the hint, fix your code, and run it again.
Stop here and test before reading the solution. Copy only the starter code into your file first. Write your own attempt. Run it. Check the result against the expected behavior. Only then open the solution to compare approaches. The mistake you make and fix yourself will teach you more than the solution you read without trying.
Exercise 1: Read and Change Text on a Click
Goal: Make a button swap the text of a heading when clicked.
Starter code:
<h1 id="title">Hello</h1>
<button id="change-btn">Change Title</button>

<script>
  function changeTitle() {
    // Your code here
  }

  document.getElementById("change-btn").addEventListener("click", changeTitle);
</script>
Expected behavior: When you click the button, the heading text changes from "Hello" to something else, like "Goodbye".
Hint: You need two steps: grab the heading with getElementById, then set its textContent property.
Try it yourself before reading the solution.
Solution:
function changeTitle() {
  const title = document.getElementById("title");
  title.textContent = "Goodbye";
}
Why this works: getElementById("title") returns the heading element. Setting textContent replaces everything inside it with the new text. The addEventListener line at the bottom connects the button click to your function, so the change happens only when the user clicks.
Optional extension: Make the button toggle between "Hello" and "Goodbye". Each click should flip the text to the other value. A good approach is checking what the current text is, then setting it to the opposite.
Exercise 2: Read a Value and Update the Page
Goal: Let the user type a name into a text box, click a button, and see a personalized greeting appear.
Starter code:
<input type="text" id="name-input" placeholder="Enter your name">
<button id="greet-btn">Greet Me</button>
<p id="greeting"></p>

<script>
  function showGreeting() {
    // Your code here
  }

  document.getElementById("greet-btn").addEventListener("click", showGreeting);
</script>
Expected behavior: When the user types "Maria" and clicks the button, the paragraph shows "Hello, Maria!".
Hint: Read the input's value property, then build a greeting string and assign it to the paragraph's textContent.
Try it yourself before reading the solution.
Solution:
function showGreeting() {
  const nameInput = document.getElementById("name-input");
  const greeting = document.getElementById("greeting");
  const name = nameInput.value;
  greeting.textContent = "Hello, " + name + "!";
}
Why this works: This is the read-then-change pattern. First you read the input's value to get what the user typed. Then you change the paragraph's textContent to show the result.
Notice the two different properties at work here. value reads or changes what a form control contains—the text sitting inside the input box. textContent handles the text inside ordinary elements like p, h1, and li. Mixing them up is a common beginner stumble, so keep that rule handy: form controls use value; regular elements use textContent.
Optional extension: After the greeting appears, clear the input field by setting its value to an empty string: nameInput.value = "";.
Knowledge check
Check your understanding
Answer this question before you continue.
Exercise 3: Create Elements from a List
Goal: Turn an array of names into list items inside an empty unordered list.
Starter code:
<ul id="name-list"></ul>

<script>
  const names = ["Ada", "Grace", "Linus"];

  // Your code here
</script>
Expected behavior: When the page loads, the list shows three bullet points: Ada, Grace, and Linus.
Hint: Loop over the array. For each name, create an li element, set its textContent, and append it to the ul with appendChild.
Try it yourself before reading the solution.
Solution:
const names = ["Ada", "Grace", "Linus"];
const list = document.getElementById("name-list");

for (const name of names) {
  const listItem = document.createElement("li");
  listItem.textContent = name;
  list.appendChild(listItem);
}
Why this works: createElement("li") creates a new list item that exists only in memory. Setting textContent gives it text. appendChild attaches it to the list, and only then does it appear on the page. The loop repeats this create-then-append pattern for every name in the array.
Optional extension: Try a longer array with five or six names. Or add a class to each new item with listItem.className = "fancy-item"; and see how it changes the items.
Exercise 4: Remove an Element from the Page
Goal: Make a button remove a specific paragraph when clicked.
Starter code:
<p id="remove-me">This paragraph should disappear.</p>
<p>This paragraph should stay.</p>
<button id="remove-btn">Remove Paragraph</button>

<script>
  function removeParagraph() {
    // Your code here
  }

  document.getElementById("remove-btn").addEventListener("click", removeParagraph);
</script>
Expected behavior: Clicking the button removes only the first paragraph. The second paragraph stays on the page.
Hint: Select the paragraph with getElementById, then call .remove() on it.
Try it yourself before reading the solution.
Solution:
function removeParagraph() {
  const paragraph = document.getElementById("remove-me");
  paragraph.remove();
}
Why this works: The remove() method deletes the element from the page entirely. This is different from hiding it with CSS, which leaves the element in the document but makes it invisible. After remove(), the element is gone from the page structure completely.
Optional extension: Instead of removing a fixed paragraph, remove the element that was clicked. Give each paragraph a class, select them all, and attach a click listener to each one that removes itself.
Knowledge check
Check your understanding
Answer this question before you continue.
Exercise 5: Combine It All into a Small To-Do
Goal: Build a mini to-do list. Typing a task and clicking Add creates a list item. Clicking a task removes it.
This exercise combines everything you practiced. It also introduces one new idea: attaching a click listener to an element you just created. In Exercise 4, the listener was attached to a button that already existed in the HTML. Here, the listener goes on each new li the moment it is born.
Think of the task as two smaller subproblems:
- Create the item: read the input value, build an
li, append it to the list. - Give the new item behavior: attach a click listener to that
liso clicking it removes itself.
Starter code:
<input type="text" id="task-input" placeholder="Enter a task">
<button id="add-btn">Add Task</button>
<ul id="task-list"></ul>

<script>
  function addTask() {
    // Your code here
  }

  document.getElementById("add-btn").addEventListener("click", addTask);
</script>
Expected behavior: When the user types "Buy milk" and clicks Add, a list item appears with that text. Clicking the list item removes it from the list.
Hints:
- Read the input's
valueto get the task text. - Create an
lielement and set its text. - Append it to the list.
- To make the item removable, attach a click listener to the new item that removes it.
Try it yourself before reading the solution.
Solution:
function addTask() {
  const taskInput = document.getElementById("task-input");
  const taskList = document.getElementById("task-list");
  const task = taskInput.value;

  const listItem = document.createElement("li");
  listItem.textContent = task;
  listItem.addEventListener("click", function() {
    listItem.remove();
  });

  taskList.appendChild(listItem);
  taskInput.value = "";
}
Why this works: This exercise combines everything you practiced. You read a value from an input, create a new element, append it to the page, and attach behavior to it. The click listener on each new item is what makes it removable. Notice that the listener is attached to the item itself, not to a separate button, so each task manages its own removal.
Optional extension: Prevent empty tasks from being added. Before creating the list item, check if task is an empty string, and if it is, stop the function early.
Common Mistakes to Watch For
These are the mistakes beginners hit most often in DOM manipulation practice. If your code is not working, check these first.
Script runs before the page elements exist
If your script runs before the browser has read the HTML, getElementById returns null, and your code crashes.
Symptom: An error like "Cannot read properties of null."
Fix: Put your <script> tag at the end of the <body>, right before the closing tag. That way, the HTML above it has already loaded.
Forgetting to append a created element
createElement makes an element in memory, but it does not show up on the page until you append it somewhere.
Symptom: You created an element, set its text, and nothing appears.
Fix: Call appendChild on a parent element that is already on the page.
Knowledge check
Check your understanding
Answer this question before you continue.
Using innerHTML when textContent is safer
For plain text, textContent is the better choice. It treats the text as plain text. innerHTML parses the text as HTML, which can cause problems if the text contains characters like < or >.
Symptom: Text appears formatted strangely, or HTML tags show up as actual elements.
Fix: Use textContent when you are setting plain text.
Selecting the wrong element
A missing # in querySelector is a classic slip.
Symptom: querySelector("title") returns nothing because it looks for a <title> tag, not an element with id="title".
Fix: Use querySelector("#title") with the # for an id, or use getElementById("title").
Knowledge check
Check your understanding
Answer this question before you continue.
What to Practice Next
You have practiced the core loop: select, read, change, create, remove. The next natural step is changing how elements look.
Try restyling elements or toggling CSS classes in response to clicks. It uses the same select-and-change loop you just practiced, but instead of changing text, you change the element's appearance. That is where the page starts to feel alive.
Before you move on, try one more thing: rebuild Exercise 1 using querySelector instead of getElementById. Then rebuild Exercise 3 the same way. Getting comfortable with both selection methods will make you flexible when you meet code in the wild.
The skill that matters is not any single method. It is the loop: write code, run it in the browser, observe what changed, and adjust. Every DOM manipulation you will ever do follows that rhythm.
Here is your next task: take the to-do exercise and add a button that clears the entire list at once. You know how to select the list and how to remove elements. Figure out how to remove all of them in one click. That small variation will stretch exactly the muscles you just built.
Knowledge check
Final check
Finish the article by checking the ideas you just learned.
References
Research updated Sep 6, 2026


