
Creating and Removing Elements
A static HTML page is frozen the moment it loads. Real sites keep changing after that—a to-do item appears, a cart entry disappears, a new message slides…

Key topics
A static HTML page is frozen the moment it loads. Real sites keep changing after that—a to-do item appears, a cart entry disappears, a new message slides into a feed. That change is DOM manipulation: using JavaScript to grow and prune the page's structure while the user watches.
By the end of this tutorial, you'll know how to create DOM elements with JavaScript, add them to the page, and remove them again. You'll build a small to-do list that does all three.
Why Add and Remove Elements?
Think of your HTML document as a tree. The <html> tag is the trunk, and every nested tag is a branch. Text inside a tag is a leaf. When the page loads, that tree is fixed—the browser reads your HTML once and builds the structure.
JavaScript lets you change the tree after it's built. You can grow a new branch, attach it where you want it, or cut a branch off entirely.
This is how modern pages stay alive. A to-do app needs a new <li> every time you type a task. A shopping cart needs to drop an item when you click remove. A chat window needs to add messages as they arrive. None of that content exists in the original HTML—it's created on the fly by JavaScript.
You already know how to select elements and change their content. This article is the next step: creating whole new elements and removing ones that are already there.
Creating an Element with createElement
The first step is creating an element in memory. The method is document.createElement(), and it takes one argument: the tag name you want to create.
const newParagraph = document.createElement("p");
At this point, newParagraph exists only in JavaScript's memory. It is not on the page. If you open your browser, you won't see anything new.
That's an important mental model: create first, then attach. A newly created element is like a seedling in a pot—it's alive, but it won't appear in your garden until you plant it.
A new element is also empty. It has no text, no children, no content. It's just a pair of invisible tags waiting for something to fill them.
Knowledge check
Check your understanding
Answer this question before you continue.
Adding Content to a New Element
To give your new element something to say, use textContent.
const newParagraph = document.createElement("p");
newParagraph.textContent = "Hello from JavaScript!";
Now newParagraph is a <p> tag with the text "Hello from JavaScript!" inside it. Still not on the page—but it's ready.
You might also see innerHTML used for this. It works, but textContent is the safer default. It treats everything as plain text, so you don't have to worry about accidentally injecting HTML. For a beginner, plain text is almost always what you want.
Knowledge check
Check your understanding
Answer this question before you continue.
Placing the Element on the Page with appendChild
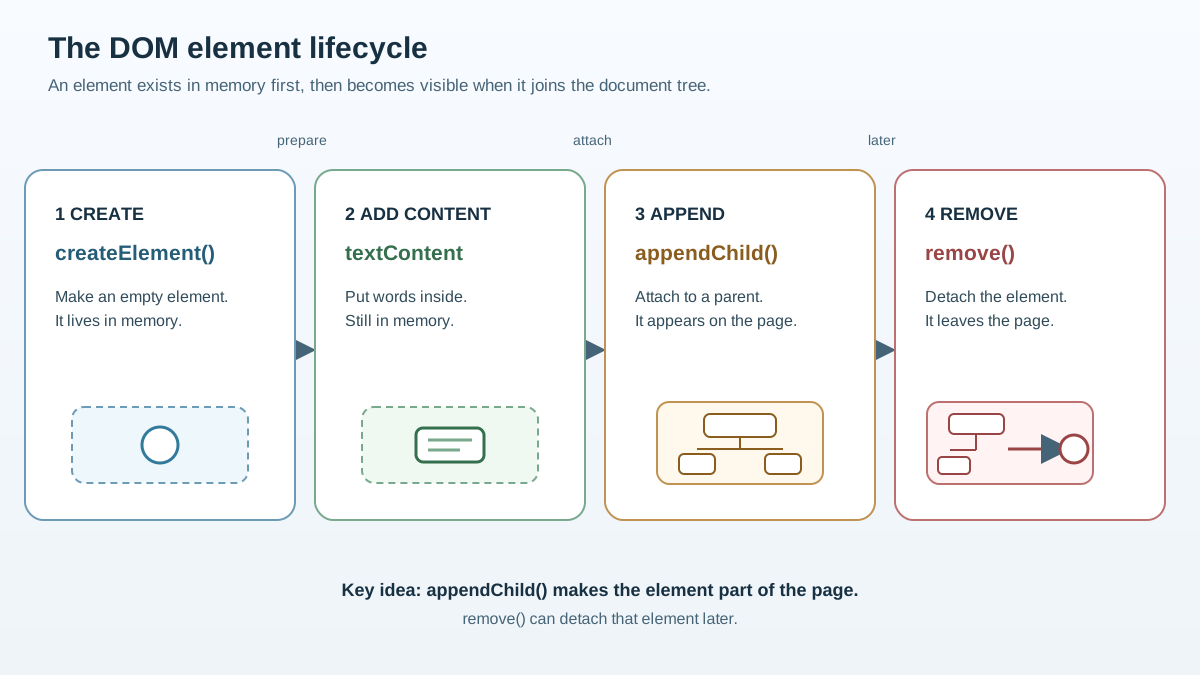
Now for the planting step. To make your element appear, you need to attach it to an existing element in the page. The method is appendChild(), and you call it on the parent element you want to add to.
const newParagraph = document.createElement("p");
newParagraph.textContent = "Hello from JavaScript!";

const container = document.getElementById("container");
container.appendChild(newParagraph);
Here's the full picture:
<!DOCTYPE html>
<html>
<body>
  <div id="container">
    <p>Original content</p>
  </div>

  <script>
    const newParagraph = document.createElement("p");
    newParagraph.textContent = "Hello from JavaScript!";

    const container = document.getElementById("container");
    container.appendChild(newParagraph);
  </script>
</body>
</html>
When you load this page, the <div> will contain two paragraphs:
Original content
Hello from JavaScript!
Notice where the new element landed: at the end. appendChild() always adds the new element as the last child of its parent. If you need to place an element somewhere specific, there's a method called insertBefore() that lets you choose a position—but for now, remember that appendChild() means "add to the end."
Knowledge check
Check your understanding
Answer this question before you continue.
Removing an Element from the Page
Removing an element is simpler than creating one, and there are two ways to do it.
The Modern Way: remove()
The remove() method is direct. You call it on the element itself, and it disappears from the page.
const unwanted = document.getElementById("unwanted");
unwanted.remove();
That's it. No need to find the parent, no extra steps. The element is gone.
Knowledge check
Check your understanding
Answer this question before you continue.
The Older Way: removeChild()
The removeChild() method requires two things: the parent element and the child you want to remove. You call removeChild() on the parent, passing the child as an argument.
const parent = document.getElementById("container");
const child = document.getElementById("unwanted");
parent.removeChild(child);
Why would you ever use the longer version? Because removeChild() has been around longer and appears in older code and documentation. You'll still see it in tutorials, forums, and codebases that haven't been updated. It's worth recognizing even if you prefer remove() in your own code.
Here's a quick comparison:
| Method | What you need | Syntax | When to use it |
|---|---|---|---|
remove() | Just the element | element.remove() | Modern code; simplest option |
removeChild() | The parent and the child | parent.removeChild(child) | Older code; when you already have the parent |
One useful trick: if you have the child but not the parent, you can use the child's parentNode property to find it.
const child = document.getElementById("unwanted");
child.parentNode.removeChild(child);
This is a common pattern in older code, and it works because every element knows who its parent is.
Common Beginner Mistakes
These mistakes show up constantly. Here's what they look like and how to recover.
Forgetting to Append
The most common mistake is creating an element and never attaching it.
const newParagraph = document.createElement("p");
newParagraph.textContent = "Where am I?";
// No appendChild() call—nothing appears on the page
The element exists in memory, but it's not in the document. If nothing shows up, check that you called appendChild().
Trying to Remove Without Selecting
You can't remove an element you haven't found yet.
// This will fail—there's no variable called "item"
item.remove();
You need to select the element first, using something like getElementById() or querySelector(), then remove it.
Calling removeChild on the Wrong Parent
removeChild() throws an error if the element you're trying to remove isn't actually a child of the parent you specified.
const wrongParent = document.getElementById("other-container");
const child = document.getElementById("unwanted");
wrongParent.removeChild(child); // Error: child is not a child of wrongParent
The error message will tell you exactly what went wrong. Read it, check your parent and child variables, and try again.
Re-Creating Instead of Reusing
If you create a new element every time you need to update something, you'll end up with duplicates or lose track of what you're modifying.
// Bad: creates a new element every click
function addMessage() {
  const message = document.createElement("p");
  message.textContent = "New message";
  document.body.appendChild(message);
}
This actually works for adding messages—but if you meant to update one specific element, you'd be creating a new one each time instead of changing the one that exists. Keep a reference to elements you plan to reuse.
Practice: Build a Simple To-Do List
Let's put it all together. You'll build a page with a text input, an "Add" button, and a list. When you click the button, a new list item appears. Each item has its own "Remove" button.
Here's the starter code:
<!DOCTYPE html>
<html>
<body>
  <input type="text" id="task-input" placeholder="Enter a task">
  <button id="add-button">Add Task</button>
  <ul id="task-list"></ul>

  <script>
    const input = document.getElementById("task-input");
    const addButton = document.getElementById("add-button");
    const taskList = document.getElementById("task-list");

    addButton.addEventListener("click", function () {
      const taskText = input.value.trim();
      if (taskText === "") return;

      const listItem = document.createElement("li");
      listItem.textContent = taskText;

      const removeButton = document.createElement("button");
      removeButton.textContent = "Remove";
      removeButton.addEventListener("click", function () {
        listItem.remove();
      });

      listItem.appendChild(removeButton);
      taskList.appendChild(listItem);

      input.value = "";
    });
  </script>
</body>
</html>
Here's what happens step by step:
- You type a task and click "Add Task."
- The script reads the input, creates a new
<li>, and gives it the task text. - It creates a "Remove" button, attaches a click handler that removes the list item, and adds the button to the list item.
- It appends the finished list item to the
<ul>. - The input clears, ready for the next task.
Type a few tasks, add them, then remove them. Watch the list grow and shrink. That's the whole skill: create, attach, remove.
If you want to extend it, try adding a checkbox to each item, or a way to mark tasks as complete. You could also prevent duplicate tasks or add a counter that shows how many tasks remain.
Your Next Step
Run the to-do list example and make it your own. Add a few tasks. Remove them. Break it on purpose and read the error message—that's how the mechanism becomes familiar.
From here, the natural next direction is handling user events more deeply, or updating content dynamically as users interact with your page. The pattern you just learned—create, attach, remove—is the foundation for all of it.
Knowledge check
Final check
Finish the article by checking the ideas you just learned.
References
Research updated Sep 6, 2026


