
Selecting DOM Elements
You cannot change an element you cannot reach. Every update, style change, and click response on a web page starts with one act of finding. JavaScript…

Key topics
You cannot change an element you cannot reach. Every update, style change, and click response on a web page starts with one act of finding. JavaScript gives you a set of finders that locate elements in the page's DOM tree, and choosing the right one depends on what you already know about the element you want.
See Selection Work First
Before we tour the methods, let me show you the payoff. Create a file named select-demo.html with this content:
<!DOCTYPE html>
<html lang="en">
<head>
  <meta charset="UTF-8">
  <title>Selection Demo</title>
</head>
<body>
  <h1 id="page-title">Welcome</h1>
  <script>
    const title = document.getElementById('page-title');
    title.textContent = 'Hello there!';
  </script>
</body>
</html>
Open that file in your browser. The heading will read "Hello there!" instead of "Welcome."
That is the whole loop: find the element, hold onto it, change it. The script grabbed the h1 by its id, stored it in a variable, and used that reference to update what the page displays.
If you want to inspect values while you work, open your browser's Developer Tools (right-click the page and choose Inspect, then find the Console tab). Any console.log output in the examples below will appear there.
Why Selection Comes First
If you have read about the DOM, you know it is the browser's tree of page elements. Every heading, paragraph, button, and list item lives somewhere in that tree. But knowing the tree exists is not the same as being able to grab a branch.
Here is the core rule: to change, style, or respond to an element, you must first grab a reference to it in JavaScript. You cannot tell JavaScript to update a paragraph if JavaScript does not know which paragraph you mean.
Different selection methods exist because you might know different things about the element you want. Sometimes you know its unique id. Sometimes you know its class. Sometimes you only know that it is the first paragraph inside a specific section. Each method matches a different kind of knowledge.
Let us set up a slightly larger page that we will reuse throughout this tutorial:
<!DOCTYPE html>
<html lang="en">
<head>
  <meta charset="UTF-8">
  <title>My Page</title>
</head>
<body>
  <h1 id="page-title">Welcome</h1>
  <p class="intro">This is the introduction.</p>
  <p class="intro">This is the second paragraph.</p>
  <ul id="todo-list">
    <li>Learn JavaScript</li>
    <li>Practice DOM selection</li>
  </ul>
</body>
</html>
Keep this page in mind. Every example below will reach into this small tree and pull out a different piece.
Selecting One Element by ID with getElementById
The simplest way to select a single element is by its id attribute. An id is meant to be unique on a page, which makes it a reliable handle for grabbing one specific element.
The syntax is straightforward:
const title = document.getElementById('page-title');
console.log(title);
When you run this in the browser console, you should see the element itself:
<h1 id="page-title">Welcome</h1>
The variable title now holds a reference to that h1 element. You already saw the proof earlier: assign new text to title.textContent, and the page updates.
One important warning: if no element with that id exists, getElementById returns null. That is the browser's way of saying, "I looked everywhere and found nothing." You will see this often while learning, and it is almost always a typo or a timing issue.
Knowledge check
Check your understanding
Answer this question before you continue.
Selecting with querySelector and CSS Selectors
getElementById is great when you know an id. But what if you want to find an element by its class, or by its tag name, or by some combination of conditions?
That is where querySelector comes in. This method accepts any CSS selector, which means it works the same way CSS does when you style a page. You already know these patterns from writing stylesheets: # for id, . for class, and a plain name for a tag.
Here is how you select the first paragraph with the class intro:
const firstIntro = document.querySelector('.intro');
console.log(firstIntro);
Expected output:
<p class="intro">This is the introduction.</p>
Notice what happened: there are two paragraphs with the class intro, but querySelector returned only the first one. That is a deliberate design choice. The method always returns the first matching element in the document, never a list.
You can also select by tag name:
const firstListItem = document.querySelector('li');
console.log(firstListItem);
Expected output:
<li>Learn JavaScript</li>
And you can combine selectors to be more specific:
const firstTodo = document.querySelector('#todo-list li');
console.log(firstTodo);
This says: find the li that lives inside the element with id="todo-list". The result is the same first list item, but the selector is now precise about where to look.
Like getElementById, querySelector returns null when nothing matches. If you misspell a class name or forget the . prefix, you will get null instead of an element.
Knowledge check
Check your understanding
Answer this question before you continue.
Selecting Multiple Elements
Sometimes one element is not enough. You want every paragraph with a certain class, or every item in a list, so you can update them all at once.
For that, use querySelectorAll. It works like querySelector, but it returns every matching element instead of just the first one:
const allIntros = document.querySelectorAll('.intro');
console.log(allIntros);
Expected output:
NodeList(2) [p.intro, p.intro]
A NodeList is a list-like collection of elements. It is not a single element, and it is not quite an array either. You can check how many elements it contains and access individual items by index:
const allIntros = document.querySelectorAll('.intro');
console.log(allIntros.length);
console.log(allIntros[0]);
Expected output:
2
<p class="intro">This is the introduction.</p>
The index starts at 0, just like arrays. The first matching element is at index 0, the second at index 1, and so on.
Here is the boundary that trips up most beginners: a single element has properties like textContent. A collection does not. If you want to change every paragraph in a group, you must visit each element and change it individually.
const allIntros = document.querySelectorAll('.intro');
allIntros.forEach(function(paragraph) {
  paragraph.textContent = 'Updated paragraph';
});
After this runs, both paragraphs on the page read "Updated paragraph." The pattern is: select the group, visit each element, change the current element.
There are two older methods that do similar work: getElementsByClassName selects elements by class name, and getElementsByTagName selects by tag name.
const introParagraphs = document.getElementsByClassName('intro');
const listItems = document.getElementsByTagName('li');
Both return a collection called an HTMLCollection. For beginners, the practical difference between a NodeList and an HTMLCollection rarely matters. What matters is this: these methods return collections, not single elements. You cannot change the text of all of them at once with one assignment. You need to loop over them or access them one by one.
My advice is to make querySelectorAll your default for multiple elements. It uses the same CSS selector syntax as querySelector, so you only need to learn one selector language. The older methods still work, but they do not earn extra attention until you meet a specific need for them.
Knowledge check
Check your understanding
Answer this question before you continue.
Which Method Should You Use?
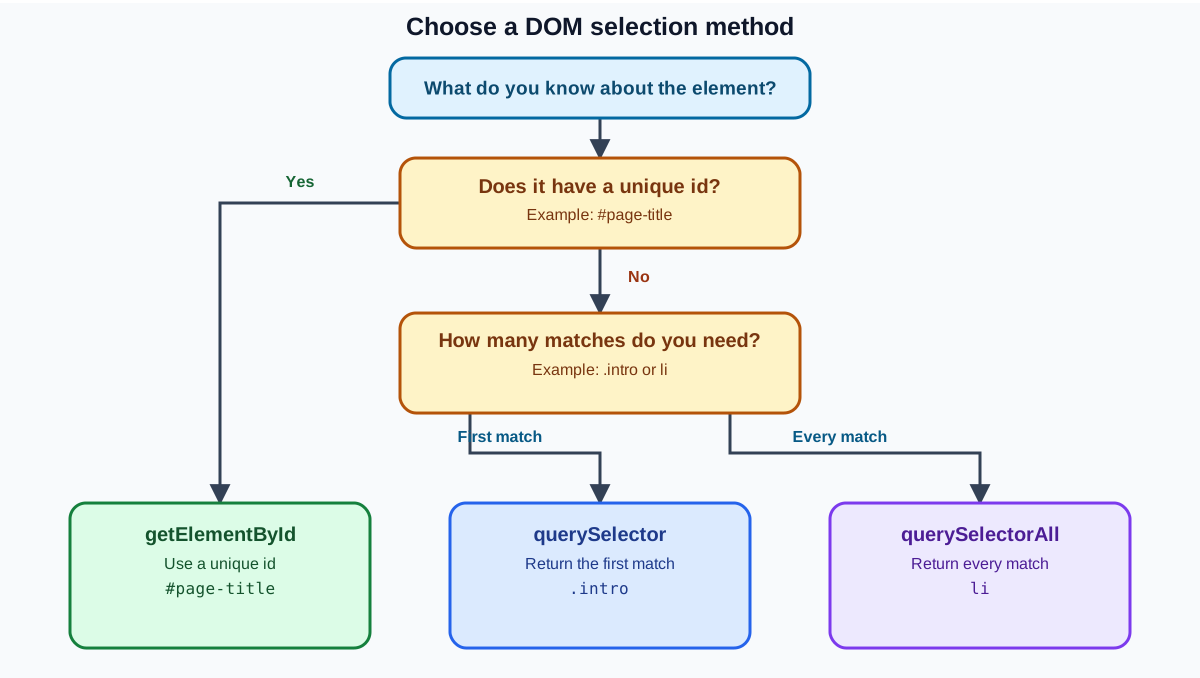
When you are new to DOM selection, the number of methods can feel overwhelming. Here is a simple comparison to cut through the noise:
| Method | What it selects | What it returns | Use this when |
|---|---|---|---|
getElementById('id') | One element by its unique id | A single element or null | You know the element's id |
querySelector('selector') | The first element matching any CSS selector | A single element or null | You know a class, tag, or combination selector |
querySelectorAll('selector') | Every element matching a CSS selector | A NodeList collection | You want all matches and plan to loop over them |
getElementsByClassName('class') | Every element with a given class | An HTMLCollection | You only need class-based selection |
getElementsByTagName('tag') | Every element with a given tag | An HTMLCollection | You want all elements of one tag type |
The decision rule is simple:
- Know the unique
id? UsegetElementById. - Need the first match of any CSS selector? Use
querySelector. - Need every match? Use
querySelectorAll.
Master getElementById and querySelector first. Those two will handle most of what you do as a beginner. Add querySelectorAll when you need to work with groups of elements, which will happen as soon as you start building lists, menus, or any repeated content.
Knowledge check
Check your understanding
Answer this question before you continue.
Common Beginner Mistakes
Every JavaScript developer has hit these walls. Here is what they look like and how to climb over them.
Mistake 1: Running the selection before the HTML loads
If your script runs before the browser has finished reading your HTML, the elements do not exist yet. Your selection returns null, and you stare at the console wondering why your perfectly spelled id is not being found.
The symptom:
null
The quick fix: place your <script> tag at the end of the <body>, right before the closing tag. By then, the browser has already parsed all your HTML, and your elements exist. That is why every example in this tutorial puts the script at the bottom of the page.
Mistake 2: Treating a collection like a single element
You select multiple elements with querySelectorAll, then try to change them all at once:
const paragraphs = document.querySelectorAll('.intro');
paragraphs.textContent = 'New text'; // This will not work
A NodeList does not have a textContent property. Each individual element inside it does. You need to loop through the collection or access items by index.
The symptom: nothing changes, or you get an error like Cannot set properties of undefined.
The quick fix: loop over the collection.
const paragraphs = document.querySelectorAll('.intro');
paragraphs.forEach(function(paragraph) {
  paragraph.textContent = 'New text';
});
Mistake 3: Typos and missing prefixes
A typo in an id or class name returns null silently. Worse, forgetting the . or # prefix in querySelector makes the browser interpret your selector as a tag name.
The symptom: null when you expected an element, or the wrong element coming back.
The quick fix: check your spelling, and remember the prefixes. # means id, . means class, and no prefix means tag name.
Here is the mindset that will save you hours: a null result is not a failure. It is the browser telling you the element was not found. Read that message, check your selector, and try again. Debugging is part of learning, not a detour from it.
Practice: Select Elements on Your Own Page
Time to make this stick. Create a new HTML file with this content:
<!DOCTYPE html>
<html lang="en">
<head>
  <meta charset="UTF-8">
  <title>Practice Page</title>
</head>
<body>
  <h1 id="main-heading">My Practice Page</h1>
  <p class="description">First paragraph.</p>
  <p class="description">Second paragraph.</p>
  <ul>
    <li>Item one</li>
    <li>Item two</li>
    <li>Item three</li>
  </ul>
  <script>
    // Your selections go here
  </script>
</body>
</html>
Now write JavaScript inside the <script> tag that does the following:
- Select the heading by its
idand log it to the console. - Select the first paragraph with the class
descriptionand log it. - Select all list items and log the collection.
Your console should show the h1, the first p.description, and a NodeList with three li elements.
When you have all three selections working, take one more step: change the text of the heading to prove your selection actually reached it.
const heading = document.getElementById('main-heading');
heading.textContent = 'Selection works!';
If the heading on your page changes, you have completed the full loop. You found an element, held onto it, and changed it.
Now that you can select elements, the natural next move is learning to change their content or respond to user actions. Selection is the doorway; modification and events are the rooms beyond it. Pick one of those next, and keep building.
Knowledge check
Final check
Finish the article by checking the ideas you just learned.
References
Research updated Sep 6, 2026


