
Practical DOM Examples
You have learned how to select elements, change their content, update their styles, and create new elements from scratch. Each of those skills makes sense…

Key topics
You have learned how to select elements, change their content, update their styles, and create new elements from scratch. Each of those skills makes sense on its own. This article is where they stop being separate facts and start working together.
We are going to build three small, runnable projects. Each one combines the DOM skills you already know into something that actually does a job in the browser. By the end, you will have written code that responds to clicks, hides and shows content, and builds new page elements on demand.
What You'll Build and What You Need First
This is a practice article, not a new theory lesson. You will be combining skills from earlier tutorials:
- Selecting elements with
querySelectororgetElementById - Changing text with
textContent - Updating styles with
classListor thestyleproperty - Creating and removing elements with
createElementandappend
If you need a refresher on creating elements, go back to the Creating and Removing Elements lesson before starting. The projects here assume you can already do each individual step. What they teach is how to chain those steps together.
Here is what you will build:
- A button that changes its own text — practices selecting, listening for clicks, and updating content.
- A message that appears and disappears — practices toggling visibility and updating styles.
- Add items to a list — practices creating elements, appending them, and clearing an input.
Setting Up Your Practice Files
Each project below is self-contained. The starter HTML and the solution include everything that project needs, and the projects are designed to be run one at a time.
The simplest approach: create one HTML file per project. Name them something like project1.html, project2.html, and project3.html. Open whichever one you are currently practicing in your browser.
If you prefer to use a single file, replace the previous project's content when you move to the next one. Do not paste all three projects into the same file. They use the same element ids in places, and combining them can cause confusing behavior that has nothing to do with the skill you are practicing.
Use this as your starting skeleton for each file:
<!DOCTYPE html>
<html lang="en">
<head>
  <meta charset="UTF-8">
  <title>DOM Practice</title>
</head>
<body>
  <!-- Your project HTML goes here -->

  <script>
    // Your JavaScript goes here
  </script>
</body>
</html>
The script tag sits at the end of the body. That way, the browser has already created all the elements on the page before your JavaScript runs. Save the file, open it in your browser, and you are ready to practice.
Project 1: A Button That Changes Its Own Text
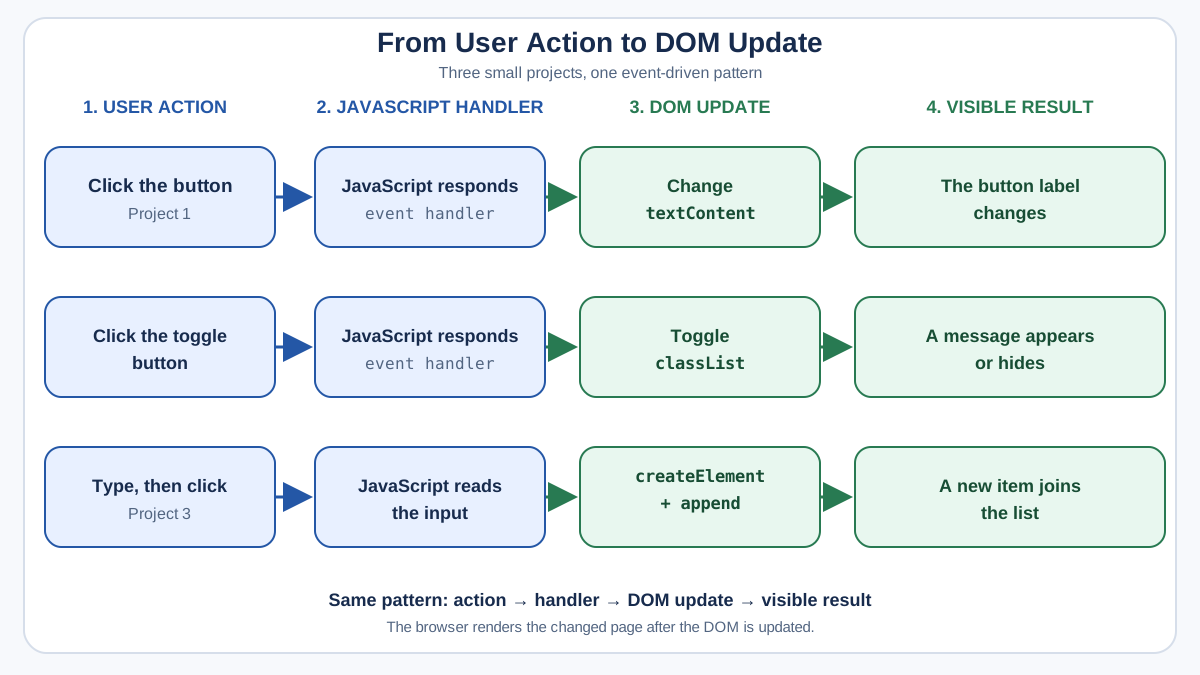
Goal: Click a button and watch its label change.
This is the smallest possible win: one element, one click, one change. It proves you can connect a user action to a DOM update.
Starter HTML
<button id="action-button">Click me</button>
Expected Behavior
When you load the page, the button reads "Click me." When you click it, the label changes to "You clicked me!" That is the entire project.
Hint
You need three steps: grab the button with getElementById, attach a click listener with addEventListener, and update the button's textContent inside the listener.
The Solution
<button id="action-button">Click me</button>

<script>
  const button = document.getElementById("action-button");

  button.addEventListener("click", () => {
    button.textContent = "You clicked me!";
  });
</script>
How It Works
The first line selects the button and stores a reference to it in the button variable. The second line tells the browser: "When this button gets clicked, run this function." Inside that function, textContent replaces the button's current label with the new one.
Notice that we used textContent, not innerHTML. For plain text, textContent is the safe choice. It treats the string as text, not as HTML. If you ever set textContent to something a user typed, it cannot accidentally break your page or create a security hole. innerHTML parses strings as HTML, which is powerful but risky. For labels, messages, and user input, make textContent your default.
Knowledge check
Check your understanding
Answer this question before you continue.
Optional Extension
Make the button toggle between two labels. Each click flips it to the other one. A simple way is to check the current label and choose the opposite:
button.addEventListener("click", () => {
  if (button.textContent === "Click me") {
    button.textContent = "You clicked me!";
  } else {
    button.textContent = "Click me";
  }
});
Project 2: A Message That Appears and Disappears
Goal: A button that shows or hides a paragraph, and changes its own label to match.
This project adds styling to the mix. You are not just changing text anymore. You are controlling whether an element is visible at all.
Starter HTML
<p id="message" class="hidden">This is a secret message.</p>
<button id="toggle-button">Show message</button>
Add this small CSS rule inside a <style> tag in your <head>:
.hidden {
  display: none;
}
Expected Behavior
When the page loads, the message is invisible. The button reads "Show message." Click it once, and the message appears while the button changes to "Hide message." Click again, and the message disappears while the button changes back.
Knowledge check
Check your understanding
Answer this question before you continue.
Hint
The classList.toggle method adds a class if it is missing and removes it if it is present. That is exactly the on-off behavior you want.
The Solution
<style>
  .hidden {
    display: none;
  }
</style>

<p id="message" class="hidden">This is a secret message.</p>
<button id="toggle-button">Show message</button>

<script>
  const message = document.getElementById("message");
  const toggleButton = document.getElementById("toggle-button");

  toggleButton.addEventListener("click", () => {
    message.classList.toggle("hidden");

    if (message.classList.contains("hidden")) {
      toggleButton.textContent = "Show message";
    } else {
      toggleButton.textContent = "Hide message";
    }
  });
</script>
How It Works
The hidden class applies display: none, which removes the element from the page layout entirely. When you toggle that class on and off, the element appears and disappears cleanly.
Why use a class instead of inline styles? Imagine you set message.style.display = "none" directly in JavaScript. Later, you want to change how the message is hidden, maybe with a fade-out animation. You would have to find and update that JavaScript line. With a class, you only change the CSS rule, and every place that toggles the class automatically uses the new behavior. Keeping styles in CSS and using JavaScript to flip classes is a cleaner separation.
Optional Extension
Change the message color each time it appears. You can pick from a small array of colors and cycle through them:
const colors = ["tomato", "steelblue", "seagreen"];
let colorIndex = 0;

// Inside the click listener, after showing the message:
message.style.color = colors[colorIndex];
colorIndex = (colorIndex + 1) % colors.length;
Project 3: Add Items to a List
Goal: Type into an input, click a button, and see the item appear in a list.
This is the project where everything comes together. You read a value, create a new element, add it to the page, and clear the input for the next entry.
Starter HTML
<input type="text" id="item-input" placeholder="Type something...">
<button id="add-button">Add item</button>
<ul id="item-list"></ul>
Expected Behavior
Type "learn JavaScript" into the input. Click the button. The text "learn JavaScript" appears as a list item. The input clears itself, ready for the next entry. Click again with a new value, and a second item appears below the first.
Hint
Read the input's value property, create an li with createElement, set its textContent, and append it to the ul with append. Then set the input's value back to an empty string.
The Solution
<input type="text" id="item-input" placeholder="Type something...">
<button id="add-button">Add item</button>
<ul id="item-list"></ul>

<script>
  const input = document.getElementById("item-input");
  const addButton = document.getElementById("add-button");
  const list = document.getElementById("item-list");

  addButton.addEventListener("click", () => {
    const itemText = input.value.trim();

    if (itemText === "") {
      return;
    }

    const listItem = document.createElement("li");
    listItem.textContent = itemText;
    list.append(listItem);

    input.value = "";
    input.focus();
  });
</script>
How It Works
The trim() method removes extra spaces from the start and end of the input. If the user typed only spaces, itemText becomes an empty string, and the return statement stops the function before adding anything. That guard prevents a list full of blank items.
Then the real work happens in three lines:
createElement("li")builds a new list item that exists only in JavaScript, not yet on the page.textContentputs the user's text inside it.list.append(listItem)attaches it to the<ul>, and the browser renders it.
Finally, clearing the input and calling focus() puts the cursor back in the text field. The user can immediately type the next item without clicking anywhere.
Why createElement plus textContent instead of building an HTML string with innerHTML? Because textContent treats user input as plain text. If someone types <b>hello</b>, it appears as literal text, not as bold formatting. With innerHTML, that same input would be parsed as HTML, which can break your layout or worse. When the content comes from a user, always use textContent.
Knowledge check
Check your understanding
Answer this question before you continue.
Optional Extension
Let the Enter key add an item too. Listen for the keydown event on the input, and check whether the pressed key is Enter:
input.addEventListener("keydown", (event) => {
  if (event.key === "Enter") {
    addButton.click();
  }
});
Calling addButton.click() runs the same code as a real button click, so you do not have to duplicate the logic.
Common Mistakes to Watch For
These are the errors beginners hit most often when combining DOM skills. Each one has a clear symptom and a simple fix.
Script runs before the elements exist
Symptom: Your JavaScript does nothing, and the browser console shows an error like Cannot read properties of null.
Cause: Your script ran before the browser finished building the page, so the element you tried to select did not exist yet.
Fix: Put your <script> tag at the end of the <body>, right before the closing tag. By then, every element above it has been created.
Selecting an element that doesn't exist
Symptom: document.querySelector("#wrong-id") returns null, and calling any method on it throws an error.
Cause: The id or selector does not match anything on the page. A typo in the id, or selecting before the element exists, both produce this.
Fix: Check the id in your HTML matches the id in your JavaScript exactly. Ids are case-sensitive.
Forgetting to clear the input
Symptom: You add "milk" to the list, and the text stays in the input. Click again, and "milk" gets added a second time.
Cause: The input's value was never reset after adding the item.
Fix: Set input.value = "" at the end of your click handler.
Knowledge check
Check your understanding
Answer this question before you continue.
Using innerHTML with user input
Symptom: A user types something with HTML tags, and the page renders it as formatting instead of text. In the worst case, the page breaks or becomes a security risk.
Cause: innerHTML parses strings as HTML.
Fix: Use textContent whenever the content could come from a user.
What to Practice Next
Here is your next challenge: combine all three projects into one small page. Build a simple to-do list where each item has its own remove button. You will need to create list items, append them, and attach a click listener to each remove button as you create it. That is the natural next step after these three projects, and it is exactly the kind of feature that appears in real web apps everywhere.
If you get stuck, read the error message in the browser console first. The console tells you which line failed and why. Debugging these small projects is not a detour from learning. It is the practice that makes the skills automatic.
Every project in this article relied on click listeners. That is the thread connecting them all, and it points to your next topic: events. Understanding how events work, how to listen for them, and how to respond to them will let you build pages that feel alive. When you are ready, move on to events, and bring these DOM skills with you.
Knowledge check
Final check
Finish the article by checking the ideas you just learned.
References
Research updated Sep 6, 2026


