
Toggle CSS Classes with JavaScript
You have a button. You have a menu. You want the button to hide the menu, and you want it to show the menu again when clicked a second time. If your first…

Key topics
You have a button. You have a menu. You want the button to hide the menu, and you want it to show the menu again when clicked a second time. If your first instinct is to write element.style.display = "none" and then reverse it later, I understand. But there is a cleaner path, and it starts with a simple idea: keep your styles in CSS, and let JavaScript flip a class on and off.
That single habit will save you from messy inline styles, duplicated CSS rules, and debugging sessions that end with you wondering why your carefully written style line did nothing at all.
Why toggle a class instead of writing styles in JavaScript
Imagine you are building a card that needs a highlighted state. The highlighted version changes the background color, adds a border, shifts the padding, and swaps the text color. That is four style changes.
If you write those styles directly in JavaScript, your code starts to look like this:
card.style.backgroundColor = "#fff3cd";
card.style.border = "2px solid #ffc107";
card.style.padding = "1.5rem";
card.style.color = "#856404";
That works, but it has a real problem. Your styles now live in two places: the CSS file where the normal card styles live, and the JavaScript file where the highlighted styles live. When you want to tweak the highlight color later, you have to go hunting through JavaScript to find it.
There is a better division of labor. CSS owns how things look. JavaScript owns when things change.
Instead of writing four style lines, you write one CSS rule:
.card--highlighted {
  background-color: #fff3cd;
  border: 2px solid #ffc107;
  padding: 1.5rem;
  color: #856404;
}
Then in JavaScript, you just flip the class:
card.classList.add("card--highlighted");
One class can bundle many style changes at once. Your styles stay in one place, easy to find and edit. And your JavaScript stays focused on behavior, not on pixel values.
If you have already learned how to modify CSS with JavaScript, this is the natural next step. Instead of changing individual style properties, you change which class rules apply to the element.
Meet classList: your class toolbox
Every element on your page has a property called classList. Think of it as a readable list of every CSS class currently attached to that element.
<p id="message" class="text-base warning">Check your email.</p>
const message = document.getElementById("message");
console.log(message.classList);
DOMTokenList(2) ["text-base", "warning"]
The classList property gives you a small set of methods for changing that list. You will use four of them constantly:
add()puts a class on the element.remove()takes a class off the element.toggle()adds the class if it is missing, and removes it if it is present.contains()checks whether the element has a specific class.
The star of this article is toggle(). It is a switch. If the class is off, it turns it on. If the class is on, it turns it off.
Here is the smallest possible example. It is a deliberately tiny drill of the same mechanism you will use for the menu later: a button that highlights a paragraph when clicked, and removes the highlight when clicked again.
<!DOCTYPE html>
<html lang="en">
<head>
  <meta charset="UTF-8">
  <title>Toggle Example</title>
  <style>
    .highlighted {
      background-color: #fff3cd;
      font-weight: bold;
    }
  </style>
</head>
<body>
  <p id="note">Click the button to highlight this text.</p>
  <button id="toggle-btn">Toggle highlight</button>

  <script>
    const note = document.getElementById("note");
    const button = document.getElementById("toggle-btn");

    button.addEventListener("click", () => {
      note.classList.toggle("highlighted");
    });
  </script>
</body>
</html>
Open that page in your browser. Click the button. The paragraph gets a yellow background and bold text. Click again. The paragraph returns to normal. That is toggle() doing its job.
Now open your browser's developer tools and find the paragraph in the Elements panel. Before clicking, the class attribute reads id="note" with no classes. Click the button once, and you will see class="highlighted" appear. Click again, and it disappears. The visual change you see on the page is just the browser reacting to that class attribute changing. When you understand that connection, debugging class toggles becomes much easier.
Knowledge check
Check your understanding
Answer this question before you continue.
Build a working toggle with a button click
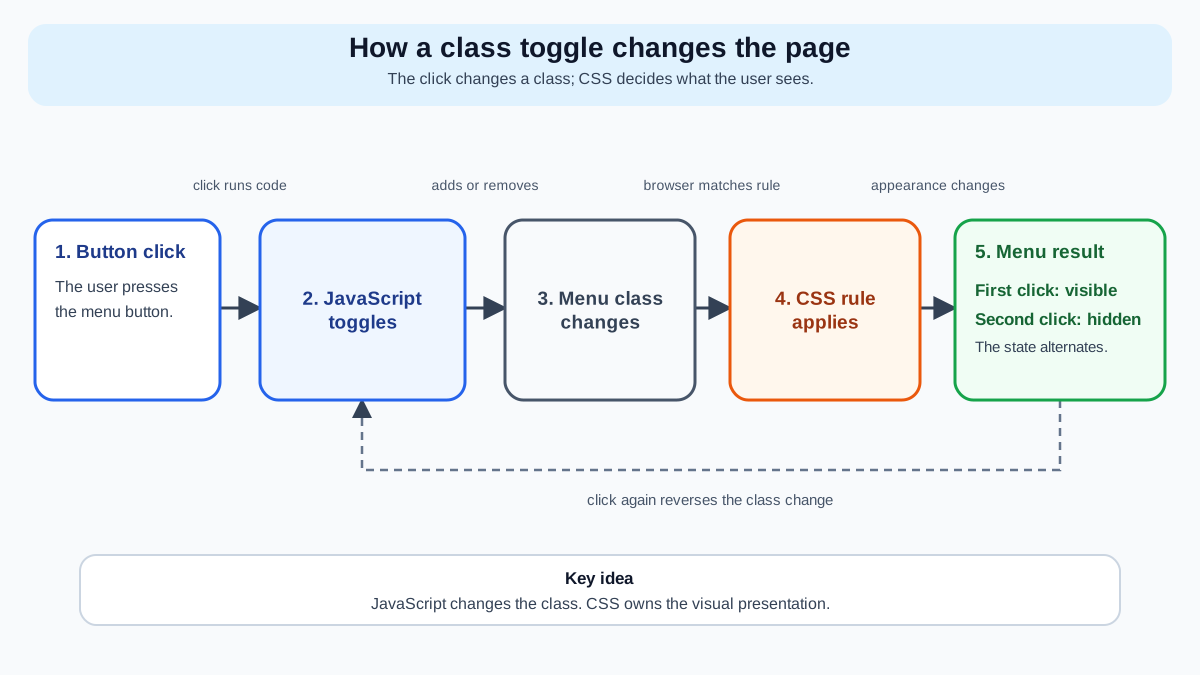
Let us build something slightly more useful: a button that shows and hides a menu. This is the classic pattern behind dropdown menus, mobile navigation, and collapsible panels.
Start with the HTML. A button and a menu:
<button id="menu-btn">Toggle menu</button>

<nav id="menu" class="menu">
  <a href="#">Home</a>
  <a href="#">About</a>
  <a href="#">Contact</a>
</nav>
Now the CSS. The menu is visible by default. The hidden class overrides that and hides it:
.menu {
  background-color: #f0f0f0;
  padding: 1rem;
}

.menu.hidden {
  display: none;
}
Notice the selector: .menu.hidden. That matches an element that has both the menu class and the hidden class. When hidden is present, the menu disappears. When it is gone, the menu shows again.
Now the JavaScript. Select the button and the menu, attach a click listener, and toggle the class:
const menuBtn = document.getElementById("menu-btn");
const menu = document.getElementById("menu");

menuBtn.addEventListener("click", () => {
  menu.classList.toggle("hidden");
});
Save all three pieces in one HTML file and open it in your browser. Here is what you should see:
- The menu is visible when the page loads.
- Click "Toggle menu." The menu disappears.
- Click "Toggle menu" again. The menu reappears.
That is the entire mechanism behind countless show-and-hide features across the web. No inline styles. No checking the current display value. Just one class flipping on and off.
Tip: If you need to toggle several classes at once, call
toggle()once per class:menu.classList.toggle("hidden")followed bymenu.classList.toggle("collapsed"). Each call handles exactly one class. That keeps the behavior predictable while you are learning.
Knowledge check
Check your understanding
Answer this question before you continue.
Add and remove classes when you need control
toggle() is perfect when you want a switch. But sometimes you do not want a switch. Sometimes you know exactly what the end state should be.
Consider a form with an error message. When the user submits invalid data, you want the error class present. When they fix the input, you want it gone. You do not want to toggle it, because toggling depends on whatever state happens to exist at that moment. You want to guarantee the class is there, or guarantee it is gone.
That is what add() and remove() are for.
// Always show the error state
input.classList.add("input-error");

// Always clear the error state
input.classList.remove("input-error");
Here is a practical example. A button that marks an item as selected. Once selected, clicking it again should do nothing, because the item is already selected:
const item = document.getElementById("item");
const selectBtn = document.getElementById("select-btn");

selectBtn.addEventListener("click", () => {
  item.classList.add("selected");
});
And a button that clears the selection:
const clearBtn = document.getElementById("clear-btn");

clearBtn.addEventListener("click", () => {
  item.classList.remove("selected");
});
Now consider a case where you need to check the current state before deciding what to do. That is where contains() comes in:
const panel = document.getElementById("panel");

if (panel.classList.contains("open")) {
  // The panel is open. Close it.
  panel.classList.remove("open");
} else {
  // The panel is closed. Open it.
  panel.classList.add("open");
}
That block of code does exactly what toggle("open") does in one line. When would you ever write it out? When the decision involves more than just the class change. Maybe you also need to update a button label, or send a request to a server, or animate a different element. In those cases, checking contains() first gives you a clear fork in the road.
Here is a quick guide to choosing the right tool:
| Method | What it does | Use this when |
|---|---|---|
toggle("class") | Adds the class if missing, removes it if present | You want a switch: show/hide, open/close, on/off |
add("class") | Adds the class, no matter what | You always want the class present at this moment |
remove("class") | Removes the class, no matter what | You always want the class gone at this moment |
contains("class") | Returns true or false | You need to check the current state before deciding |
Knowledge check
Check your understanding
Answer this question before you continue.
Common beginner mistakes and how to fix them
Every JavaScript developer hits these walls. Here is what goes wrong and how to get past it.
Mistake: reading inline styles to check the current state
New developers often try to read a style value to decide what to do next. It seems logical: check if the element is hidden, then show it.
// This will not work the way you expect
if (menu.style.display === "none") {
  menu.style.display = "block";
}
The problem: element.style only reads styles that were written directly on the element as inline styles. If your CSS rules live in a <style> block or a separate stylesheet, menu.style.display returns an empty string, even when the element is visibly hidden.
The fix is to stop reading styles and start reading classes. That is what contains() is for:
if (menu.classList.contains("hidden")) {
  menu.classList.remove("hidden");
} else {
  menu.classList.add("hidden");
}
Or just use toggle() and skip the check entirely.
Mistake: attaching the listener to the wrong element
If your button click does nothing, check which element you selected. A common slip is selecting the element you want to change instead of the button that triggers the change.
// Wrong: this listens for clicks on the menu itself
const menu = document.getElementById("menu");
menu.addEventListener("click", () => {
  menu.classList.toggle("hidden");
});

// Right: listen for clicks on the button
const menuBtn = document.getElementById("menu-btn");
menuBtn.addEventListener("click", () => {
  menu.classList.toggle("hidden");
});
Knowledge check
Check your understanding
Answer this question before you continue.
Mistake: using className and wiping out other classes
The className property replaces the entire class list. If you write:
element.className = "active";
you just deleted every other class that element had. Any styles that depended on those other classes vanish instantly.
Use classList methods instead. They add, remove, or toggle individual classes without touching the rest.
Mistake: including the dot in the class name
CSS selectors use a dot to target classes: .active. The classList methods do not. They expect the bare class name.
// Wrong: the dot is not part of the class name
element.classList.toggle(".active");

// Right
element.classList.toggle("active");
If your toggle silently does nothing, check for a stray dot. It is one of the easiest mistakes to make and one of the quickest to fix.
Common mistake: If you toggle a class and see no visual change, open your browser's developer tools and inspect the element. Look at the class list in the Elements panel. If the class is being added and removed correctly, the problem is in your CSS, not your JavaScript. Remember the earlier inspection step: the class attribute is the mechanism, and the visual change is just the browser reacting to it.
Practice: build a show-and-hide toggle
Time to build something on your own. This task pulls together everything you just learned.
The task: Create a button that shows and hides a paragraph. Use a hidden class and classList.toggle().
Start with this HTML and CSS:
<!DOCTYPE html>
<html lang="en">
<head>
  <meta charset="UTF-8">
  <title>Show and Hide Practice</title>
  <style>
    .message {
      background-color: #e8f4fd;
      border-left: 4px solid #2196f3;
      padding: 1rem;
    }

    .message.hidden {
      display: none;
    }
  </style>
</head>
<body>
  <button id="toggle-message">Show message</button>
  <p id="message" class="message">
    This message can appear and disappear.
  </p>

  <script>
    // Your code goes here
  </script>
</body>
</html>
Expected behavior:
- The message is visible when the page loads.
- Clicking the button hides the message.
- Clicking again shows it.
Try writing the JavaScript yourself before peeking at the solution. You need three things: select the button, select the message, and attach a click listener that toggles the hidden class.
Here is one working solution:
const toggleBtn = document.getElementById("toggle-message");
const message = document.getElementById("message");

toggleBtn.addEventListener("click", () => {
  message.classList.toggle("hidden");
});
One small improvement you might notice: the button says "Show message" even when the message is already visible. A nice extension is to update the button text based on the current state:
toggleBtn.addEventListener("click", () => {
  message.classList.toggle("hidden");

  if (message.classList.contains("hidden")) {
    toggleBtn.textContent = "Show message";
  } else {
    toggleBtn.textContent = "Hide message";
  }
});
Extension challenge: Build a card that switches between a light and dark theme. Give the card a default light style, then create a .dark class that changes the background color and text color. Use a button to toggle the .dark class on and off.
Keep styles in CSS, let JavaScript flip classes
Here is the rule that will carry you through the next several projects: keep styles in CSS, and let JavaScript flip classes on and off. Reach for toggle() when you want a switch. Reach for add() and remove() when you know the exact end state. Use contains() when you need to inspect the current state before deciding.
You now have the core skill behind dropdown menus, mobile navigation, modal windows, tabs, accordions, and theme switchers. The next natural step is learning how to create and remove elements entirely, which lets you build lists, notifications, and dynamic content from scratch.
Knowledge check
Final check
Finish the article by checking the ideas you just learned.
References
Research updated Sep 6, 2026


