
Work with Multiple DOM Elements in JavaScript
You learned to select one button and make it respond to a click. Then your page grew five buttons that all need the same behavior—and your trusty…

Key topics
You learned to select one button and make it respond to a click. Then your page grew five buttons that all need the same behavior—and your trusty querySelector only touches the first one. The missing tool is querySelectorAll, which hands you the whole group so you can work with every member.
Why One Element Is Not Enough
Real pages are full of repeated things: a row of buttons, a grid of product cards, a list of menu items. When you want all of them to behave the same way, selecting just one element is a dead end.
Here is the trap. Say you have three buttons in your HTML:
<button class="pick">Apple</button>
<button class="pick">Banana</button>
<button class="pick">Cherry</button>
You already know how to select one element:
const firstButton = document.querySelector(".pick");
firstButton.textContent = "Picked!";
Only the first button changes. The other two stay exactly as they were. That is because querySelector always returns the first match it finds—nothing more.
What you actually need is a way to say: give me every button with this class, not just the first one. That is exactly what querySelectorAll does.
Selecting a Group with querySelectorAll
querySelectorAll uses the same CSS selector syntax you already know from querySelector. The difference is in what it returns: every matching element, not just the first.
const allButtons = document.querySelectorAll(".pick");
console.log(allButtons);
The result is a NodeList—a list-like collection that holds each matching element in document order. Think of it as a shelf where every button you selected is sitting in a labeled spot.
NodeList(3) [button.pick, button.pick, button.pick]
You can check how many elements the list holds with .length:
console.log(allButtons.length);
3
One detail worth knowing: querySelectorAll returns a static list. It takes a snapshot of the page at the moment you call it. If you add another button to the page afterward, the list will not update itself. For most beginner work, this is exactly what you want—a stable group to loop through.
Knowledge check
Check your understanding
Answer this question before you continue.
A NodeList Is Not a Single Element
Here is where beginners often get stuck. You have a list of buttons, so you try to change them all at once:
const allButtons = document.querySelectorAll(".pick");
allButtons.textContent = "Picked!"; // This will not work
Nothing happens. No error, no change—just silence.
The reason is simple once you see it: methods like textContent and addEventListener live on individual elements, not on the list that holds them. The NodeList is the shelf. Each button is an item on that shelf. You cannot tell the shelf to change color; you have to reach each item and tell it what to do.
To grab one item from the list, use bracket notation with its index, just like an array:
const allButtons = document.querySelectorAll(".pick");
allButtons[0].textContent = "Picked!"; // Changes the first button
The index starts at 0, so allButtons[0] is the first button, allButtons[1] is the second, and so on. This works, but typing allButtons[0], allButtons[1], allButtons[2] for every button would get old fast. That is why you need a loop.
Knowledge check
Check your understanding
Answer this question before you continue.
Looping Through the Group
A loop lets you visit every element in the NodeList without writing repetitive code. You have two solid options as a beginner.
Option 1: A for Loop
You already know for loops from earlier lessons. The same pattern works here: start at 0, keep going while the counter is less than the list length, and move to the next item each time.
const allButtons = document.querySelectorAll(".pick");

for (let i = 0; i < allButtons.length; i++) {
  allButtons[i].textContent = "Picked!";
}
Now every button changes. The loop runs once per button: first it updates allButtons[0], then allButtons[1], then allButtons[2], and stops when i reaches 3.
Option 2: The forEach Method
The forEach method is purpose-built for collections. It runs a function once for each element in the list, passing that element in as an argument.
const allButtons = document.querySelectorAll(".pick");

allButtons.forEach(function (button) {
  button.textContent = "Picked!";
});
Inside the function, button represents the current element for each round. The first time through, it is the first button. The second time, the second button. And so on.
Both approaches produce the same result. Which should you use?
| Approach | Reads naturally when... | Watch out for... |
|---|---|---|
for loop | You need the index number, or you want to stop early | Easy to make an off-by-one error with the condition |
forEach | You just want to do something with each element | You cannot easily stop the loop early |
My rule for beginners: start with forEach. It is shorter, harder to mess up, and it makes your intent clear—do this for every element in the group.
Knowledge check
Check your understanding
Answer this question before you continue.
Attaching Behavior to Every Element
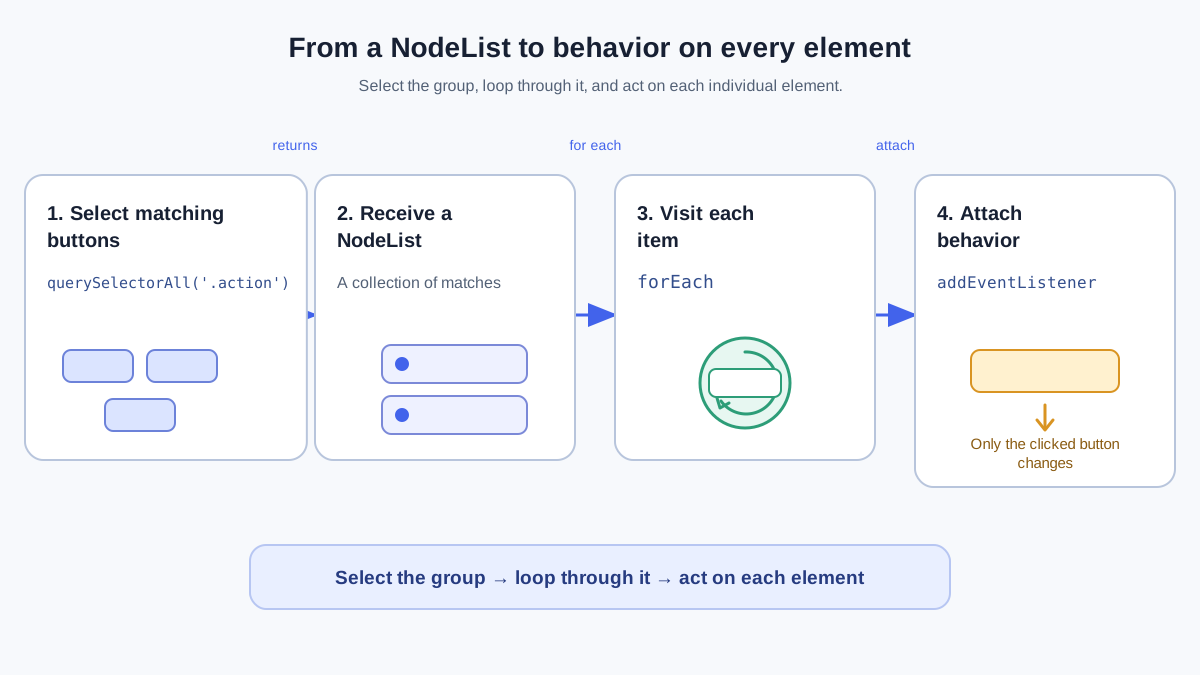
Now for the payoff. You want every button in a group to respond when clicked. The pattern combines everything you have learned: select the group, loop through it, and attach an event listener to each element inside the loop.
<button class="pick">Apple</button>
<button class="pick">Banana</button>
<button class="pick">Cherry</button>
const allButtons = document.querySelectorAll(".pick");

allButtons.forEach(function (button) {
  button.addEventListener("click", function () {
    button.textContent = "Picked!";
  });
});
Click any button, and that button alone changes its text to "Picked!". The other buttons stay untouched.
Why does this work? Each trip through the loop hands the event listener to one specific button. The first iteration attaches a listener to the Apple button. The second attaches one to the Banana button. Every button ends up with its own listener, and each listener knows which button it belongs to.
This is the same addEventListener pattern you used with a single element—just applied to every member of the group.
Common mistake: Putting
addEventListeneron the NodeList itself instead of on each element. The list has no click behavior. Each button inside it does.
Knowledge check
Check your understanding
Answer this question before you continue.
Common Beginner Mistakes
These three mistakes trip up almost everyone who is new to working with multiple elements. Now you know how to spot and fix each one.
Mistake 1: Using querySelector Instead of querySelectorAll
Symptom: Only the first element changes.
Why it happens: querySelector returns the first match and stops.
The fix: Use querySelectorAll when you need the whole group.
// Wrong: only the first button gets the listener
document.querySelector(".pick").addEventListener("click", handler);

// Right: every button gets the listener
document.querySelectorAll(".pick").forEach(function (button) {
  button.addEventListener("click", handler);
});
Mistake 2: Calling an Element Method on the Whole NodeList
Symptom: Nothing happens, or you get an error like allButtons.textContent is not a function.
Why it happens: The NodeList is a collection. Methods like textContent belong to individual elements.
The fix: Loop through the list and call the method on each element.
// Wrong: textContent does not exist on the list
const buttons = document.querySelectorAll(".pick");
buttons.textContent = "Picked!";

// Right: reach each element through the loop
buttons.forEach(function (button) {
  button.textContent = "Picked!";
});
Mistake 3: A Selector That Does Not Match Anything
Symptom: The NodeList is empty, and your code silently does nothing.
Why it happens: A typo in the class name, tag name, or selector syntax means no elements match.
The fix: Check your selector against the HTML, and verify the list has items before looping.
const buttons = document.querySelectorAll(".pick");
console.log(buttons.length); // If this prints 0, your selector is wrong
If the length is 0, look for a mismatch: maybe the class is pick-btn in the HTML but .pick in your selector, or the buttons live inside a different part of the page than you expected.
Practice: Make Every Card Respond
Time to put it together. Build a small set of cards and make each one respond to a click by changing its own background color.
Start with this HTML:
<div class="card">One</div>
<div class="card">Two</div>
<div class="card">Three</div>
Your goal: when you click any card, that card's background turns light blue.
Hint: You need three pieces—querySelectorAll to grab every .card, forEach to visit each one, and addEventListener to catch the click. Inside the click handler, change the style of the card that was clicked.
Try it on your own first. When you are ready, here is one working solution:
const cards = document.querySelectorAll(".card");

cards.forEach(function (card) {
  card.addEventListener("click", function () {
    card.style.backgroundColor = "lightblue";
  });
});
Click "One" and only the first card changes. Click "Three" and only the third card changes. Each card carries its own listener, and each listener knows exactly which card it belongs to.
Optional extension: Inside the loop, add an if statement that only attaches the click behavior to cards whose text is not "Two". You will need to check the card's textContent before adding the listener.
What to Do Next
Run the practice task until clicking each card feels natural. Then try combining this pattern with what you already know: select a group of headings and change their text, or grab every list item and give it a new style.
The mental model to carry forward is simple: querySelectorAll returns a group, and you act on each member by looping. Once that clicks, you are ready for the next step—changing content across a group, or creating and removing elements dynamically as your page responds to the user.
Knowledge check
Final check
Finish the article by checking the ideas you just learned.
References
Research updated Sep 6, 2026


