
Render an Array as a List in the DOM
You have an array of names sitting in your JavaScript file. You want those names to show up as bullet points on the page. The naive approach is to write…

Key topics
You have an array of names sitting in your JavaScript file. You want those names to show up as bullet points on the page. The naive approach is to write each <li> by hand in the HTML. That works right up until the data changes—then you are editing HTML by hand instead of letting your code do the work.
The real skill is turning array data into repeated DOM elements, and re-running that step whenever the data changes. The array is the source of truth. The page is just a snapshot of it.
What "Rendering an Array" Actually Means
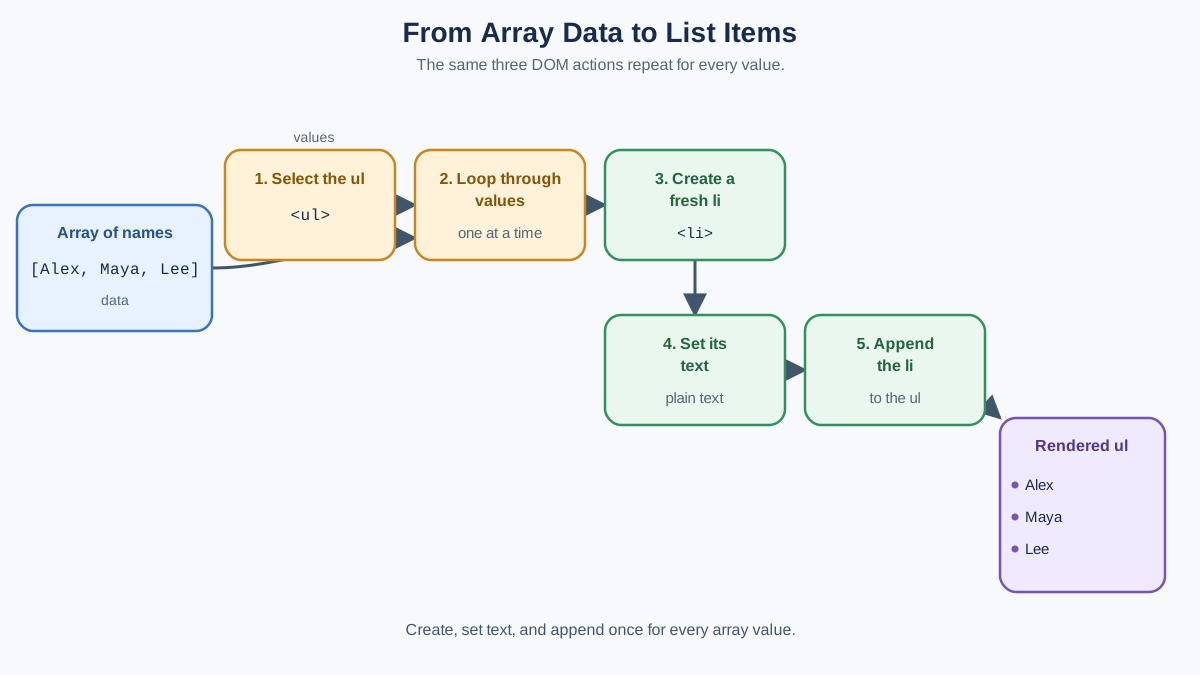
Rendering is a fancy word for a simple idea: taking data and producing visible HTML from it. When you render an array, you loop through each value and create one matching element on the page.
Before we write code, let's name the five operations you are about to combine:
- Select the existing
<ul>so JavaScript knows where the list lives. - Loop through the array once per value.
- Create a new
<li>for each value. - Set the plain text of that
<li>. - Append the
<li>to the<ul>.
You may already know some of these steps from earlier lessons. This article shows you how they fit together into one repeatable pattern.
Knowledge check
Check your understanding
Answer this question before you continue.
A Complete Example You Can Run
Let's start with something you can copy, save as an HTML file, and open in your browser immediately. This single file contains the page, the data, and the rendering code:
<!DOCTYPE html>
<html>
<head>
  <title>Render an Array</title>
</head>
<body>
  <ul id="name-list"></ul>

  <script>
    const names = ["Ada", "Grace", "Alan"];
    const list = document.getElementById("name-list");

    for (const name of names) {
      const listItem = document.createElement("li");
      listItem.textContent = name;
      list.appendChild(listItem);
    }
  </script>
</body>
</html>
Open that file in a browser and you will see:
- Ada
- Grace
- Alan
Let's walk through what each line does:
const names = ["Ada", "Grace", "Alan"]holds the data you want to display.document.getElementById("name-list")finds the empty<ul>on the page.- The
for...ofloop visits each name in the array, one at a time. - Inside the loop,
document.createElement("li")creates a brand new list item. listItem.textContent = nameputs the current name inside that item.list.appendChild(listItem)attaches the item to the<ul>.
Notice that a fresh <li> is created inside the loop on every pass. That is not an accident. Each array value needs its own element. If you tried to create one <li> outside the loop and reuse it, you would keep moving the same element around, and only the last name would appear.
This is the heart of rendering an array to HTML with JavaScript: loop, create, set text, append. Repeat for every item.
Knowledge check
Check your understanding
Answer this question before you continue.
Clear the Container Before Re-Rendering
Here is the mistake almost every beginner hits. Run the render code twice and see what happens:
const names = ["Ada", "Grace", "Alan"];
const list = document.getElementById("name-list");

for (const name of names) {
  const listItem = document.createElement("li");
  listItem.textContent = name;
  list.appendChild(listItem);
}

// Run the same loop again
for (const name of names) {
  const listItem = document.createElement("li");
  listItem.textContent = name;
  list.appendChild(listItem);
}
Now the page shows six items:
- Ada
- Grace
- Alan
- Ada
- Grace
- Alan
The list duplicated because nothing told the container to start fresh. The old items were still sitting there, and your loop added new ones on top of them.
Think of it this way: the page is a snapshot of the data. If you never clear the old snapshot before taking a new one, the old image stays visible underneath. Stale items linger because you never removed them.
The fix is to clear the container before rebuilding the list. The simplest way is to set the container's innerHTML to an empty string:
list.innerHTML = "";
That wipes out everything inside the <ul>, giving you a clean slate. Then your loop rebuilds the list from scratch.
Let's wrap the whole thing in a function so you can call it whenever you need:
const names = ["Ada", "Grace", "Alan"];
const list = document.getElementById("name-list");

function renderList() {
  list.innerHTML = "";

  for (const name of names) {
    const listItem = document.createElement("li");
    listItem.textContent = name;
    list.appendChild(listItem);
  }
}

renderList();
renderList();
Call the function twice. The output stays the same:
- Ada
- Grace
- Alan
The clear step makes re-rendering predictable. Every call produces exactly one copy of the current data, no matter how many times you run it.
Knowledge check
Check your understanding
Answer this question before you continue.
Keep the Data and the Page in Sync
Now that you have a render function, you can connect it to real data changes. The pattern is simple:
- Change the data first.
- Call the render function to refresh the page.
Here is a small example where a name gets added:
const names = ["Ada", "Grace", "Alan"];
const list = document.getElementById("name-list");

function renderList() {
  list.innerHTML = "";

  for (const name of names) {
    const listItem = document.createElement("li");
    listItem.textContent = name;
    list.appendChild(listItem);
  }
}

renderList();

// Later, the data changes
names.push("Barbara");
renderList();
After the second call, the page shows:
- Ada
- Grace
- Alan
- Barbara
The order matters. Change the data first, then render. If you render first and change the data after, the page still shows the old snapshot.
This is where the source-of-truth idea becomes practical. The array is the single place where the list's content lives. The render function is the only code that touches the DOM list. If you want to know what the page should show, you look at the array. If you want to change what the page shows, you change the array and render again.
The wrong approach is editing the DOM directly instead of the data. If you manually append a <li> without updating the array, the array and the page disagree. Later, when you call renderList(), your manual edit gets wiped out because the render function only knows what is in the array.
My rule is simple: the array is the source of truth, and the render function is the only thing that touches the list. Follow that rule and your page always reflects your data.
Knowledge check
Check your understanding
Answer this question before you continue.
Common Beginner Mistakes
Let's look at the mistakes that trip people up most often, so you can recognize them when they happen to you.
Reusing one list item
Symptom: Only the last item in the array appears on the page.
Cause: You created one <li> outside the loop and kept updating it instead of creating a fresh one each pass.
// Wrong
const listItem = document.createElement("li");
for (const name of names) {
  listItem.textContent = name;
  list.appendChild(listItem);
}
Fix: Move the createElement call inside the loop so each iteration gets its own element.
Forgetting to clear the container
Symptom: The list duplicates every time you call your render function.
Cause: Old items were never removed before new ones were added.
Fix: Set list.innerHTML = "" at the top of your render function.
Using innerHTML with user input
Symptom: The page breaks, or unexpected HTML appears, when a value contains special characters.
Cause: innerHTML treats strings as HTML markup. If a value contains something like <b>, the browser interprets it as a tag instead of plain text.
Fix: Use textContent to set the text of each list item. It treats the value as plain text, which is what you want for data.
Selecting the wrong container or running too early
Symptom: JavaScript throws an error like "Cannot read properties of null."
Cause: The script ran before the <ul> existed on the page, or the id in your selector does not match the HTML.
Fix: Place the script after the <ul> in the HTML, or check that your getElementById call matches the id exactly.
Practice: Render a To-Do List
Time to put the pattern together yourself. Start with this HTML and JavaScript:
<!DOCTYPE html>
<html>
<head>
  <title>To-Do List</title>
</head>
<body>
  <ul id="task-list"></ul>

  <script>
    const tasks = ["Buy groceries", "Walk the dog", "Write code"];
    const list = document.getElementById("task-list");
  </script>
</body>
</html>
Your task:
- Write a
renderList()function that clears the container and displays each task as a<li>. - Call the function and check that all three tasks appear.
- Add a new task to the array with
tasks.push("Read a chapter"). - Call the function again.
The expected behavior: the page shows exactly the current tasks, with no duplicates.
Hint: Your function needs two parts. First, clear the container. Second, loop through the tasks, creating a fresh <li> for each one.
Once you have that working, try a slightly harder version: render an array of objects instead of strings. Something like:
const people = [
  { name: "Ada", age: 36 },
  { name: "Grace", age: 45 },
  { name: "Alan", age: 41 }
];
Display each person as a list item that shows both their name and age, like "Ada - 36 years old". The loop-and-render pattern stays exactly the same. Only the way you build the text inside each <li> changes.
That small extension is the same skill you will use to render tables, cards, comment sections, and any other repeated content on the web. Master the loop-and-render pattern now, and you have a tool you will reach for in nearly every project you build.
Knowledge check
Final check
Finish the article by checking the ideas you just learned.
References
Research updated Sep 6, 2026


