
Build an Image Slider with JavaScript
An image slider looks like a piece of fancy UI magic. Underneath, it is just a number moving through an array and telling the page which image to show.…

Key topics
An image slider looks like a piece of fancy UI magic. Underneath, it is just a number moving through an array and telling the page which image to show. Build that number, and the slider builds itself.
What We Are Building and Why It Matters
Here is the finished behavior we are aiming for:
- A page shows one image at a time.
- A Next button moves to the following image.
- A Previous button moves back to the earlier image.
- When you reach the end, the slider wraps around to the start. When you go back from the first image, it wraps to the last one.
That last behavior is the part that surprises beginners. Most people expect the slider to stop at the edges. Instead, real sliders loop. Clicking Next on the final image returns you to the first one, like turning a page in a circular book.
The core mental model is simple: a slider is an index into an array. The array holds your images. The index is a number that remembers which image is currently visible. Change the number, update the page, and the slider moves.
This pattern shows up everywhere, not just in image sliders. Photo galleries, tabbed panels, testimonial carousels, and product showcases all work the same way: store a collection, track which item is active, and re-render when the active item changes.
Before we start, this project assumes you are comfortable with a few JavaScript basics:
- Storing a collection of values in an array
- Responding to button clicks with event listeners
- Updating the page with the DOM
- Making decisions with if/else statements
If those feel shaky, review them first. The slider itself will reinforce each skill, but it will not re-teach them from scratch.
We will write three small files: an HTML file for structure, a CSS file for styling, and a JavaScript file for the logic. That separation keeps the project readable and easy to debug.
Setting Up the Project Files
Create a new folder on your computer called image-slider. Inside it, create a subfolder called images, then create three files:
image-slider/
├── index.html
├── style.css
├── script.js
└── images/
    ├── mountain.jpg
    ├── ocean.jpg
    ├── forest.jpg
    └── desert.jpg
Add four images of your own to the images folder. You can download free photos from a site like Unsplash or use any pictures you already have. Name them exactly as shown above so the code in this tutorial works without changes.
Open index.html and add the basic HTML skeleton with links to the other two files:
<!DOCTYPE html>
<html lang="en">
<head>
  <meta charset="UTF-8">
  <meta name="viewport" content="width=device-width, initial-scale=1.0">
  <title>Image Slider</title>
  <link rel="stylesheet" href="style.css">
</head>
<body>
  <!-- Slider markup goes here -->

  <script src="script.js"></script>
</body>
</html>
Notice where each file is linked. The CSS link goes in the <head> so styles apply as the page loads. The <script> tag goes at the end of the <body> so the HTML exists before the JavaScript tries to find elements in it.
Why separate the files at all? Imagine debugging a slider where the HTML, CSS, and JavaScript all live in one giant file. Every change risks breaking something unrelated. With separate files, you know exactly where to look: structure lives in the HTML, appearance lives in the CSS, and behavior lives in the JavaScript.
Open index.html in your browser now. You should see a blank page with no errors. That blank page is your starting line.
Building the HTML Structure
The slider needs three visible pieces: a container for the image, a Previous button, and a Next button. The images themselves will not be hard-coded in the HTML. Instead, the JavaScript will pull them from an array and insert the current one into the page.
Add this markup inside the <body>, replacing the comment:
<div class="slider">
  <div class="slide-container">
    <img id="slide-image" src="" alt="Current slide">
  </div>
  <div class="controls">
    <button id="prev-btn">Previous</button>
    <button id="next-btn">Next</button>
  </div>
</div>
The img tag starts with an empty src attribute. That is intentional. The JavaScript will fill it in when the page loads. The id attributes give the script clear hooks to target: slide-image for the picture, prev-btn and next-btn for the controls.
Now add some basic styling to style.css so the slider has a sensible shape:
body {
  font-family: Arial, sans-serif;
  display: flex;
  justify-content: center;
  align-items: center;
  min-height: 100vh;
  margin: 0;
  background: #f5f5f5;
}

.slider {
  text-align: center;
  max-width: 600px;
  width: 90%;
}

.slide-container img {
  width: 100%;
  height: 350px;
  object-fit: cover;
  border-radius: 8px;
  display: block;
}

.controls {
  margin-top: 15px;
  display: flex;
  justify-content: center;
  gap: 10px;
}

.controls button {
  padding: 10px 20px;
  font-size: 16px;
  border: none;
  border-radius: 5px;
  background: #333;
  color: white;
  cursor: pointer;
}

.controls button:hover {
  background: #555;
}
The object-fit: cover property is worth noting. It tells the browser to crop the image so it fills the 600 by 350 pixel space without stretching. Without it, images with different aspect ratios would distort the layout.
Storing the Images in an Array
Now open script.js. This is where the slider comes to life.
The first step is storing the images. An array is the natural home for a collection of items you want to step through one at a time. Each element in the array is one slide.
const images = [
  "images/mountain.jpg",
  "images/ocean.jpg",
  "images/forest.jpg",
  "images/desert.jpg"
];
These paths point to the files inside your images folder. The browser will look for them relative to index.html, which sits in the project root. If you named your files differently, update the paths here to match.
Here is the key insight about arrays: the positions start at zero, not one. The first image lives at position 0, the second at position 1, and so on. Beginners trip on this constantly. When you write code that steps through an array, you must remember that the last valid position is length - 1, not length.
Because the code will reference images.length later, adding or removing images only means editing the array. Nothing else in the script needs to change. That is the payoff of storing the collection in one place.
Knowledge check
Check your understanding
Answer this question before you continue.
Tracking the Current Image with an Index
The slider needs to remember which image is showing. That memory lives in a single variable called an index.
let currentIndex = 0;
The variable starts at 0 because that is the position of the first image in the array. This one number is the entire state of the slider. Change it, and the slider moves. Leave it alone, and the slider stays put.
Let us make that state visible. Add a quick log to see what the index points at:
let currentIndex = 0;

console.log(images[currentIndex]);
Open the browser's developer console (right-click the page, select Inspect, then click the Console tab). You should see the first image path printed.
images/mountain.jpg
That log is doing something important. It proves the connection between the index and the array. images[currentIndex] reads the array at the position stored in currentIndex. When the index changes, that expression returns a different image.
This is the whole trick of the slider. Everything else is just wrapping this idea in buttons and page updates.
Writing a Function to Show the Current Image
Logging the image path to the console proves the logic works, but the user needs to see the image on the page. That requires updating the <img> element's src attribute.
We could write that update code in multiple places, but repeating yourself invites bugs. If the update logic changes, you would need to find every copy and fix each one. Instead, write one function that does the job:
function showImage() {
  const slideImage = document.getElementById("slide-image");
  slideImage.src = images[currentIndex];
}
This function does two things:
- Finds the
<img>element on the page. - Sets its
srcattribute to the image at the current index.
Call it once after defining it to display the first image:
showImage();
Refresh the page. The first image, mountain.jpg, should now appear in the slider container.
Why does one function beat repeating the code in every button handler? Because the function gives the update logic a single home. Every button calls showImage(), and the function handles the rendering. If you later want to add a caption or change how images display, you edit one place instead of several.
Keep this function small and focused. Its only job is to render whatever the index points at. It does not change the index. It does not decide what comes next. It just looks at the current state and paints the page to match.
Knowledge check
Check your understanding
Answer this question before you continue.
Wiring Up the Next and Previous Buttons
Now the slider gets its controls. The buttons need event listeners that change the index and then re-render the page.
For the Next button, increase the index by one:
const nextButton = document.getElementById("next-btn");

nextButton.addEventListener("click", function() {
  currentIndex = currentIndex + 1;
  showImage();
});
For the Previous button, decrease it:
const prevButton = document.getElementById("prev-btn");

prevButton.addEventListener("click", function() {
  currentIndex = currentIndex - 1;
  showImage();
});
Each handler follows the same rhythm: change the state, then update the page. The order matters. If you called showImage() before changing the index, the page would show the old image. The index change must come first.
Test the slider now. Click Next a few times and watch the images advance. Click Previous and watch them go back.
But there is a problem hiding at the edges. Click Next enough times and the image disappears. Click Previous from the first image and the same thing happens. The index has walked past the end of the array, and images[currentIndex] no longer points at anything valid.
This is the boundary problem, and it is the most interesting part of building a slider.
Knowledge check
Check your understanding
Answer this question before you continue.
Wrapping Around at the Start and End
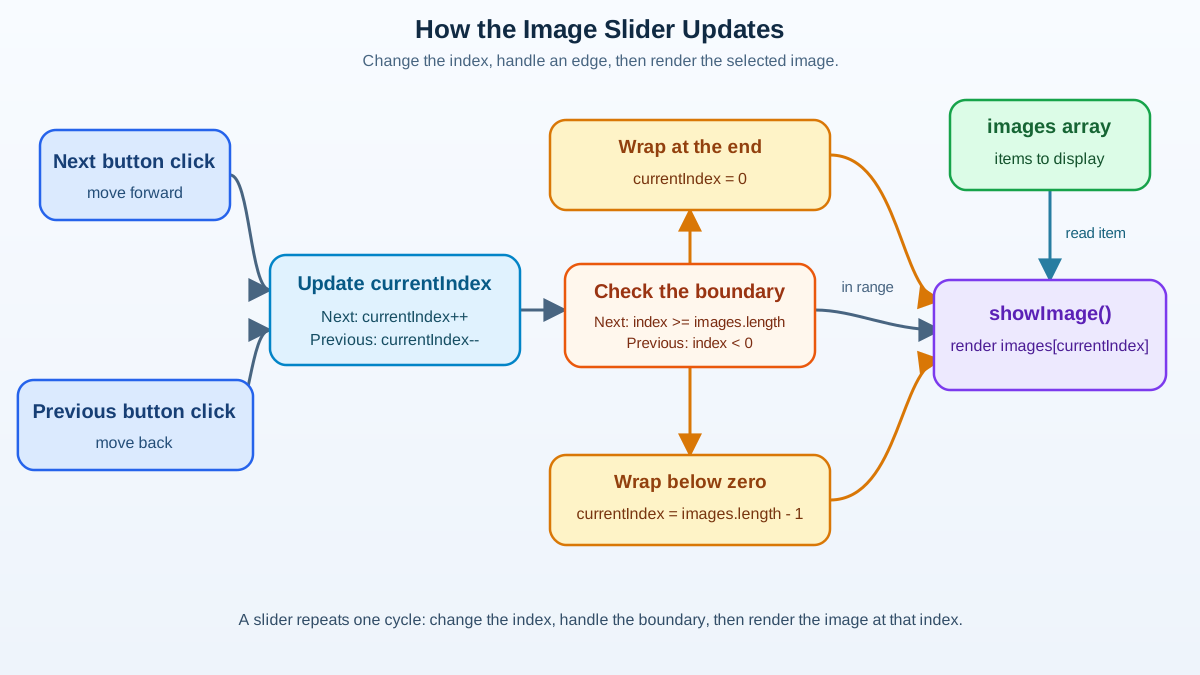
Here is what happens when the index goes out of bounds. If the array has four images, the valid indices are 0, 1, 2, and 3. Clicking Next on the last image sets currentIndex to 4. The expression images[4] returns undefined, and the browser cannot load an image from an undefined source. The picture area goes blank.
The fix is to check the boundaries and wrap the index back around. When the index passes the last image, send it back to 0. When it drops below the first image, send it to the last position.
Update the Next button handler:
nextButton.addEventListener("click", function() {
  currentIndex = currentIndex + 1;

  if (currentIndex >= images.length) {
    currentIndex = 0;
  }

  showImage();
});
The condition currentIndex >= images.length catches the moment the index reaches the end. If the array has four images, images.length is 4. When currentIndex becomes 4, the condition is true, and the index resets to 0.
Update the Previous button handler with the mirror logic:
prevButton.addEventListener("click", function() {
  currentIndex = currentIndex - 1;

  if (currentIndex < 0) {
    currentIndex = images.length - 1;
  }

  showImage();
});
When the index drops below 0, it wraps to images.length - 1, which is the last valid position in the array.
Test both directions now. Click Next past the last image and the slider returns to the first. Click Previous from the first image and the slider jumps to the last. The loop is closed.
Common mistake: Using
images.lengthinstead ofimages.length - 1when wrapping backward. If the array has four images,images.lengthis4, but the last image lives at index3. Wrapping to4would point past the end again. The- 1is not optional.
Knowledge check
Check your understanding
Answer this question before you continue.
The Complete Script
Here is the finished script.js with every piece assembled in order. Compare it against your own file to catch any missing or misplaced code:
const images = [
  "images/mountain.jpg",
  "images/ocean.jpg",
  "images/forest.jpg",
  "images/desert.jpg"
];

let currentIndex = 0;

function showImage() {
  const slideImage = document.getElementById("slide-image");
  slideImage.src = images[currentIndex];
}

const nextButton = document.getElementById("next-btn");

nextButton.addEventListener("click", function() {
  currentIndex = currentIndex + 1;

  if (currentIndex >= images.length) {
    currentIndex = 0;
  }

  showImage();
});

const prevButton = document.getElementById("prev-btn");

prevButton.addEventListener("click", function() {
  currentIndex = currentIndex - 1;

  if (currentIndex < 0) {
    currentIndex = images.length - 1;
  }

  showImage();
});

showImage();
Notice that showImage() is called once at the bottom. That initial call displays the first image when the page loads. Without it, the slider would start blank until the user clicks a button.
Common Beginner Mistakes and How to Fix Them
Every beginner hits the same few walls with this project. Here is how to recognize and fix each one.
Off-by-one errors. Arrays start at zero, so the last valid index is always length - 1. If your slider skips the last image or shows a blank space at the end, check every comparison against images.length. A condition like currentIndex > images.length - 1 works, but currentIndex >= images.length is cleaner because it matches the moment the index actually goes out of bounds.
Forgetting to call showImage(). The button handler changes the index, but the page does not update. The state changed inside the JavaScript; the DOM just never heard about it. Every index change must be followed by a render call. If a click does nothing visible, check that showImage() runs after the index update.
Wrong selector or typo. The event listener never fires because the button id in the JavaScript does not match the id in the HTML. Check for typos like next-btn versus nextButton. The browser console will usually show an error like Cannot read properties of null when getElementById finds nothing.
Images not loading. If the page loads but the image area stays blank, the problem is likely the file path. Open the browser's Network tab and refresh the page. A failed image request will appear in red. Check that your image files are inside the images folder and that the names in your array match the actual filenames exactly, including the extension.
The console is your friend. When something breaks, open the developer tools and look at the Console tab. Then add a console.log(currentIndex) inside the button handlers. Watch the number change as you click. If the index moves but the image does not, the problem is in the render function. If the index never moves, the problem is in the event wiring.
Testing Your Slider and Next Steps
Run through this checklist to confirm the slider works:
- The first image,
mountain.jpg, shows when the page loads. - Clicking Next advances to
ocean.jpg, thenforest.jpg, thendesert.jpg. - Clicking Previous returns to the earlier image.
- Clicking Next on the last image wraps to the first.
- Clicking Previous on the first image wraps to the last.
If all five pass, you have built a working JavaScript image slider. The core mechanism is solid: an array holds the images, an index tracks the current position, and a render function updates the page whenever the index changes.
Now try one small extension that reuses the same pattern. Add a caption below the image that changes with each slide. Store captions in a second array, track them with the same currentIndex, and update a text element inside showImage(). You will discover that the pattern scales naturally: one index can drive multiple parts of the page.
Another good extension is adding navigation dots. Create a dot for each image, highlight the dot matching the current index, and let clicking a dot jump directly to that slide. That last feature introduces a new idea: setting the index to a specific value instead of just incrementing or decrementing it.
The index-and-render pattern you just built appears in tabs, accordions, and countless other interfaces. You are not just building a slider. You are learning to control which item from a collection is visible at any moment. That skill will follow you into nearly every interactive page you build from here.
Knowledge check
Final check
Finish the article by checking the ideas you just learned.
References
Research updated Sep 6, 2026


